We shall start with a bit of history:
- 2016: Building a Low Power PC on Skylake – 10 watts idle
- 2019: 9w Idle – Creating a low power home NAS / file server with 4 Storage Drives
- 2021: (no write-up) – 11 watts using an Intel i3-10320 on a Gigabyte H470M DS3H
Not all my systems have been so successful. In 2022 I measured a couple other systems at 19 watts and 27 watts as part of Curbing the “Gas-Guzzling” tendencies of AMD Radeon with Multi-Monitor . While I did manage to get that 27 watt AMD system down in power some time later, not every CPU/motherboard combo is destined for the 10 watt ballpark.
—
Before going further, the 7 watt figure for this system was before storage has been added. The 7 watts (measured at the wall) includes:
- Motherboard (Intel H770)
- CPU (Intel i5-12400)
- 64GB RAM
- SSD (booting Ubuntu Server 23.04)
- PSU (Corsair)
- C-States set up in BIOS so that it reaches C8
- powertop with auto-tune (which disabled the USB keyboard when the port went to sleep)
Note that if I don’t allow powertop to disable the keyboard, I get 8 watts measured at the wall.
—
Let’s get into detailed specs and component choices. This time around I had the following goals:
- low idle power
- reasonable CPU performance for compression
- able to handle 12 hard drives + at least 1 NVMe
- capacity to (eventually) convert those 12 hard drives to 6 NVMe + 6 SSD SATA
- keep costs under control – since a motherboard purchase would be required, try to stick with DDR4 and reuse a CPU I already have.
Putting together a new system with the hopes of getting in the ballpark of the 10 watt range *measured from the wall* is often not only a challenge, but a bit of a gamble. Sometimes you just have to take your best educated guesses in terms of components, build your rig, tune what you can, and let the chips fall where they may.
Motherboard – ASUS Prime H770-Plus D4
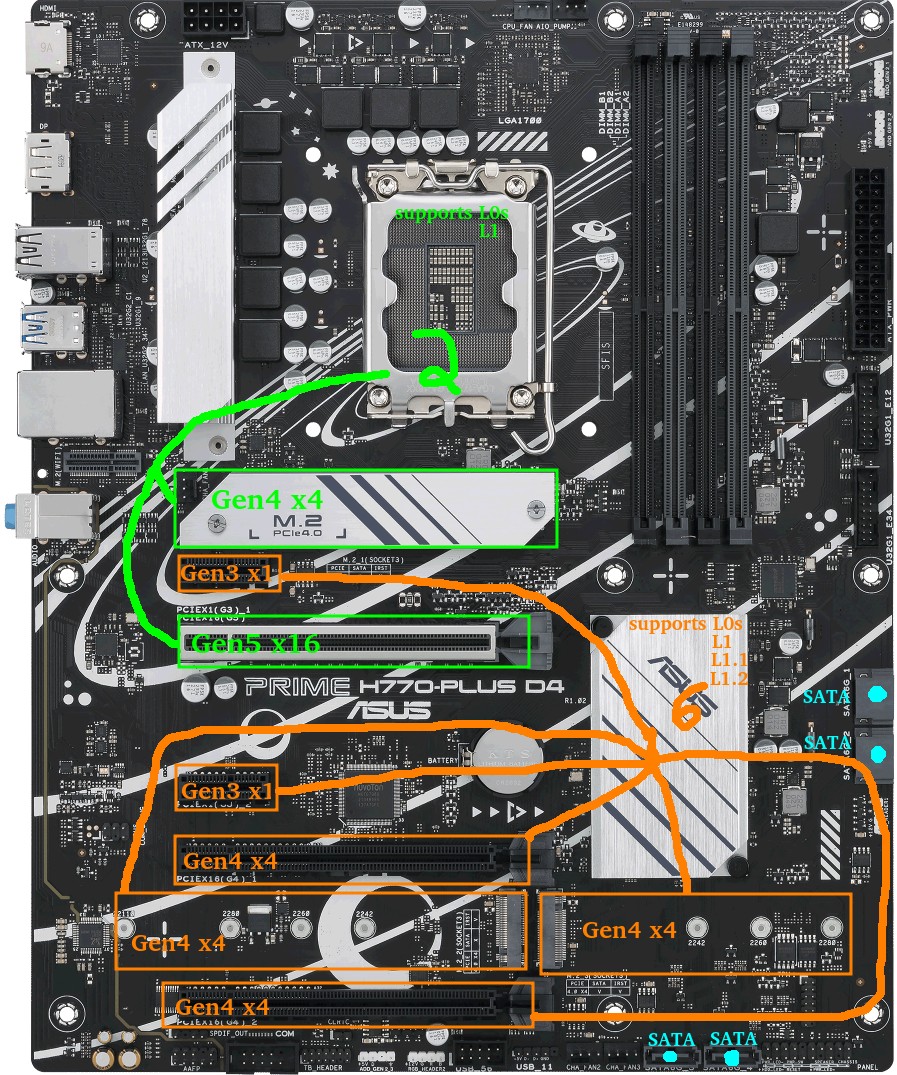
Before I begin, here is a quick look at the motherboard layout. The GREEN CPU-connected slots and ORANGE chipset-connected slots will become relevant throughout this write-up.
At the time of writing, widely available consumer options were motherboards in the Intel 600/700-series and AMD 500/600-series.
One of my goals above was the capacity for an eventual 6 NVMe drives.
Digging into deeper details as to why this can be a challenge (feel free to skip this section)…
Problem: There are 0 consumer motherboards with 6x M.2 slots that can all be used at the same time in PCIe mode. On AMD the MEG X570S Unify-X Max *looks* like it does, but check the manual and you’ll find that if you try to populate all 6, the last one has to be a SATA variant. The ASRock Z790 PG Sonic also has 6 slots, but you can only use 5 of them (with a legitimate excuse: they offer a Gen5 NVMe slot but it comes with an either/or caveat).
Why This Problem Exists: There are chipset lane limitations on consumer boards. Assuming I want the ability to run all M.2 in Gen4x4 and assuming a manufacturer were actually willing to devote all the lanes to M.2 NVMe slots (they’re not), AMD X570 and Intel B760 would max at three M.2 slots, with AMD B650 and Intel H670/Q670/Z690/W680 managing four. Five M.2 slots is possible on AMD X670 and Intel H770 boards. Six on a Z790 board. Beyond that, extraordinary measures like robbing the main PCIE slot of lanes would be required. If sheer M.2 count were desired, manufacturers could run theoretically run lanes in Gen4x2 or add some Gen3 M.2 slots, but at that point they’ve created a *very* niche product.
The Solution: PCI-E to M.2 adapters became necessary. Now when searching for a motherboard, it became a matter if adding the M.2 slots included to any available PCI-E slots capable of x4 or higher. My options were now limited to AMD X570, Intel H770, and Intel Z790 motherboards. Note that while using bifurcation is a possibility on some motherboards to get more than 1 NVMe out of the main PCIe slot, I decided not to rely on it.
I decided to go the Intel route for a few reasons:
- Chipset TDP: 600/700-series Intel chipsets all have a 6W TDP, whereas the TDP of the AMD X670 chipset is pretty high (7w+7w). AMD chipset power consumption has concerned me for a while, as previous X570 chipsets had a TDP of 11w and needed a fan.
- Chipset Speed: Intel H670/Q670/W680/Z690/H770/Z790 chipsets have a DMI 4.0 x8 link to the CPU. AMD X570/B650/X670 have a PCIe 4.0 x4 link to the CPU. Theoretical throughput on the Intel should be twice as much as AMD (16GB/s vs 8GB/s).
- I already had 64GB of DDR4 that the Intel system could use. AMD 600-series chipsets are all DDR5-only.
- I already had an Intel 12th Gen CPU.
- I’ve yet to see any positive discussion around AM5 power consumption. At all. Update: as I was writing this, news actually came out about AMD 7000-series CPUs burning/bulging where the motherboard socket pins meet the CPU. Yeah, sorry AMD, not this time.
So Intel it was. After checking out available DDR4 motherboards on the market, I quickly narrowed options to 2 manufacturers: MSI and ASUS.
Don’t care about the board comparisons? Feel free to skip this.
The enticing MSI boards were the PRO Z790-P WIFI DDR4 and Z790-A WIFI DDR4. Nearly identical on the surface, except the “A” is a little more premium (audio, rear ports, heatsinks, power phases, etc). Pros/cons:
- Pro: 4x M.2 (Gen4x4) + 1x PCIE Gen5x16 + 1x PCIE Gen4x4 supports a total of 6 Gen4 NVMe
- Pro: 2x PCIE Gen3x1 extra
- Pro: 6 SATA ports
- Con: Intel 2.5G LAN (known to be problematic and buggy)
- Con: I’m not a fan of the MSI BIOS
- Con: My current B660 board that results in higher idle consumption than expected is an MSI.
Attractive ASUS options were the Prime H770-Plus D4 and Prime Z790-P D4 (optional WIFI edition). Getting into the TUF, Strix, or ProArt was just too expensive.
I’ll start by listing pros/cons for the H770-Plus:
- Pro: 3x M.2 (Gen4x4) + 1x PCIE Gen5x16 + 2x PCIE Gen4x4 supports a total of 6 Gen4 NVMe
- Pro: 2x PCIE Gen3x1 extra
- Con: Only 4 SATA ports
Pro: 2.5G Realtek Network Adapter (preferable to Intel 2.5G LAN these days)(see comments)The Z790-P D4 is similar except it has more power phases, better heatsinking, more USB ports, extra fan header, and for our purposes…:
- +1 PCIE Gen4x4
- -1 PCIE Gen3x1
Ultimately the ASUS Prime H770-Plus D4 was about $100 cheaper at the time and is what I chose.
One upside I’ve found with “cheaper” boards is they tend to have fewer components and thus less vampire power drain at idle, though this isn’t always a certainty.
CPU – Intel i5-12400 (H0 stepping) – Alder Lake
I already had this CPU as part of a previous desktop build. At the time it was chosen for the desktop system because:
- it had AV1 hardware decode
- it had the highest performance available from the Intel lineup of the 12th generation that avoids the E-core silicon overhead
- in that build, I was getting a new motherboard with 2xDP anyway, and going older-gen didn’t make sense to me.
That desktop build turned out to be a disappointment, and ranks as one of my least favorite builds.
Some details…
I had issues where sometimes only 1 of 2 DP-attached monitors would wake in Linux which meant I had to either pull/reconnect the other DP connector, or manually suspend/resume the system so it could try again.
Another issue was that rebooting between Windows/Linux sometimes caused odd issues which necessitated a full poweroff/restart.
Hardware decode on Ubuntu using Wayland is still problematic and when programs tried to use it to play video, problems would ensue.
Finally, unlike my previous Intel systems which could all be brought down near the 10 watt mark, this one was idling at 19 watts, though I suspected the MSI motherboard I was using may have been a factor.
Most of the headaches I experienced were related to the GPU and display. Since I was about to build something server-oriented, that was no longer a factor.
MEMORY – 64GB DDR4-3200
Here’s what I used:
- 2x16GB Kingston HyperX dual-rank (Hynix DJR)
- 2x16GB Kingston HyperX single-rank (Hynix CJR)
This was memory I already had. I ran the 4 sticks of memory at the XMP profile of the dual-rank kit which was 16-18-18-36. Everything else was essentially left to the defaults except that I ran the RAM at 1.25 volts (higher than stock 1.20, but lower than the XMP 1.35v setting). TestMem5 and Memtest86 showed stability at 1.22v, though testing this memory on previous motherboards had shown 1.22v to be unstable, so for a little extra buffer when it comes to stability I boosted the voltage to 1.25v.
Boot Drive – Sandisk Ultra 3D 1TB SSD
This component wasn’t deliberately chosen. When I wanted a fresh Ubuntu Server install for testing, this happened to be the only SSD I had kicking around that wasn’t currently being used. I was going to be doing a lot of A/B testing on PCIE and NVMe devices, so installing Ubuntu 23.04 to a SATA SSD made sense to keep PCIE slots free.
Note that after testing, the main OS was to be run on a Samsung SSD 970 EVO Plus 500GB NVMe. Not much to say except that Samsung stuff tends to reliably go into low power modes.
Having used both drives, I can’t measure any power difference between them in my testing. Tom’s Hardware tested the Samsung idle at 0.072 watts (via ASPM/APST), and Anandtech tested the Sandisk Ultra 3D idle to be 0.056 watts (via ALPM). Both are well below the 1W resolution of my Kill-A-Watt meter.
PSU – Corsair RM750
As much as this 750W PSU may appear to be overkill for a system intended to sit around 10 watts, when 12 drive motors spin up at the same time, the instantaneous load is likely to be quite high. Seagate states 2A/3A DC/AC peak currents on the 12V rail for one of their 10TB 3.5″ drives. Even peak random read/writes can clock in at over 2A.
This bursty power demand has the potential to be problematic if the PSU isn’t up to the task. If an array of 6 drives collectively pull 150-200 watts at the same moment the CPU spikes to pull a peak 120W, that’s a jump from around 10 watts idle to around 400 watts. This could easily cause an instantaneous voltage dip – if it dips enough to cause an immediate crash/reboot it’s probably not a big deal, but if it dips just enough that data is corrupted during a memory refresh or when another drive is mid-write… that’s a more painful problem. Oversizing the PSU to some degree (or adding some in-line capacitors to the power rails) makes sense.
Fortunately, despite operating outside of the peak efficiency range, much of the Corsair RM series is pretty efficient across a wide range.
Power Measurements – Initial
A few important bits:
- Power measured from the wall
- Intel PowerTOP was used to auto-tune settings
- Ubuntu Server 23.04
A few potentially-important BIOS bits:
- CPU C-states were enabled in the BIOS (C10)
- ASPM was enabled with everything set to L1
- RC6 (Render Standby) enabled
- Aggressive LPM Support enabled (ALPM)
- DISABLED: HD Audio, Connectivity Mode, LEDs, GNA Device, Serial Port
9-10 watts was the consumption when the display output was on.
7 watts was the consumption once the display turned off (consoleblank=600 kernel boot parameter for a 600s timer), which is where this system sits most of the week.
8 watts was the consumption if the USB keyboard power management was disabled. If you don’t SSH into the server from elsewhere, spending the extra watt for keyboard use might be necessary.
Problematic Power Measurements – Loaded up with spinning rust (spun-down)
As mentioned in the beginning, I started with 12 hard drives. Half were 2.5″ and the other half were 3.5″. Because the motherboard only has 4 SATA ports, a SATA controller and a port multiplier were used to handle the remaining drives. Additionally, 4 NVMe drives were used early on: one of them, a Western Digital SN770 had a tendency to get quite hot even at idle which indicates it probably wasn’t going into a low power mode.
With all the equipment connected, at idle, with display off, and with the 12 drives spun down to standby, I was shocked to see that my idle power consumption had gone from 7 watts all the way up to a whopping 24-25 watts. Far too much! Something was amiss.
Power Consumption Puzzles – High Power Investigation and Diagnosis
I disconnected the hard drives and started testing components one at a time. These were fairly crude tests meant to get a rough idea as to the culprit, so numbers here aren’t precise.
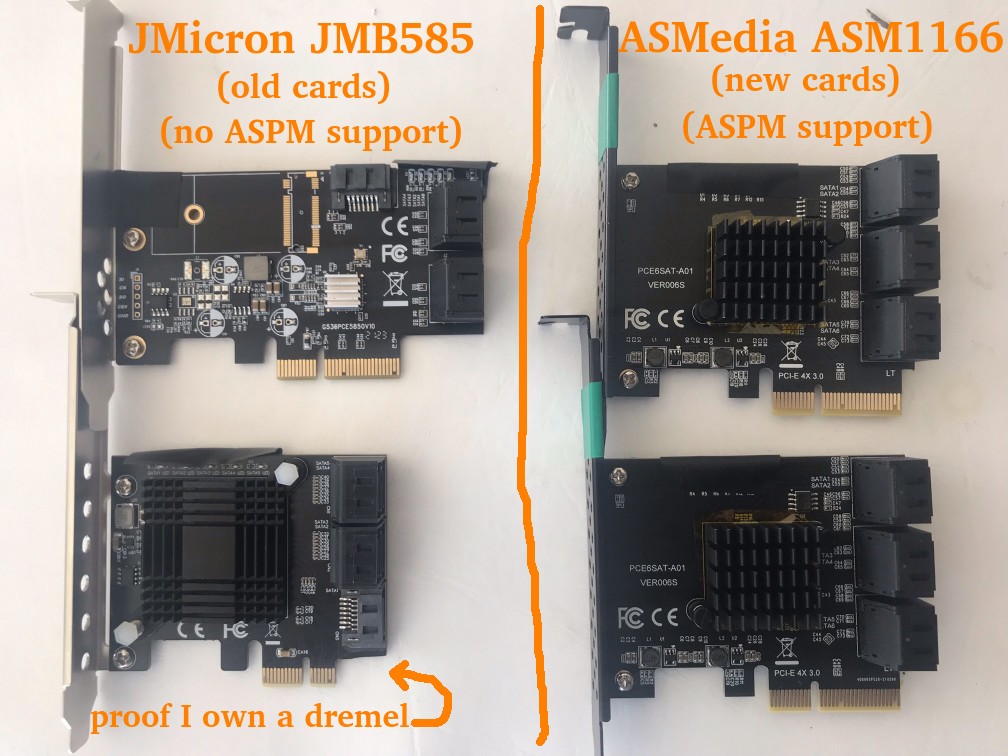
I quickly discovered that the JMB585 SATA controller I was using caused power consumption to increase by something in the 6-10 watt range (precise measurements in a later section). The controller itself is only supposed to take a couple watts, and the tiny heatsink stayed cool, so there was obviously more going on. Where was the power going?
I decided to watch the CPU package C-states. Without the JMB585 SATA controller, the system hit C6. When the JMB585 was reconnected, the best the system hit was C3. Ah ha! But why? Turns out that if a PCIE-connected device won’t go into ASPM L1, the CPU won’t go into as deep a sleep. The JMB585 controller cards don’t seem to have ASPM support.
A little further experimentation revealed something else that I hadn’t known, and it has to do with C6 vs C8. The system will only hit C8 if there’s nothing hooked up to the CPU-attached PCIE lanes. In other words, if anything is plugged in to the top PCIE slot or the top NVMe slot, C6 is the maximum. The power consumption difference between C6 and C8 *seemed* to be less than a watt in a simple test.
So while C8 would be a luxury, hitting C6 was a must. C3 uses too much power. If SATA controllers were going to prevent the CPU from hitting the best power saving states, I started to wonder whether I should have been looking for a motherboard with 6-8 SATA ports so that I wouldn’t have to rely on add-on controllers…
A little searching for SATA HBAs showed that while there aren’t many options here, the ASM1166 SATA controller should support ASPM L1, though the firmware has to be flashed for it to work properly (and to work at all on newer Intel boards). This was something I’d have to order: I have Marvel and JMicron spares, but they don’t support ASPM. I’d actually been avoiding ASMedia for years, but out of necessity they were now getting another chance: I ordered a couple ASM1166 6 port SATA controllers.
Aside: BadTLP, Bad! AER Bus Errors from the pcieport
Worth a mention… During initial testing with a WD Black SN770 (Gen4 NVMe), I found a problem when the primary (top CPU-attached) PCIE and NVMe ports were used. Running dmesg resulted in output littered with stuff like:
pcieport 0000:00:06.0: AER: Corrected error received: 0000:02:00.0
nvme 0000:02:00.0: PCIe Bus Error: severity=Corrected, type=Physical Layer, (Receiver ID)
pcieport 0000:00:06.0: PCIe Bus Error: severity=Corrected, type=Data Link Layer, (Transmitter ID)
pcieport 0000:00:06.0: AER: Error of this Agent is reported first
nvme 0000:02:00.0: [ 6] BadTLP
…after much trial-and-error I found that if the “PEG – ASPM” BIOS setting was set to [Disabled] or [L0s] there were no errors.
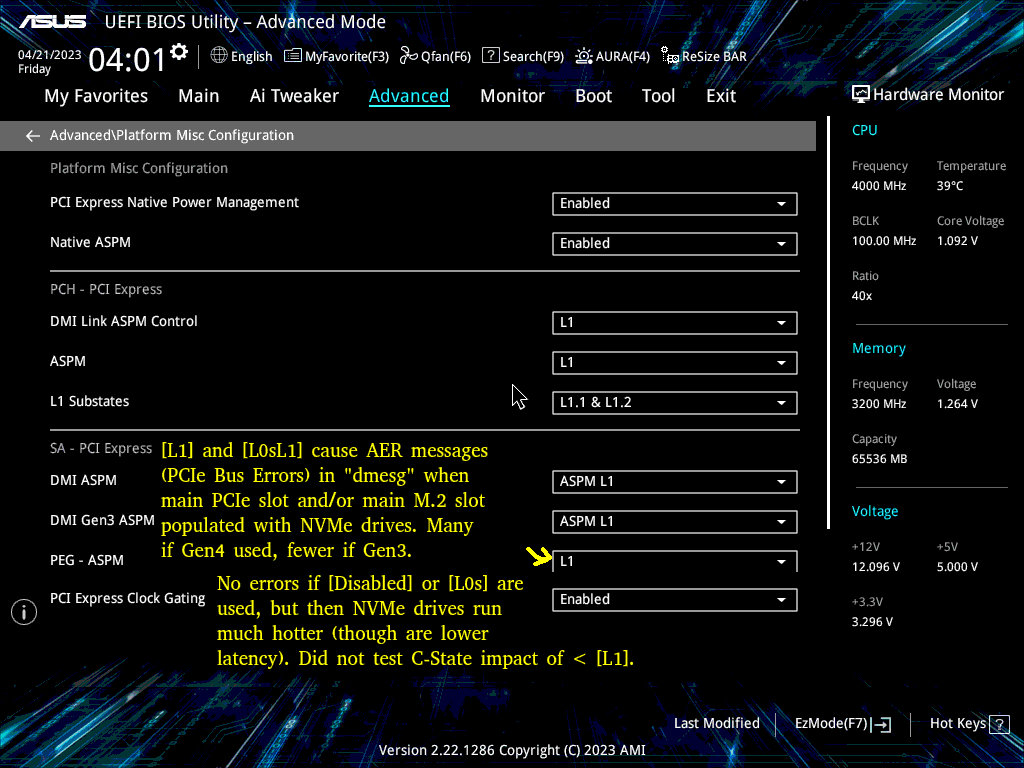
Of course, this was a bad option, as [L1] is crucial for power savings. If [L1] or [L0sL1] were used, the only option was to set the Link Speed of those ports to [Gen3], which didn’t stop the errors, but reduced them substantially.
Some research showed the root cause can be any number of things. Because swapping the motherboard or CPU wasn’t a pleasant thought, my best hope was swapping to a different brand of NVMe.
I ordered some Crucial P3 NVMe drives. This turned out to be a successful endeavor: with the WD drives replaced by the Crucial drives, I was no longer getting any errors, though keep in mind these are Gen3 drives.
Power Consumption Puzzles – Finding L1.1 and L1.2 to be enabled on chipset-connected ports only
When I had the 2 Crucial P3 NVMe drives installed in the CPU-connected PCIEx16 slot and the top M2 slot, I noticed higher idle temps than expected. While the NAND sat at about 27-29C, the controllers were reporting 49-50C – much higher than I expected for these particular drives.
I moved the one from the PCIEx16 slot to a chipset-connected PCIEx4 slot. An interesting difference between these drives showed up via lspci -vvv:
CPU-connected M2 slot: L1SubCtl1: PCI-PM_L1.2- PCI-PM_L1.1- ASPM_L1.2- ASPM_L1.1-
Chipset-connected PCIE slot: L1SubCtl1: PCI-PM_L1.2+ PCI-PM_L1.1+ ASPM_L1.2+ ASPM_L1.1+
L1 sub-states only seem to get enabled on the chipset-connected slots. Unfortunate, but it does seem to coincide with the available BIOS settings in the screenshot above.
Let’s reference that motherboard picture again to show the situation:
I put both NVMe drives on chipset-connected PCIE slots. Now both showed L1.1+/L1.2+ and both controller temps were down from the 49-50C range to 38-41C.
Unfortunately when attempting various A/B tests using these 2 Crucial NVMe drives with different slot configurations and various BIOS settings, I saw very inconsistent behavior in terms of temperature, though it’s worth noting the JMB585 and an NVMe boot drive were also connected during these tests. For example, both drives might idle at around 40C until a soft reboot at which point 1 (or both) might now idle at the 50C range. Sometimes it seemed possible to keep 1 drive on the CPU-connected M.2 and retain 40C temperatures on both drives as long as the x16 slot wasn’t populated. Presumably I was hitting some sort of bug. The Samsung boot NVMe seemed to keep a consistent idle temperature regardless of what was happening with the Crucial NVMe drives, so I suspected the Crucial drives themselves are at least partly to blame.
Interestingly, sometimes one (or both) controller temps would drop all the way down to the 29C range when on the chipset-connected slots. Since trying to find a low-power 4TB NVMe replacement for the Crucial P3 wasn’t a realistic goal, my best hope at this point was that the ASPM-incompatible JMicron JMB 585 was somehow to blame, since it was soon to be replaced with the ASPM-compatible ASMedia ASM 1166.
Late Update: I unfortunately didn’t keep track of temperatures throughout the rest of the testing, and heatsinks/airflow between drives have all been jumbled around. But for whatever it’s worth, In the final build, my Crucial P3 controller temps are 31-34C, and NAND temps are 23-24C.
Power Consumption Puzzles – Swapping from the JMB585 to the ASM1166.
After a couple weeks the ASM1166 arrived. First a couple bits regarding the card which you might find helpful if you’re considering it…
I began with a firmware flash – ASM1166 cards often have old firmware which doesn’t work with Intel 600-series motherboards and from what I understand can have issues with power management. Newer firmware can be found floating around in various places, but I decided to grab a copy from SilverStone (“fix compatibility issue” in the Download section of https://www.silverstonetek.com/en/product/info/expansion-cards/ECS06/) and followed the instructions at https://docs.phil-barker.com/posts/upgrading-ASM1166-firmware-for-unraid/ . Note that the SilverStone files had an identical MD5 to firmware I found by following the thread at https://forums.unraid.net/topic/102010-recommended-controllers-for-unraid/page/8/#comment-1185707 .
For anyone planning to purchase one of these ASMedia cards, I should note that like most SATA controllers and HBAs out there, the quality really varies. One of my cards had a heatsink that was on a bit crooked: the thermal pad was thick enough to prevent it from shorting nearby components, but be aware that these products can be really hit-and-miss. This is one of the situations where paying a little more to buy from somewhere with a good return policy can be prudent.
I did quite a bit of A/B testing, so here is a quick “JMicron JMB585 vs ASMedia ASM1166” in terms of total system power consumption, though it may only be applicable to this platform (or perhaps even this specific motherboard).
DRIVELESS
First, power consumption without any drives connected to the cards (the SATA SSD boot drive is connected to the motherboard) to get a baseline. PowerTOP used on all devices except for the keyboard (adding +1 watt). Measurements after the display output went to sleep.
- 8 watts – No SATA controller – C8 power state
- 9 watts – ASM1166 on a chipset-connected x4 slot – C8 power state
- 12 watts – JMB585 on the CPU-connected x16 slot – C3 power state
- 15 watts – JMB585 on a chipset-connected x4 slot – C3 power state
- 22 watts – ASM1166 on the CPU-connected x16 slot – C2 power state
The ASM1166 does well here if plugged into a chipset-connected slot (only +1 watt), but does horribly if connected to the main PCI-E slot (+14 watts) where the CPU package power state plummets to C2. Shockingly, the JMB585 behaves in an opposite manner where it’s consumption is lower on the CPU-connected slot (and it didn’t cause C2) – however, you’ll soon see that things change when drives are actually connected…
I did additional testing with the controllers, including playing “musical chairs” with a couple NVMe drives to see if multiple devices would throw a wrench into things, but nothing unexpected took place so I’ll skip those details.
ADDING DRIVES
With baseline measurements complete, next it was time to actually put some drives on these controllers. The SATA SSD boot drive stayed on the motherboard, 2 NVMe drives were added to the mix (chipset-connected unless otherwise noted), and 4 of the 2.5″ SATA hard drives were placed on the controller. I’ll list the “spun down” consumption after the hard drives went into standby – “spun up” was exactly 2 watts higher in every test while the drives were idle.
- 10 watts – ASM1166 on a chipset-connected x4 slot – C8 power state
- 11 watts – ASM1166 on a chipset-connected x4 slot with 1 NVMe moved to the CPU-connected x16 slot – C6 power state
- 11 watts – 2x ASM1166 on chipset-connected x4 slots, with only 1 NVMe drive – C8 power state
- 16 watts – JMB585 on a chipset-connected x4 slot – C3 power state
- 24 watts – JMB585 on CPU-connected x16 slot – C2 power state
With 4 drives connected via a chipset-connected slot, the ASM1166 adds +2 watts to system power consumption, whereas the JMB585 adds +8 watts. No contest.
An additional benefit is that I was able to use both of the ASM1166 cards in the system, whereas attempting to use both of my JMB575 cards at the same time resulted in the system refusing to boot, though that could be a platform or motherboard-specific issue.
There is a trade-off though – I always found the JMB585 to be rock-solid reliable, including when paired with a JMB575 port multiplier. My past experience with ASMedia SATA controllers has been less than stellar: reliability with the ASM1166 remains to be seen, but at the very least it’s a bad candidate for a port multiplier since it doesn’t support FBS (only CBS).
A couple other minor hiccups that presented with the ASM1166:
- When removing/reinserting the NVMe boot drive, a BIOS message appeared claiming that it couldn’t boot due to GPT corruption. The ASM1166 cards had to be temporarily removed for the BIOS to “find” the NVMe boot drive again (after which they could be reinstalled).
- The ASM1166 cards claim to have a *lot* of ports – this causes additional boot time as Linux has to iterate through all of them.

Update: SATA and SSD Brands
One of the comments mentioned an older Samsung 840 PRO SSD limiting to C3 whereas a Crucial Force GT SSD allowed C8. While those are older drives, I still found this a bit surprising. It was worth investigating.
I used the H770 as a testbed with a Samsung 850 EVO SATA SSD boot drive along with a Crucial P3 NVMe and built a custom kernel to allow the Realtek network adapter to reach L1.2. No ASM1166, just using the Intel onboard SATA. I reached C10 after running powertop with auto-tune and allowing the display to sleep. I tried various drives I have on hand, powering off the system each time to swap drives and repeat the process. Here were the results.
Drives that resulted in the system being stuck at C6:
- 1TB Patriot P210 SATA SSD
Drives that allowed C10:
- 500GB Samsung 850 EVO SATA SSD
- 4TB 2.5″ Seagate SATA HDD
- 8TB 3.5″ Seagate SATA HDD
- 14TB Toshiba SATA HDD
- 1TB Sandisk Ultra 3D SATA SSD
- 4TB Sandisk Ultra 3D SATA SSD (note: slow trim)
- 4TB Crucial MX500
I suggest being cautious when selecting SATA SSD brands and models. I’ll try to update this list over time with drives I’ve tested, but keep in mind certain manufacturers in the storage space have shown a propensity towards silently swapping to inferior components in some of of their mainline products, so you should always verify the claimed performance metrics of any storage devices you buy while within your return window. Feel free to leave a comment with good/bad drives you come across.
Power Consumption Puzzles – Conclusion
A few important bits if aiming for low consumption:
1) Motherboard support and BIOS configuration are critical – I’ve had motherboards with very inflexible BIOS’s. On this one, “Native ASPM” and the appropriate L1 states must be enabled (to allow OS-controlled instead of BIOS-controlled) for low power consumption to work.
2) Devices all need to support ASPM L1. Otherwise you’re really rolling the dice. The hardest part here as you might have guessed is finding SATA controllers that support it – if possible, get a motherboard enough sufficient Intel chipset-connected SATA ports to avoid needing a separate card. I should note that finding NVMe drives that have working low-power APST power states under ASPM isn’t always a given and you’ll want to do some research there too.
3) If you can hit the C8 power state, avoid using CPU-attached PCIe lanes (top PCIe and M2 slot). On this specific motherboard, my advice would be to avoiding using them altogether if you can, unless you either need the low-latency full-bandwidth path to the CPU or your devices are so active they never sleep anyway. Recall that BOTH my JMicron and ASMedia SATA cards caused the CPU Package C-State to plummet to C2 if plugged into the x16 PCI-E slot.
4) Measuring power from the wall is the only way to make sure that what you *think* is happening is actually happening. A Kill-A-Watt device will pay for itself over time if you use it – consider that I bought mine in 2006 ($16USD + $14USD shipping at the time through eBay). At that time I found our rarely-used fax machine which was always powered on used 7 watts… just keeping that one device powered off when unused during the next 10 years more than paid for the Kill-A-Watt.
Power Consumption when loaded up with a bunch of HDDs
Now that a variety of parts have moved in-and-out of the system throughout this process, the current setup is as follows:
- 1x Samsung 970 EVO Plus NVMe (500GB boot drive)
- 2x Crucial P3 NVMe (4TB each)
- 5x Seagate 2.5″ HDD (5TB each – 4TB utilized)
- 6x Seagate 3.5″ HDD (10TB each – 8TB utilized)
- 2x ASM1166 cards providing SATA ports
Total power measured from the wall (display on, keyboard enabled):
- 50 watts with all 11 HDD in active-idle
- 38 watts with the 6x 3.5″ HDD in Idle B
- 34 watts with the 6x 3.5″ HDD in Idle C
- 21 watts with the 6x 3.5″ HDD in Standby_Z (spun down)
- 18 watts with the 5x 2.5″ HDD ALSO in Standby
- 16 watts with the display output ALSO off
- 15 watts when PowerTOP is allowed to disable the USB Keyboard
Seagate rates standby consumption of these 3.5″ drives at about 0.8w each, and the 2.5″ drives at about 0.18w each. This lines up with what I’m seeing above. My active-idle numbers actually match up pretty well to Seagate specs too.
The obvious observation: compared to the rest of the system components, the 3.5″ drives are power-hungry monsters.
The HDDs will eventually be replaced with SSDs. With idle consumption as low as it is during HDD standby, there isn’t a major rush and this process will gradually take place as my HDD drives/spares fail and SSD prices fall.
The plan for “end game” is for an all-SSD build. Originally the plan was for 1 boot drive, 6xNVMe (likely Crucial P3 4TB) for a RAIDZ2 array, and 6xSATA (likely Samsung 870 QVO 8TB) for the 2nd RAIDZ2 array. Since using the CPU-connected M2/PCIe slots not only brings unpredictability but also comes at a slight C-state/power/temperature cost, I might alter that plan and give up a couple NVMe in the first array and use SATA instead so that I don’t have to touch CPU-connected lanes. Time will tell.
Unnecessary Storage Details
This part is only worth reading if you’re interested in meticulous details about the storage. Feel free to skip to the final section otherwise.
NVMe boot drive
As alluded to earlier, this is a Samsung 970 EVO Plus. Currently less than 4GB of the 500GB space is used (a 64GB swap partition exists but always sits at 0 used). It was originally chosen because Samsung had developed a reputation for reliability (which has been falling by the wayside lately), and Samsung also scored well in reviews every time it came to idle power consumption. This drive is almost always idle and both Controller and NAND temps stayed low throughout all testing (20-24C). It may eventually be swapped to a SATA SSD to free up an NVMe port.
2.5″ HDD
These drives are used for the primary 6-drive ZFS RAIDZ2 array – the one that gets the most use. One day a week it’s busy with a task that involves reading a few TB over the course of 24 hours. Usage through the rest of the week is sporadic, and the drives spend most of the week spun down. For anyone wondering why piddly 2.5″ drives are used instead of 3.5″ drives, there *is* a reason: power consumption.
Power consumption of the 2.5″ Seagate drives is honestly pretty impressive. Spun down they’re each rated at 0.18w, in low power idle they’re rated at 0.85w, and the read/write averages are rated at about 2w. There are plenty of SSDs out there with worse power consumption numbers than this spinning rust. 5TB capacity gives a lot of storage-per-watt.
The major downsides to these 2.5″ Seagate drives are:
- Not great performers. 80-120MB/s peak read/write. To be fair though, many TLC/QLC SSDs fall to these write levels when their SLC cache is exhausted.
- SMR (Shingled Magnetic recording). Reads are fine, but write performance absolutely plummets when random writes take place – it acts like a QLC SSD without an SLC cache that also doesn’t have TRIM.
- Low rated workload (55TB/year vs 550TB/year for 3.5″ Exos drives).
- No configurable error recovery time (SCT ERC), and these drives can hang for minutes if they hit an error while they relentlessly try to re-read the problematic sector. Ubuntu needs to be configured to wait instead of trying to reset the drive after 30 seconds.
- Higher error rates if they heat up (I’ve had to replace a few and have discovered they don’t like running hot).
- Typical HDD pain points (slow to spin up, etc).
To be absolutely fair to Seagate, these are sold as external USB backup drives. Pulling these 15mm tall drives out of the enclosures and using them as RAID members in a NAS isn’t exactly using them as intended. The ultra low power consumption is tremendous, but there are obvious trade-offs.
Long term, these 2.5″ 4/5TB drives will slowly be replaced by 4TB SSD drives (possibly all NVMe). SSDs in 4TB capacity started to become available on the consumer end in 2021/2022 at about 4-5x the cost of the spinners. Less than 2 years later they’ve dropped to about 2x the cost, and I expect decent brands to last more than 2x as long as the Seagate spinners.
If availability of the Crucial P3 (Gen3) model remains, I’ll likely keep with this model despite being limited to Gen3 speeds. I strongly considered the Crucial P3 Plus (Gen4), but power consumption in reviews was higher despite very few situations where performance was notably higher as well. My biggest concern with the P3 Plus (Gen4) was that if I had issues with ASPM/APST, Tom’s Hardware showed it with a 0.3w idle power premium over the P3 (Gen3) for the 2TB model. I prefer “worst-case scenario” power to be as low as possible.
3.5″ HDD
Used in the secondary 6-drive RAIDZ2 array – a backup array that’s spun up for about 2 hours a week where it receives constant heavy writes.
Power consumption of the 3.5″ Seagate drives is about what you’d expect. These 10TB drives are rated at about 0.8w each in standby, 2-5w idle, and 6-9w reading and writing.
Two concerns here:
- These are rated to collectively pull about 45-50 watts when writing. That’s a bit of extra UPS load I don’t really want if a lengthy power outage takes place during the backups (I stick with consumer 1500 watt UPS’s).
- These are rated to collectively pull about 4.8 watts when in standby. Again, some UPS load I wouldn’t mind shaving off.
Long-term these drives will likely be replaced by Samsung 870 QVO 8TB SATA drives. The 870 QVO sports 0.041w/0.046w idle with ALPM, 0.224w/0.229w idle without, and 2.0-2.7w during a copy (according to Toms/Anandtech).
Price-wise, the Samsung 8TB SATA SSD is currently a fair bit more expensive than 8TB spinners (closer to 3x the cost) so unless these drives start to see more frequent use for some reason, replacement with the SSDs will almost certainly wait until I’ve run out of spares.
NVMe Cache Drive
Replacing my spinning rust with SSDs is a process that will likely take a while.
In the meantime, ZFS has a couple options to make use of high-speed storage (typically SSD) in front of slower storage:
- “Special” Allocation Class – allows you to create a vdev specifically for metadata and for “small” blocks if desired.
- A cache drive, known commonly as an L2ARC.
If you create the “special” vdev at pool creation, all your metadata (and optionally, small blocks of a size you choose) will go on the “special” vdev instead of your spinning rust. Very fast file listings and directory traversal whilst keeping the spinning rust for the files themselves. Yes, you can “ls” a bunch of directories without waking your HDDs from sleep. Biggest downside is that because all your metadata is on this vdev, if it ever dies, access to all your data is essentially gone. So it really should be at least mirrored. Maybe even a 3-way mirror. Say goodbye to a few ports.
The L2ARC is a bit different. It’s essentially a level 2 cache. When the cache in RAM gets full, ZFS will copy some of the blocks to the L2ARC before it evicts that content from RAM. The next time that data needs to be accessed, it’ll be read from the L2ARC instead of the disk. One benefit compared to the “special” vdev is that you’re fine with only 1 SSD – if there’s a problem with the data in the L2ARC (bad checksum, drive dies, etc), ZFS will just read the content from the original disk. Also, once the L2ARC is full, ZFS will just start again at the beginning of the L2ARC SSD and overwrite stuff it wrote before which has some pros (old data never accessed anymore) and cons (data that was frequently accessed and will need to get written to the L2ARC again). You can also add/remove L2ARC devices from the pool at your leisure – want to add a 64GB SSD, 500GB SSD, and 2TB SSD? Go right ahead – ZFS will distribute blocks among them. Need to remove the 500GB SSD from the pool a few days later and use it elsewhere? Go right ahead. The biggest downside to the L2ARC is that if you forget to specify “cache” when adding the device, you probably mucked up your pool. It’s also imperfect: even with careful tuning it’s hard to get ZFS to write EVERYTHING you want to the L2ARC before it gets evicted from memory. At the same time, depending on your data, the L2ARC may see a lot of writes, and you may have to carefully watch the health of your SSD.
In the past I’ve used the “special”, used L2ARC, and have used both at the same time (you can even tell the L2ARC not to cache things already contained in the “special” vdev).
This time around I simply went with an L2ARC on a 4TB NVMe: once all the other 2.5″ drives have been replaced by SSD and the speed benefits of an SSD cache no longer apply, I can simply remove this cache device (though theoretically having 1 L2ARC cache drive handling the bulk of reads *would* allow the other NVMe drives to stay in low power mode more…).
Conclusion – Regrets? Second-guessing? What could have gone differently?
Unlike the ASRock J4005 build where I realized part way through that I’d kneecapped myself in a number of ways, I don’t get the same sense here. This time I ended up with low idle power AND a pretty capable system that should be flexible even if repurposed in the future.
I’m quite happy with my component choices, though I’d be curious to know how the MSI PRO Z790-P DDR4 (one of the other motherboards I considered) would do in comparison. Functionality-wise the MSI has the advantage of 6xSATA ports, but it comes with the obvious downside of the notorious Intel 2.5G networking chip. The MSI also has a PS/2 port and I’ve never actually checked to see if PS/2 keyboard power consumption is lower than USB (recall that I save 1 watt if I allow powertop to shut down the USB keyboard port). And of course it would be interesting to compare the ASPM and ALPM settings, and to see if the snags I hit with CPU-attached PCIe/M.2 slots exist in the same way.
While this system currently sits in the 15-16 watt range when idle with drives in standby, once all HDDs are replaced with SSDs, I’d expect idle consumption of around 10-11 watts which isn’t bad for 72TB worth of drives, 64GB of RAM, and a pretty decent processor.
Update: Recent Linux kernels disable the L1 power saving modes of most Realtek NICs which prevents the CPU from entering decent C-states, thus increasing power consumption by quite a lot. While there are workarounds, moving forward I’ll likely limit myself to motherboards containing Intel 1 Gigabit network adapters (perhaps moving to Intel 2.5 Gigabit when it becomes clear they’ve worked out all the kinks). You can find further details about the Realtek NIC situation in the comments below. The script I mention deep in the comments can be found at: RTL8125-ASPM.sh.txt .
I guess a lot of headaches could have been avoided if you found a board with more sata ports on it!
On my end I never managed to get my chip beyond C3. I purposefully tried to reduce the amount of excess components (like those SATA controllers, I'd read about how hit and miss they could be).
I'll double check my BIOS settings to make sure that I've enabled all the relevant things you mentioned in your piece.
Very interesting article, many thanks.
So you don’t care about ECC, some say it’s a must for an always on server especially with ZFS.
Also NVME’s seem to burn more fuel than SSD’s.
I am looking for a frugal ECC motherboard but did not find anything yet, W680 boards are hard to get.
In the meantime I am running Unraid on a J5040 Asrock board with two 1TB SSD’s in mirror and 3 mechanical WD’S that are sleeping most of the time.
The system burns 19 watt at idle, its was 16-17 watt (C6) before adding an Asmedia Controller (4). I will replace the old seasonic PSU by Corsair soon.
Regards
Geert
Keep in mind that if the 2nd M.2 slot is populated, only 5 of the 6 SATA ports will work. If I recall correctly the BIOS on the H470M DS3H also hid a few options (like forcing IGPU or dedicated GPU) unless put in CSM mode. Additionally it would randomly hang on the boot screen with an error if I had an LSI SAS HBA installed, necessitating another restart attempt - regular SATA controllers worked fine though. Putting aside those weird little nuances, I found it to be reliable and it worked great and I quite like the board.
Do you plan to publish a similar article but for a system with ECC support and low idle power consumption that would still be compatible with Linux (I think low idle power consumption from AMD is not the best for Linux as an example).
I am planning to make such a build soon myself and I would like to know if I should start making my build in the next month or two or maybe wait a bit to read your publications which would provide some useful in sites that can help me make a better educated decisions on the components choice.
Nevertheless, thank you very much for the thoroughly written article. You did an impressive job here highlighting the important parts of building a very efficient low power NAS.
In any case, best of luck with your build!
Thanks for your very detailed and informative NAS articles!
I'm putting mine together with an i3-10500T, 16GB and 4xHDD.
For the power supply, I found an Antec EarthWatts 380W EA-380D (80+ Bronze) reconditioned for 25€. Is it worth it in your opinion? or is it too old?
If you have another model to recommend, I'd love to hear from you. Thanks in advance.
I also got a 970 Evo Plus (2TB) as the boot drive and can confirm that it must be connected to the chipset in order to reach low package C-States (C8). What I found interesting is that the difference between package C3 and C8 was much bigger when then SSD is connected to the chipset. I believe that's because the chipset itself will only go into deep sleep states when all attached devices support ASPM and SATA Link Power Management is active.
Connecting the SSD to the CPU PCIe did only increase power consumption by ~2W (Package C3 vs C8), while having not having ASPM on a device connected to the chipset seems to take additional 5W just for the chipset but has the same effect (C3) to the package C-State.
One interesting thing worth noting is that I have a PCIe 1.1 DVB-C Capture card connected to the chipset. Even though ASPM is listed as a capability for the card by lspci and I booted the kernel with pcie_aspm=force it didn't get enabled for that card. I had to force-enable ASPM via setpci, see https://wireless.wiki.kernel.org/en/users/documentation/aspm - seems to work without issues. That helped me reaching that 15W idle power. Unfortunately the capture card still takes ~5W, otherwise I currently only have 2x4TB HDD from Toshiba connected which spin down when idle.
Btw. Sata Hot Plug must be disabled for all ports, or otherwise the package will only reach C6.
1) it looks like that it is better to use a CPU with an embedded GPU unless the motherboard supports booting without GPU. I was planning to reduce power usage just by removing the discrete GPU card (after system installation) but this motherboard hangs at boot if there is no GPU connected! By googling around I found that this condition is quite typical for consumer motherboards. Looking at xblax's numbers, he can reach better idle power levels (ok, the motherboard is not exactly the same...).
2) I can reach C10 state for all the cores (right-most columns in powertop) but the package C-state reached at idle depends on which PCIe slot is used for the discrete GPU. By using the first PCI slot served by the CPU lanes I cannot go beyond package C2 state for 99% of time: in this configuration the average mains power is stably below 26W. If I move the GPU to one of the other slots served by the B760 chipset lanes, the package C-state reaches about 7% (C2) and 91% (C3), the average power drops below 22W but it is less stable
Is there any chance to improve the result or is it better to buy the 12100 CPU (with GPU)?
sh -c "echo 1 > /sys/bus/pci/devices/0000:01:00.0/link/l1_aspm"
(you'll need to replace 0000:01:00.0 with whatever coresponds with your Realtek card, from lspci -vv)
If you try it, can you please let us know on what C State and Watt usage you go to? :)
Also, did you swap to an iGPU and remove the old GPU?
I saw that also someone with an MSI PRO B760M-A WIFI DDR4 (which seems to be the same with the ASUS one), has the same issue, also the same with Asrock B760M Pro RS/D4
I was able to reach around 13-14W with that board by using ASPM L1 on the 2.5Gbit port, all the BIOS settings and "powertop --auto-tune"
No USB / screen attached, only CPU (12600) and 1 Samsung 980 Pro Nvme in a chipset slot, proxmox running in idle.
However I am using a Be quiet! Dark Power Pro 11 currently, which I guess isn't very power efficient at those lower loads. I am thinking about looking for a used Corsair RM750(/x)/RM650(/x).
You can look up a good test on tweakpc.de
Super great article, thanks for all these informations.
I’m planning building my nas. As the power consumption is the main topic, what do you think about the following build (but I’m kinda a noob about the system and what’s possible and/or the limitation of such a low tdp chip) ?
Asrock N100M micro ATX (with the new Intel® Quad-Core Processor N100 (up to 3.4 GHz) with a 6W tdp. As there are only 2 sata ports, the idea is to add a SAS HBA card with 8 additional SATA ports on the 1 x PCIe 3.0 x16 Slot. For the storage it would be 1 M2 (the one from the motherboard) for TrueNas OS, 2 SSD mirroring sata for VM, docker, … and 8 HDD Seagate EXO 7200 rpm drives as a final step (2 at the beginning and then evolving based on the need).
For the power supply, a Seasonic Focus PX 550W - Modular 80+ Platinum ATX and finally a unique stick of 32GB of ram (non ECC).
Many thanks in advance
On the SAS HBA card, I'd suggest looking around to see what idle power consumption others are seeing on the specific card you're considering: the popular ones often pull a few watts while doing absolutely nothing. Not sure how *BSD handles the cards, but of the few that seem to have ASPM enabled by default, Linux eventually seems to disable it in the kernel at some point due to issues. That said, this is a situation where the ASRock N100 might fare better than a separate CPU/motherboard combo as I'd expect it to be less sensitive to c-state implications of an expansion card, though this is just a guess based on what I saw with my ASRock J4x05 boards and may not apply to N100.
The Seasonic PX 550W looks like a great choice.
Overall looks like a solid build!
Do you have any tips for identifying motherboards that can achieve low power usage? People sometimes recommend ITX motherboards but I haven't found any measurements about how many watts ITX vs ATX usually saves. Now, ITX wouldn't have worked for this build, but ATX doesn't seem to have been a significant source of power consumption anyway. In general, it seems very hard to figure out which motherboards are power-efficient and which are not?
What do you mean with "the E-core silicon overhead" and why did you try to avoid it? I understand the CPUs with E-cores are probably more complex, but I would've thought that the E-cores could lead to lower power usage when the CPU is doing non-intensive tasks at low load.
Again, thanks for the great info. I hope to be able to build a system with similar power efficiency. Right now I have a Gigabyte Z790 UD AX motherboard and an i5-13500 system that I can not get below 28W.
The advantage to ITX is that it tends to limit the component count, but it's not strictly necessary - last week I actually repurposed the "Intel i3-10320 on a Gigabyte H470M DS3H" I mentioned at the beginning and got it down to 6 watts idle (headless, no keyboard, onboard Intel i219V 1GbE network only, c-states in BIOS, 3 Samsung SATA SSDs 840/860/870, Corsair RM850 power supply, Ubuntu Server with powertop). It's a very utilitarian motherboard. I won't do a separate write-up because the board is no longer available, but 6 watts on that MicroATX Gibabyte H470 board and 7 watts on the ATX ASUS H770 board in this write-up are my best 2 results so far and notably neither were ITX. Something else I just noticed: both these boards only have 6 power phases.
As to the "E-core silicon overhead", a lot of details can be found at https://www.hwcooling.net/en/the-same-and-yet-different-intel-core-i5-12400-duel-h0-vs-c0/ , but I'll try to summarize. The i5-12400 comes with 6 P-cores and 0 E-cores enabled, commonly referred to as 6+0. However, it came in 2 variants: a "C0" stepping which was originally an 8+8 that had cores fused off to become a 6+0, and an "H0" stepping which was manufactured directly as an 6+0 and never had any E-core hardware inside to begin with. In the tests (page 5 of that article), the C0 used up to 16 watts more power than the H0 depending on the benchmark, including almost 11 watts more at idle. Now it's always possible their C0 sample had other contributing issues causing power leakage, or that there's some other variable at play, but either way the 2 chips that had physical E-Cores hardware inside didn't fare well in the idle test.
Because I focus on extremely low idle consumption for most of my systems, I can't justify buying any of the combined P/E-core chips until I see some data that shows chips with E-cores doing under 10 watts idle. And I simply haven't yet. This is an area where Intel is very much under threat these days: the AMD Mini PCs are now getting down to about 6-7 watts idle power consumption for a Ryzen 9 7940HS ( https://youtu.be/l3Vaz7S3HmQ?t=610 ) and if AMD brings this type of APU design to the desktop side or someone like ASRock starts to package some of these impressive HS chips in a custom motherboard, Intel could quickly lose the low-idle-power market.
I can see that the motherboard I bought is probably not ideal (it advertises a lot of phases).
With that said, even if your board had a lot of inefficient MOSFETs, the 28 watt power consumption you said you're getting seems a bit high unless you've got some spinning rust or a PCIe card that guzzles power. Have you checked to see if you're hitting C6 or better power states? Recall that when I put the ASM1166 on the main PCIe slot I was limited to C2 and was consuming 22 watts.
You are indeed correct that the 28 W I shared was not as good as it could get. I made the mistake of thinking that unplugging the SATA cables from my HDDs would leave them powered off. As is obvious in hindsight, you also need to unplug them from the PSU. Additionally, I had a bunch of peripherals connected to the PC that I didn't realize would consume power (in particular a plugged-in monitor makes a big difference). After disconnecting all HDDs and all peripherals I get readings in the 8-10W range.
To hopefully make this a useful data point for others I'll share some more details. The CPU is an i5-13500 in a Gigabyte Z790 UD AX motherboard. The only thing connected is a SATA SSD and a single stick of memory. The PSU is a 850W Corsair RM850x. The system reaches C8 and even C10. A few more things could be done to reduce the power draw. I was measuring while idling in GNOME (I assume having no DE running will save a tiny bit of CPU), I have two CPU fans that are running slowly even at low temps, the system is on WiFi (I assume ethernet consumes less power), and I haven't disabled case LEDs nor HD Audio.
I'm now very happy with the level of power consumption. Perhaps, one takeaway is that Intel E-cores do not affect the idle power draw much, at least in this CPU. The only problem I have now is that the system is unstable and sporadically reboots 😭. I think I've narrowed the issue down to a faulty CPU or a faulty motherboard (I've tried replacing the PSU and memtest86+ says that the memory is fine). The company where I purchased the parts claims that both are fine, but unless I find another solution I'll try and replace the CPU and motherboard with some low-end parts: a 13th gen i3 and an Asus B760M-A motherboard. If that fixes the problem hopefully I'll be able to return the other parts, in the worst case I'll use the budget parts for a server and the higher-end parts for a workstation.
i have exactly same setup ( i5-13500 + Z790 UD AX), my boot drive is Samsung 990 pro 4TB
and i have exactly same problem - sporadic reboots. Have you managed to find what is causing it?
I've tried latest BIOS F9b as well as F5 and changing multiple BIOS settings, but so far nothing helps. My suspicion is that boot drive goes into some low power mode and as is unable to recover from it, but don't know how to prove it.
there are no events before the crash, i also have netconsole configured - still nothing logged.
With latest BIOS, default settings and 970 evo plus as boot device (no other disk attached) system seems stable, but unfortunately it draws 32W on average while idling which is not acceptable.
Currently i'm changing one setting at a time and waiting for 12h+ in order to figure out what is really causing this and that takes a lot of time.
I've tried all settings, once I enable c8/10 system will become unstable and shutdown at some point, I've checked all drives and cables, replaced psu twice, currently awaiting a cpu RMA from intel. Judging from this thread here it might seem this is a gigabyte issue, I've also tried varying BIOS firmwares without any luck, so it seems if a CPU RMA does not fix it, it would be an issue with Gigabyte z790 motherboards.
Disappointing for sure, as I am out of return window and really do not want to deal with Gigabyte RMA, so If CPU RMA doesnt work, I will just have to live with it or sell it off and buy a different board.
Since this thread is a little old (Dec 2023), I wonder if anyone else has had this issue and was able to resolve it.
Thank you.
I'm currently testing an ASUS TUF GAMING B760M-PLUS WIFI D4 (12+1 DrMos) and at idle, with the monitor and USB (mouse, keyboard) suspended, the power meter shows 6.7-8.1 W. The rest of the system:
- i5 13500
- 2 x 16 GB 3600 MHz (gear 1)
- 1 TB KC 3000
- RM550x 2021
- 2 x 120 mm fans @ 450 rpm
- audio codec on
- WiFi off
Arch Linux + RTL8125 module (my router does not support EEE)
With the Realtek card disabled, the power meter shows 6.4 - 6.7 W
PC states w/ LAN
C2 (pc2) 0,7%
C3 (pc3) 1,3%
C6 (pc6) 41,1%
C7 (pc7) 0,0%
C8 (pc8) 0,0%
C9 (pc9) 0,0%
C10 (pc10) 55,8%
PC states w/o LAN
C2 (pc2) 0,6%
C3 (pc3) 0,9%
C6 (pc6) 0,0%
C7 (pc7) 0,0%
C8 (pc8) 0,0%
C9 (pc9) 0,0%
C10 (pc10) 97,8%
I had similar results on a B660 AORUS MASTER DDR4 (16+1+1).
I recently bought an i3-13100 (4+0) and an i3-13500 (6+8) to test out the "E-core overhead" claims I've seen online. I'm happy to report that the power consumption at idle is identical for both of these chips! Perhaps the elevated power consumption issue is unique to the i5-12400 C0, unfortunately I don't have one on hand to test.
4W power loss
I'm currently running an off-lease quanta 1u that I grabbed off ebay just before covid hit and it's single-core performance is really showing its age. Also it idles at 80W >.<
I would like to share my experience with my new 12—14 W PC.
I just built fanless mini-ITX PC. Case is also a passive cooler - AKASA Maxwell Pro and inside is AMD Ryzen 5600G (Zen 3, 65W TDP), Gigabyte B550I AORUS PRO AX (bios FB), 1x 16GB DDR4 (I plan to upgrade to 2x32GB), 1x 2TB Samsung 980Pro m.2 SSD. It's powered by 12V AC/DC power supply from AKASA (max. 150W) and Inter-Tech MINI-ITX PSU 160 W.
12—14W idle power consumption for whole PC under Windows 10 (measured on DC side, power plan is balanced, but I enabled ASPM, Pstates and C-states in bios and PCIe power saving in advanced setting in windows Power plan).
Under load (Cinebench R23) 61—65W. Currently I'm doing undervolting to have better power consumption and temperatures.
----------
my small home-lab & NAS has under 2W idle power consumption ‼️
I recommend Odroid H3 (H3+) with BIOS 1.11 and Debian 11 + DietPi + kernel 6.0.0 (or newer) + applied tweaks via powertop it has idle power consumption only 1.2 — 1.5W (compared to 2.7W for RPi 4 - source) ⚡️(with my configuration: 1x 16GB RAM and 1x SATA SSD).
See: https://i.ibb.co/7QD390m/H3-1-10-6-0-0-sata-idle.gif
Max memory size is 64 GB RAM and it has 1x m.2 port, 2x SATA 3, and 2x LAN 2.5Gbps. It's much faster than Raspberry Pi 4 with lower power consumption in idle. In load it can consume 20W (+depends on connected devices).
If you need more SATA ports then m.2 port can be expanded to 5x SATA using this: https://wiki.odroid.com/odroid-h3/application_note/m.2_to_sata_adapter
I'm currently struggling with getting my new NAS to use less than 40W at idle with no data drives, and I can for the life of me not understand why it's using that much. My gaming desktop idles at less.
It's an Asrock H670M-ITX/ac with an i3-12100, 8GB RAM, be quiet 400W PSU. Originally used a Kingston NV2 NVMe for OS, but found that replacing it with a SATA SSD decreased idle power by about 10W (50W - > 40W).
According to powertop, cores get into C7 no problem, but package refuses to leave C2. Not sure how important that is.
I'll keep working at it, with your article as reference. :)
Matt,
Your articles inspired me so I purchased the same motherboard ( prime h770 plus d4 ) and similar processor etc. I was able to reach 12-14w minimum. Happy with that for now but the additional 8w due to the package not reaching c8 anymore has been very frustrating, have you seen anything similar in your build?
Several investigations have shown that it is a drive problem with RealTekLAN. If you download and install drivers for the 8125 chipset from the Realtech site, you can reach c10 as before.
you should consider a different PSU like the Corsair RM550x (2021) or BeQuiet 12M 550W. The Corsair is the best for low power setups, but extremely hard to get. It will reduce the power consumption even further (2 to 4 watts).
This and other tweaks are mentioned in this topic:
https://forums.unraid.net/topic/98070-reduce-power-consumption-with-powertop/
Sadly, this was an intentional change to the Realtek driver contained in the kernel. It ensures that L1 is disabled on virtually every Realtek adapter, seemingly in response to a number of Realtek adapters experiencing stability issues when these low power states are enabled. On my current test system, this results in a 4 watt power increase at idle with the screen slept as the system no longer goes beyond C3.
Trying the Realtek driver that was linked by Tseting is likely to be the easiest workaround for now, though I have no idea how it will fare on unsupported kernel versions and I'm personally not a huge fan of kernel modules. I'll paste it here for convenience: https://www.realtek.com/en/component/zoo/category/network-interface-controllers-10-100-1000m-gigabit-ethernet-pci-express-software
There is of course a harder workaround - for those familiar with compiling the kernel, reverting the change in the diff above will restore L1/L1.1 on RTL8168h/8111h, RTL8107e, RTL8168ep/8111ep, RTL8168fp/RTL8117, and RTL8125A/B devices (anything older already had it disabled) - if you want to allow L1.2 you can force rtl_aspm_is_safe() to return true, though on my test system it didn't provide any benefit over L1.1.
Unless the kernel devs have a change of heart here, it looks like Intel NICs may be the only viable option moving forward. Intel 1G NICs have generally been very solid. Worryingly, I found that disabling the Realtek NIC on my MSI board doesn't completely detach it (still stuck at C3) so buying a board with a Realtek NIC with plans to disable it and use an Intel network expansion card may be risky. Worth noting that moving forward there is a flag vendors can set on an 8125A/B adapter to indicate L1.2 is tested and allowed which the linux kernel will respect, but I don't know if it's made it into any motherboards or expansion cards.
thanks for the detailed information you shared.
Your setup has inspired me and I have purchased the "Prime h770-plus" including 4800 DDR Ram.
Unfortunately I also have problems with NVME SSD's when aspm is enabled in the bios (and PCI express clock gating). The workarounds to block certain power saving modes of the WD's did not help. Tried the SN750 (1tb) and the SN850X(2tb).
Can you still recommend the Crucial P3 or does it also regularly fail with reference to ASPM problems?
Who has what other NVME on the board running reliably with ASPM enabled?
Do you run the setup productively in continuous operation?
Additionally, I have found that an 840pro (256gb) at least on SATA1 prevents the system from going lower than C3. A Crusial Force GT (128GB), on the other hand, works up to C8.
I got around the problem with the Realtek NIC by removing the check in the kernel.
Thank you and best regards
I have now tried a Samsung 990 pro. Unfortunately this still leads to the already known nvme aspm errors.
Does anyone else have any ideas?
It can't really be the power supply (I would find that very strange), because a Corsair cx 750 is being used here temporarily.
If nothing helps, does anyone have a good alternative board?
Somehow I put my foot in my mouth too often when it comes to hardware ;-(.
Itself it is a REALLY efficient nvme drive for just a few bucks. But what makes it excellent for our use is its capability to let any cpu run down to c10 with a few bios settings.
"I guess a lot of headaches could have been avoided if you found a board with more sata ports on it!"
That's not true by default - because it comes down to what SATA-Controller is used and/or how these Ports are connected. Chances are high that its using an onboard controller, and specifically for the N5105 there's a wide known NAS-Variant with 6-SATA Ports floating around sold by Kingnovy and Topton.
The Black one uses JMS585 and the Green PCB one uses ASM1166 - black is stuck with C3 and Green can go down to C8 (verified myself because I do have the green variant). If I would need anything more then a backup server, then I'd go the route here - with an much more powerfull Intel on LGA1700.
A good example of how low you could go with idle power consumption is the Odroid H3 - <2W idle with 2x HDDs via SATA in Spindown ... however as soon as you add (the wrong) components that will accelerate quickly - check the power consumption stats here:
https://github.com/fenio/ugly-nas
TLDR: In the end its sipping more power then your build here - and I have to add that I previously owned an Odroid H2, which fried their 5V lane and pulled the (expensive) SSDs with it ... every since then I'm staying away for the absolute maximum of the lowest power consumption in exotic combinations like the Odroid H3.
I'd say in the end it all comes down to - how practical everything is vs the power consumption levels.
That said I'm impressed with this build here - 7W idle with a 750W PSU is quite something.
I am currently upgrading my home server from j3455 to 11400.
While switching hardware I found a strange issue:
I5-11400+2x8Gb 2666 ddr4 +ASUS Prime B560M-A (latest bios) +asm1166.
If I boot from USB without any sata drives attached package C state reaches c8.
If I boot from USB with a SATA drive attached to the onboard sata controller package c state only reaches C2 (+4W).
If I boot from USB with a SATA drive attached to an pcie asm1166 package c state reaches c8.
So to me it seems the b560 SATA controller seems to have problems with power saving. Even if I have L1 enabled for everything and ran powertop tune it will not go below c2.
Do you have an idea what could cause the b560 SATA controller cause 4w more?
In the end it could be cheaper longtime to add another ASM1166 instead of the onboard controller. :D
This is enabled, I also tried with disabled, but it did not change power consumption or C-States. (leaving it enabled for now)
In the BIOS I am able to specifiy if M.2_2 is using SATA or PCIE. According to BIOS and Manual, SATA6G_2 is only blocked if M.2_2 is set to SATA.
But I have connected the ASM1166 in M.2_2 and configured it as PCIE. I confirmed that all onboard SATA ports work as expected with this setting.
Hotplug is disabled for all Ports by default. I enabled it to see if it changes something, but it did not. Leaving it on Disabled for now.
I booted from USB and tried different devices: 2x SSDs (Emtec and older Samsung), 2x 3.5" HDDs (WD and Seagate) and even 1x LG DVD Burner.
It seems that it doesnt matter what kind of deviecs is attached.
It is always the same, as soon as I connect a devices over SATA onboard C2 is maximum.
To verify this I booted from USB Stick with SATA devices attached, and then unplugged all of them while booted.
As soon as the last sata device is physically disconnected from the live system it will go to pc6 immediately and pc8 short after.
When reconnecting all SATA devices it stays in PC6/8 but also dmesg does not recognize the replug (most likely because of hotplug disabled)
I will crawl through dmesg boot logs, maybe something interesting pops up.
-m.2 slot of mobo works(tested with m.2 ssd)
-sata controller works (tested with m.2-pcie adapter&x16 slot of the mobo and m.2 slot of another minipc)
But with asm1166 connected to m.2 slot, nothing show up with bios or lspci.
So it looks like asrock board have some problem.
Don't know how to proceed from further
https://youtu.be/-DSTOUOhlc0?t=254
Also, one thing I don't understand in general, if I use the home server as a NAS but also as my router, would that prevent reaching high c states at idle given that it would always have to do some work? I have a gigabit connection and I am currently using openwrt on a pi4 but with qos enable I can get half download speed.
Thanks again.
As for being a router, I'm not sure although it's something I hope to test out within the next couple weeks. Currently I've got the ole ASRock/Intel J4005B-ITX running OpenWRT here as a router but the motherboard limit on it is C6 (though it spends 88-92% of time there after powertop with typical home traffic including a YouTube stream I tested just now). The thing's powered by one of my old Antec PSUs, and it reliably sits at a constant 10 watts.
EDIT/UPDATE Dec 13: Just to follow up, I did a bit of testing with the Asus H770 + i3-12100 + Intel i350-4T running OpenWRT in a systemd-nspawn container running privileged with SYSTEMD_SECCOMP=0. Results are a bit messy.
Doing nothing, it would be in C10 90-95% of the time.
TEST A: Handling just 1 device watching YouTube, 90% C10. Connected to very light household traffic (spiky with under 3Mbit/s average) it sat in C10 for 80-90% of the time. Downloading from one of my web servers which caps the rate at 4MB/s (roughly 32Mbit/s) it dropped to around 50-60% range in C10.
TEST B: Running iperf tests from an exterior VPS to a local machine (forwarding a port):
- 0Mbps = approx 82% C10 (household traffic only)
- 1Mbps = approx 73% C10
- 5Mbps = approx 61% C10
- 10Mbps = approx 58% C10
- 20Mbps = approx 30% C10
- 30Mbps = approx 12% C10
...it hit 0 at just over 40Mbps.
TEST C: Interestingly, passing through the router between 2 local networks (no NAT, just forwarding) offered different results:
- 0Mbps = approx 82% C10 (household traffic only)
- 1Mbps = approx 82% C10
- 5Mbps = approx 80% C10
- 10Mbps = approx 74% C10
- 20Mbps = approx 70% C10
- 30Mbps = approx 64% C10
...it hit 0 at just over 70Mbps.
Since I'm in an nspawn container, I wasn't able to try software flow offloading in the firewall section of OpenWRT to see if it would soften the impact in tests A and B - it's quite possible that the "flow offloading" it does would bring the results closer to test C. Also possible that IPv6 might do better in tests A and B by skipping NAT, though the impact of smaller-but-more packets could always throw a wrench into things.
So far as I can tell, the takeaway here is that there's some degree of traffic the computer can handle as a firewall while still finding opportunities to sleep. But if it's being kept awake... other options start to look enticing too. I just tested the Intel J4005 again (plugged into nothing but a monitor) and it sits at 9-10W in OpenWRT even if C-States are disabled, and I suspect the J5xxx series would be similar (no idea about N100). If some oomph is needed, my Ryzen 5600G does 22-23W on a Ubuntu LiveDVD with C-states disabled. Both of those start to look equally attractive any time Alder Lake loses it's C-State advantage in my view.
EDIT/UPDATE Dec 15: Bare metal, configured Debian as a router. TEST B was nearly identical except time in C10 was +6% for each item - still hit the hard wall just over 40Mbps. Flow tables didn't help.
Test C fared a bit better, with the final numbers being:
- 70Mbps = approx 70% C10
- 75Mbps = approx 60% C10
- 80Mbps = 0% C10 (hit a hard wall here)
When I enabled flow tables for Test C, I eeked out a little bit more:
- 80Mbps = approx 60% C10
- 85Mbps = approx 45% C10
- 90Mbps = 0% C10 (hit a hard wall here)
TEST D: To test the impact of an increasing number of connections, I fired up a torrent client and added a bunch of torrents with a capped global download speed of 1MB/s.
- 0 connections = approx 80% C10 (household traffic only)
- 16 connections = varied 36-39% C10
- 32 connections = varied 33-35% C10
- 64 connections = varied 26-29% C10
- 128 connections = varied 21-29% C10
- 256 connections = approx 20% C10
- 512 connections = approx 15% C10
- 1024 connections = approx 5% C10
...I tried flow tables at various points. No positive difference.
I came across a few interesting discoveries along this journey.
First, flow tables didn't help much at all. If anything, it seemed that online speed tests seemed to peak a bit less. Maybe it's something specific to the Intel i350-T4 I used (in a Debian bare metal H770 and an OpenWRT bare metal J4005).
Second, OpenWRT in a container wasn't a pleasant experience. I had weird issues cropping up where some connections were solid and others struggled. Perhaps with enough tweaking and coaxing it could be made to work smoothly. I found that a VM ate 2-2.5% CPU full-time on a bare install and wasn't easy on the C-states so I didn't chase that one further.
Third, and this is very obscure and likely specific to the ASUS H770 or perhaps my combination of hardware or perhaps even the linux kernel I ran... if the built-in Realtek NIC was enabled in the BIOS but was NOT activated (via a systemd-networkd .network file), having another network card installed and activated caused the system to spend 50% of the time in C3. By "activated", I mean even something as simple as a [Match]name=X with the rest being empty. I tried an i210, i340 and i350. When using the i350-T4, I noticed that a corresponding SMBUS item in powertop also disappeared after I'd disabled the onboard NIC and moved the card to the second PCIEx1 slot. Sometimes it seems like ASUS has some gremlins running around on the PCIE bus.
I followed your build and bought the same motherboard with a i3-13100 cpu.
I have one issue that I can't resolve and I don't know where / what to look for.
I have installed ubuntu 22.04 and tried with 23.04 but the issue is still the same :
Whenever I tried to ping http://www.google.com I have an issue AS SOON AS I remove my keyboard and mouse:
- either "ping sendmsg no buffer space available" with drivers r8168
- or "pcie link is down" with drivers r8125
I have removed every power management option I could find.
I tried to plug in another usb device.
Any clues ?
- Check output of "dmesg" for any associated events.
- See if it happens when booting via the 22.04/23.04 LiveCD or if it's only post-install.
- Try Ubuntu 23.10 (I *think* the release version shipped with the kernel that disabled ASPM on the RTL8125) - either LiveCD or install depending on results of #1.
- Try a different set of USB ports, do 1 at a time to narrow down whether it's keyboard or mouse (or both), try a different brand keyboard/mouse to see if it makes a difference.
- Unplug/replug the network cable to see whether the network comes back up or if it's down for good.
- Disable "F1 for error" in the BIOS and try booting to the OS without keyboard/mouse plugged in, then see what happens when it's plugged in and unplugged.
- If you have a PCIe network card around (ideally non-Realtek for this test), see if it suffers from the same issue.
Perhaps someone else who has hit the same issue will reply. This isn't a situation I'd have encountered as I ended up leaving my keyboard plugged in (eventually swapping to a wireless keyboard which didn't mind being slept by powertop). Could always be a weird issue with defective hardware.CPU: i5-12600K
PSU: Corsair RM750e
NVMe: Samsung 980 Pro
RAM: 2x16 GB DDR5
OS: Ubuntu 23.04 Server (running off USB)
I initially bought a ASRock B760M Pro RS. After tuning the BIOS and even after force-ably enabling ASPM on the Realtek card, I couldn't get lower the PC-3. My total wattage was about ~15 watts. Not terrible but this machine was for a new home server that would be 24x7 and knew it could be better. I emailed ASRock, as their BIOS does not explicitly setting PC state values, it just has a tri-state of Auto, Enabled and Disabled, on if they plan on adding support and heard nothing back. So I was done with them.
I returned the ASRock and switched to a ASUS Prime B760-M-A. I configured the BIOS and ran powertop. ASPM L1 was working on the Realtek without user changes. I was at about 11 watts. After unplugging the DP cable and USB wireless KB/mouse it dropped down to 7.2 watts. Awesome! It was able to down to PC10 and the system seems very stable. Pretty incredible how far desktop computers have come for power usage.
just did a build with an Asus Prime b760M d4 build and had exactly the same findings on my motherboard. Have contacted Asus too see if they have any feedback regarding the cpu connected pci/m2 slot. I get to C6 when having an intel I226-v in x16 slot and a samsung 970 evo in cpu m2 slot.
However my X710-da2 network card I have to run in x4 slot since if used in x16 package c-state goes only to c2/c3.
I have no issues with my i226-v nic.
My usecase was to build a low power 10 gigabit router. Currently running OPNsense, but may switch to Vyos for lower system load.
I tried with
1. intel x520-da2(board from china), which does not support aspm
2. melanox connectx4(board from china), which support aspm but only allow c3
3. randome i226 nic from china-which support aspm, but can't enable aspm
So. can you let me know exact model or where you bought your i226v-nic please?
I used this one. https://www.aliexpress.com/item/1005005929535264.html
I'm sure you've heard this before but thank you for your informative posts and time.
100% new to this all and it's a bit overwhelming to be honest, but the thought of owning a server is incredibly appealing. I approached this all exactly as I did when I started out pc building, a bunch if youtube videos, read a bunch of articles and sort of muddle my way through. Researching server builds it's immediately apparent you actually need to know what you're doing and reading your articles makes this even more starker.
What are your suggestions for a plex/jellyfin server, always on, low power, full transcoding capabilities. Folks either seem high or low on products like synology and QNap which gives me pause. Thanks once again
Thanks for the great write-up! This year I have built myself a low-powered NAS to replace my pre-built QNAP TS-351 (Intel J1800) and a Gigabyte Brix J4105. My requirements were that this new system needed to consume less power on average than both of those systems combined and have far supirior performance. With the help of your (previous) articles, the Dutch Tweakers forum, the German Hardwareluxx forum, the unRAID forum and some other sources I came up with the following:
- Intel i5-13500
- Gigabyte B760M GAMING X DDR4
- Crucial Pro CP2K16G4DFRA32A
- be quiet! Pure Power 12 M 550W
- 1x Toshiba MD04ACA50D 5TB (from my NAS)
- 2x Toshiba MG07ACA14TE 14TB (from my NAS)
- Crucial P1 1TB (NVMe)
- Samsung 980 1TB (NVMe)
- Crucial BX500 1TB (backup connected through USB)
- Transcend SSD230S 2TB (SATA SSD)
- Philips OEM USB2.0 drive (boot drive)
With this setup I currently run almost 50 Docker containers with various applications and databases and I can reach 17W from the wall at idle. Everything spun down and no services accessed, except SSH. Which I'm pretty pleased with. Package C8 can be reached, especially when most applications aren't doing much or when I stop them. When I stop everything I can reach 11W at the lowest on unRAID.
Another thing I (and several others) have noticed on Intel 600/700 was that using USB2.0 Serial devices like Zigbee or Z-Wave devices increased power consumption by a lot. Something like 5-7W. I currently use ser2net on a Pi to circumvent this. I reached out to Gigabyte and Intel but both denied that this was an issue.
I also utilize E-cores for most apps as this saved me 1-2W on average. Some goes for system processes which I tend to move to those cores with taskset. Which seems to go over pretty good.
Regarding the Realtek NIC, I recently tried the 'native' Realtek driver that's available in the apps store but that disabled L1 completely for me. Resulting in an additional 4W. Reverting to the kernel one and forcing L1 with: `echo 1 > /sys/bus/pci/devices/0000\:04\:00.0/link/l1_aspm` works.
If you have any questions, you can always reach out. Have a great new years <3!
/sys/bus/pci/devices/$DEVICELOC/link/l1_aspmsetting - thanks for this. Just tried it with the RTL8125 on my MSI board and it works great - much easier to just set this at boot instead of building a custom kernel. Unfortunately the RTL8168 on the older Gigabyte H110N here doesn't seem to have that sysfs setting exposed so it will continue getting the custom kernel treatment until I get the chance to swap in an Intel i210 (which despite being 1Gbit is now slightly more expensive than the 2.5Gbit Intel i225 on AliExpress).How is a stability of this build so far? I’m thinking of getting same cpu mobo combo but i’m worried it will be unstable at iddle, which will defeat my purpose of retiring my old xeon system.
Regards,
Wojtek
My setup:
I5-12500
Asrock B660M Steel Legend
64GB DDR4-3200 Corsair LPX
2xNVME drives (1 SK Hynix Gold P31, 1 TeamGroup)
ASM1064 PCI-Express 3x1 to 4 SATA adapter"
Realtek 2.5G NIC
3x120mm Fans.
Proxmox 8 w/ Linux 6.5.11 kernel. Powersave governor enabled.
I tried to strip everything down to the basics and removed all storage and other devices. I disabled onboard audio, realtek nic, and the ASM1062 SATA controller. Booting from a USB-Stick and running Powertop, it was ~50% C2 and ~50% C3. Never above. I confirmed that all devices supported ASPM using LSPCI and enabled every ASPM power related setting I could find in the bios. I also looked for sneaky overclocking settings but didn't find any enabled. In this config, the power usage was ~20W. Adding the ASM1064 SATA controller and the NVME drives didn't make a significant difference. I've run powertop --auto-tune each time with no appreciable affect.
I then added an Nvidia 1660 Super GPU which I pass through to a lightweight Linux VM. I then run the nvidia drivers with persistence mode and nvidia-smi reports that it's using ~1 Watts. This saves ~10-20W.
Adding ~8 HDD (combo of Western Digital Reds and Seagate Exo drives), the machine idles at ~100W and spends 80% of time in C2.
I then start my main VM and passthrough the SATA controllers. The power usage increases by 30W to 130W and stays there. Powertop on the host shows the package never entering any c-states. I don't have any drive spindown configured.
Not sure if I'm asking something, just sharing my experience. Even if it didn't make a big difference, I certainly learned a few things.
I'm thinking that I may migrate from the VM to a Linux LXC container on the host. I'm wondering if the VM is somehow affecting power management. Thanks again for the very detailed and interesting writeup!
Corsair SFX SF450 Platinum
ASRock Z690-ITX
Corsair DDR4 2*16GB 3200 MHz
2 Samsung NVMe 980 Pro 1TB on board miniPCIe (ZFS Mirror)
1 Samsung EVO 870 2TB on board SATA (ext4)
I5-12400 stepping H0
Realtek 2.5G disabled
1 Noctua Fan on CPU (92mm)
Proxmox 8.1 (1 Docker LXC running with plex)
No Screen attached, no keyboard, no mouse
BIOS loaded with ASRock default parameter + Audio/Wifi disabled, ASPM enabled everywhere
Idle Consumption at the wall = 18W
Powertop says | Pkg C2 28%, C3 64% | Core CPU C7 97%
Anyway, I enabled everything in ASPM page of my motherboard (Asus Pro WS W680-ACE IPMI), the only thing that I noticed that it reset to Auto every time is the Native Aspm (when Enabled it should add OS ASPM support) but every time I enter the BIOS I see it set on Auto. DO you have any clue?
When I run this command, this is the actual status of the devices:
As to the BIOS, my guess is that "Native ASPM" Auto/Enabled probably result in the same thing anyway. You could try setting "Native ASPM" to Disabled to try and force your BIOS settings on the OS, then see whether "lspci" reports an improvement on any of 8 entries that currently say "ASPM Disabled" - however you should probably make sure you have external backups just in case the kernel has intentionally disabled it on your system for reasons pertaining to data loss. I'm not sure what your ASPEED AST1150 bridge runs, but since ASPM seems to be disabled on it, I wouldn't be surprised if any devices downstream from it might be disabled too.
When troubleshooting you may find it useful to change 1 BIOS setting at a time between rebooting/testing. If you can't get PowerTOP to tell you anything (even via something like a Ubuntu Live DVD), your next best bet is probably going to be to just use a Kill A Watt device to measure the impact of your changes.
What do you think of the board: ASRock PG Riptide Intel Z690 So. 1700 Dual Channel DDR4 ATX Retail
Since I would have 8 SATA ports, I wouldn't need another PCIe card (until further notice). Plus the i5 12400F with existing HDD'S and SSDs
In my office computer with MSI mainboard I don't have any of the C-State, energy saving modes or other settings as mentioned here. Is this due to MSI or the board itself? It is a B450M PRO-VDH MAX (MS-7A38).
Thanks for any help and any commThank you for the excellent article.
What do you think about the board: ASRock PG Riptide Intel Z690 So. 1700 Dual Channel DDR4 ATX Retail
Since I would have 8 SATA ports, I wouldn't need another PCIe card (until further notice). Plus the i5 12400F with existing HDDs and SSDs
In my office computer with MSI mainboard I don't have any of the C-State, energy saving modes or other settings as mentioned here. Is this due to MSI or the board itself? It is a B450M PRO-VDH MAX (MS-7A38).
Thanks for any help and grateful for comments :)
Not sure on the B450M motherboard you mentioned, though it's an AMD motherboard and I only have a couple B550 boards so not a lot of experience with them. You might have a really basic toggle called "Global C-State Control" although you may have to dig through all the menu items to find it. Depending on the CPU, if you're using Linux, newer kernels in the 6.x line support different amd_pstate scaling drivers which may have a positive overall power benefit.
Now a colleague has bought a mini PC and installed Unraid. This with an m.2 to SATA adapter and therefore has 6 SATA ports. This would probably also be available with 2x m.2, so that 2 Ryzer cards could be installed.
https://www.amazon.de/gp/product/B0BCVCWWF3/ https://www.amazon.de/gp/product/B0BWYXLNFT/
Consumption without any settings with 2 docks and 2x VM is approx. 9W in idle mode. 5 HDDs are connected.
The idea is that there is a mobile CPU behind it and you can find something like that. Do you have any experience? The results look good and the performance should be sufficient.
I'd expect CPU performance to be completely fine for most tasks.
- The Mini PC has its own power supply and the HDDs are supplied via a 2nd Pico PSU with 160W. He has an empty NAS enclosure, but the two fans alone consume an additional 11W, so he'll take another look at that.
My idea was to open the Mini PC and install everything, including the HDD, in my ATX case. 1 or 2 Nactua fans, turned down considerably and then use the power supply with an existing ATX power supply, in addition to the Pico PSU for the Mini PC.
Hardware:
* CPU Alder Lake N6005
* Samsung 980 1TB
* 32 GB SO-DIMM
* 1 Gb/s network
Software
* Proxmox 8
* LXC Home-Assistant
* LXC Plex (I915 hardware transcoding)
* LXC dokuwiki
* LXC fileserve (smbd,filebrowser,vsftpd)
* LXC Syncthing
* LXC mosquitto
* LXC heimdall
* LXC gotify
* LXC rtsptoweb
* LXC esphome
etc..
RUNNING 24/7
Consumption measured at the wall (mostly idle): 7 watts
=== I also have a home build 'pseudo NAS' based on AsRock Z690 ===
* CPU I5-12400
* 2 NVMe 1TB
* 8 hard disks ZFS Raidz2
* Proxmox 8
* 2.5 Gb/s network to my Desktop PC
Consumption measured at the wall (mostly idle): 70 watts
RUNNING ON-DEMAND
=== Switch 8 ports ===
Consumption : 8 watts
=== my current experiment ===
For a home usage, I do not to run my 'pseudo NAS' 24/7 but only on request
I have installed debian wakeonlan on the NUC11, then
When needed (either on schedule or manuel request) I can run
* wakeonlan [MAC-ADDRESS-Z690] to wakeup the NAS
* systemctl suspend [PSEUDO-NAS-Z7690] to put the NAS in sleep mode
All this work pretty well
I am working on a graphical interface in Home-Assistant which will also monitor the consumption
This a the best compromise I have found: NAS, low consumption, home automation)
Idle power: ~5.3 watts
Hardware:
* ASUS PRIME H610I-PLUS D4
* Intel Core i3-12100
* Crucial RAM 32GB DDR4 2666 MHz CL19 CT32G4DFD8266
* SAMSUNG 980 PRO SSD 2TB NVMe
* PicoPSU-150-XT
* Noctua NH-L9i-17xx, Low-Profile CPU Cooler
* Noctua NF-A8 PWM, Case Fan
Software:
* BIOS 3010
* Ubuntu 22.04.3 Server (running from a USB thumb drive)
BIOS Settings:
* EZ System Tuning set to: “Power Saving” (this automagically set all the needed BIOS settings)
* PL1/PL2 set to 35/69 watts. (because of tight enclosure and the low power pico-psu)
Software Settings (set from the attached TV console display)
* powertop --auto-tune
* setterm -blank 1
Measured at the wall with a kill-a-watt. The reading mostly hangs out between 5.1 and 5.5 watts. The power measurement is taken once the console screen blanks. Package C-State are gathered through ssh. The processor spends most of the time in package C-state C10 (~90%).
Some benefits to this configuration:
* Very nice idle power
* Simple BIOS configuration.
* PCIe 4.0 x16 slot for potential upgrades/expansion (however, using it looks like it might mess up the low idle power)
Some drawbacks to this configuration:
* 1GbE vs 2.5GbE
* The picoPSU has a 4 pin power connector, the board wants an 8 pin power connector (internet research indicates this is OK for low power situations)
* Single M.2 slot. PCIe 3.0 x4 mode
I had wanted 2.5GbE. When I hit critical mass in the house for 2.5GbE, I’ll probably play around with a 2.5GbE card in the PCIe 4.0 x16 slot.
Other Info:
* The magic “Power Saving” BIOS setting didn’t turn on “Native ASPM”. However, turning it on didn’t make a difference.
* Disabling the WIFI/Bluetooth module in the BIOS didn’t make a difference.
OS: Unraid on USB
PSU: RM850x (2021) as it is very efficient as low loads.
Disks: added 2x12TB WD Red Plus NAS Drives alongside the NVMe
RAM: 1x32GB 3400MHz DDR4 (salavaged from current PC)
Fans: Intel stock CPU fan + case fans from the Fractal Node 304 case at low speed.
My idle wattage measured from my UPS is ~21W, with Linux ISOs seeding on one HDD and the other drive in standby mode. They are clearly adding a lot of wattage to the build. I set the parity drive to only spin up when syncing nvme cache to data drive once a day (at least this is how I plan for it to function...), and the CPU is plenty fast for watching Creative Commons Licensed films. At any rate, 21W is nice for my first seedbox :D
This PSU Efficiency spreadsheet should be useful for people here! Data was taken from cybernetics:
https://docs.google.com/spreadsheets/d/1TnPx1h-nUKgq3MFzwl-OOIsuX_JSIurIq3JkFZVMUas
My ethernet being plugged in is preventing my package C states from dropping below C3. When I unplug them, I get a drip of about 4W.
Curious if you had this as well.
I’m on Ubuntu 24.04.1, the audio driver is r8169, and the board has a Realtek RTL8111/8168/8211/8411 controller.
I was able to get the asmedia 1166 to run on the pcie x16 slot and use m2 slot connected to cpu and get to c8.
Had to mod the Asus bios to get access to root port settings. Disabled Multi-VC on root port 1 and can now use the x16 slot and I am getting down to c8 cpu package state. I get to c8 when using m2 slot connected to cpu at the same time aswell.
Simplified steps:
Desoldred BIOS from motherboard
Dump bios with an ch341 3.3v programmer
modded BIOS with opensource UEFI-Editor and "unhidden" root port settings.
Flashed BIOS
resolder back.
My motherboard is an ASUS PRIME B760M-A D4, but it should be the same on Prime H770-Plus D4 .
Will have to thank Intel support for suggesting disabling Multi-VC, wouldn't have figured out that myself.
I gave it a try on an ASUS P9DWS Motherboard but unfortunately no matter what i did (even after Patching ACPI FADT Tables, Patching Kernel to disable Quirks or Patching BIOS Settings using the below Method), it just would not work. I managed to undervolt the CPU by 90 mV though, which according to Turbostat seemed to save quite a bit of Power with the conservative (and potentially ondemand) CPU Governor.
If interested, the Procedure is very roughly described here. You basically disassemble the BIOS into a Text-File showing all Menus & Settings, find the Desired Setting, then from the UEFI Shell with setup_var.efi you set the Value. Easier to write all of this in a *.nsh (UEFI) Script so that you remember what you did / can share with others / easier to reapply if you change something from the BIOS Screen afterwards:
https://github.com/luckylinux/aspm-troubleshooting?tab=readme-ov-file#patching-bios-settings
CPU: i5-14500
MB: Asus Z790-P D4 (Got this one as a customers return for the same price as the H770-P D4, and as you said it has an extra PCIe 4.0 x4)
RAM: 4x 8Gb (no XMP) => will be replaced by 2x 32Gb
NVMe: Sabrent Rocket 1TB PCIe 3.0
PSU: Seasonic Focus GX-550
This was tested on TrueNas Scale 23.10.2 and Ubuntu Server 23.10. For both of them, I grabbed the Realtek driver
A few observations:
Yes I am sure. When I connected my Logitech MX Keys usb2.0 dongle on the motherboard, the power consumption on the shelly went from 10.5 to 15-16W. If I remember correctly, it was messing with CPU C-states (i.e. no longer going into C6, C8).
I have only tested with USB2.0 devices on the ports attached to the motherboard (on the rear I/O). USB2.0 devices weren't even recognized in non USB2.0 ports.
My theory is BIOS and/or drivers for the USB controller. Since I'm not using any kind of USB in normal operation, I didn't investigate further. I'm now back on TrueNas and it's stuck with powertop 2.14 which doesn't support my CPU so C-state reporting is broken.
For info, I'm running BIOS version 1611 and Intel ME 16.1.30.2307v4.
As for the other tests:
Congratulations on the well-founded and time-consuming article. The best source I could find here on the net on the subject, especially regarding the technical background. I've jumped on the bandwagon and will report back ;-)
One short question remains: Is there an exact specification of which Kingston HyperX memory was used? What role does RAM play in power consumption?
Thanks again and best regards,
Michael
The question remains as to which hard disks enable C10. There really isn't much to be found on the net. Do you have any experience with 3.5" Seagate Exos disks? The Toshibas seem to work. Thank you
Is it lottery which stepping of 12400 I will get when buying one from retail shops? I heard C0 stepping consumes more at idle than H0 stepping.
Also wanted to ask, if 12600 could be a good alternative?
I am considering 12600 since it has a more powerful iGPU than 12400. Both CPUs are 6P cores +0E cores.
Do you know if 12600 also has different steppings?
Your article and comments are a real treasure. Thanks to everyone who has contributed so much. I would like to share my experience briefly:
ASUS Prime H770-Plus D4 + i5-12400 H0 + 2x16GB Kingston DDR4-3200 Kingston Fury Beast + Samsung 970 Evo Plus
Without keyboard and HDMI
Powertop 2.14 (--auto-tune)
Ubuntu Server 23.04 Kernel 6.2.0-20 (new, no updates):
6-7 watts (mainly C10)
Note: If HDMI is connected (+2-3 watts) and Logitech MX Bluetooth receiver +4-5 watts = 7-8 watts for headless operation)
Upgrade additionally 2xSamsung EVO 970: 7-8 watts
Upgrade additionally 4xSeagate X20 9-10 Watt (sleep mode)
Upgrade 2x14mm fan 12-13 watts (lowest level)
Just under 13 watts with 2xNVME and 4x3.5" is not a bad value (C10 at 90%).
After a kernel update to 6.2.0-39, C10 is no longer possible, the system only goes up to C3 and consumes 21 watts.
Obviously Realtek-associated. The manual setting of
setpci -s 00:1c.2 0x50.B=0x42
setpci -s 04:00.0 0x80.B=0x42
fortunately leads back to the C10 status and thus 12-13 watts again
Similar behavior with Ubuntu Server 23.10 Kernel 6.5.x 16-18 watts (mostly C3) ...
I tried Unraid (6.1.74) as a test. The system is not quite as economical, hangs at 16 watts, even after manually setting the ASPM states via setpci (see above) ... Ubuntu has a few watts less, you'll have to do some research.
In any case, building and researching was a lot of fun, the old Synology consumes many times more than the new system.
Thanks again Matt and everyone else.
I am using this build for a year now, but since the beginning the system with ASUS Prime H770 D4 + i5-12400 H0 keeps suffering from sudden power losses RM750 Corsair powered. No shutdown, just power off. Sometimes it happens after 2 weeks, sometimes after 5 weeks uptime. I really can't figure out why. It this the same behaviour you mentioned in your text ("Another issue was that rebooting between Windows/Linux sometimes caused odd issues which necessitated a full poweroff/restart") ? Does anybody have a clue?
Many thanks,
Michael
Then again, maybe someone else out there experienced the issue but actually did manage to narrow down the cause. Hopefully they chime in if so.
My ASRock B760M Pro RS/D4 struggle with 13500 c-states (maximum c3) and 20w idle power on clean proxmox.
I tested it with Arc a380 and none of recipes from internet worked, it draws 20w idle :facepalm:
Please recommend mATX motherboard for 13500,
It would be perfect if mb also will support pcie bifurcation (x8x4x4)
I have a question. Is there any difference in power consumption between the H610, B660, and B760? Also, if I connect a GPU to PCIe, will I only have an inefficient C2 state?
Log story short, I am having a problem with the first PCI slot reducing the C states to 2 with a GPU installed. Otherwise, with 2 x Lexar 1TB NVMEs and 64 GB memory, I am seeing power consumption as low as 4.5-6W with it 12600k, which is astonishing.
Im looking to build a ITX based i3-12100 nas with the asm chip. However, as i understand, the usage of the x16 pci slot Will Force the system to remain at C2.
But, Will running 8HDDs, 2ssds and one nvme (chipset) make reaching High Cstates a bit irellevant?
I Assume your wattage tests show only the asm in a non cpu connected slot. It looks like i would save roughly 20W by achieving higher cstates with my cpu? The harddrives idle capacity and thus power savnings is not connected to the C-States?
Drive power savings and C-State savings are mostly unconnected: I say mostly because certain NVMe drives, certain SSDs, and even certain SATA configurations seem to inhibit C-States. But the power savings from having an HDD physically spun down (vs spun up) should be completely independent from anything else happening in the system power-wise, including C-States.
I am a bit worried that even if I force ASPM to be enabled then it could cause some weird stability issues. I guess 1GbE cards are still the only safe choice to be sure that power management will work properly with Linux.
thanks for the great article. I use the same build and get C10 states using both the lower M2-Slots with Samsung 970 EVO. What bothers me is the temperature. The left slot is consistently getting 15 degree celsius lower temperatures. I am using BeQuiet heat sinks. I googled but did not find a clue. Did anybody observe a similar problem ?
Thanks a lot Michael
Asus Prime H770 Plus D4, I3-12100, 2x32GB Corsair Vengeance LPX 2666MHz RAM, be quiet! Pure Power 12 M (550 W), WD blue SN570 512GB NVME drive, Supermicro AOC-SG-I2 Dual Port GbE, be quiet Pure rock slim 2 CPU cooler
After forcing ASPM on the Realtek driver, which seemed to cause troubles even while it was deactivated, I can plug the WD blue into the Gen 4x4 NVME slot and the Supermicor in the Gen4x4 PCI-E slot, without the hardware package staying at C3. With Proxmox 8.2 I get around 60% time on C8 for the HW package, 98% C10 for the CPU and 96% on C7 for the Core(HW), resulting in around 8-9W power consumption, measured at the wall. All after applying all the standard BIOS power saving settings and running powertop --auto-tune, plus setting L1 ASPM on the Realtek via command line.
All I see are short spikes, where consumption goes up to 15W, just to drop back to 8W, while running powertop. So I have 2 additional slots for MVME drives or places where I can add NVME -> 6x SATA adapter cards (with ASM1166 chipset).
I also can confirm that after setting ASPM on Realtek NIC other cards don't cause C3 on the package anymore. If someone wants a cheaper option than the Supermicro, the "10Gtek dual NIC card with 82576 Intel chipset" also works fine.
Do you have an optimised build for 2024 or any hints, sugestions?
I plan a nas build for zfs (raidz2) with 6 or 8 drives + plex server.
I was looking for a tower case / motherboard for i5-14500t (plex igpu transcode) with at least ddr5 (it has some checksum error correction but not as good as ECC ) or maybe a mobo with ddr4 with ecc un-buffered (supported)
The reason I found your article in the first place is I have been experimenting with ASPM on a desktop system and found it only saved me a miserable 2 watts of power, your article indicates something isnt right with my findings and I perhaps need to do more digging, sadly hardly anyone spits out power saving numbers for specific things. Your article suggests to me the biggest gain from ASPM is that it allows the CPU to go in to a deep power saving state, so I suspect thats where my problems lie. I am also taking an interest because like you I am using desktop parts to run a storage platform which I would like to be as low power draw as possible.
Interesting also that you have drives that have such low idle power.
I brought two seagate ironwolf drives, which I regret, the idle power draw of these drives is a whopping 8w (when spinning), although when in standby they are under 1w. I then brought some 12tb WD helium drives which are under 4w idle when spinning. Similar power to the seagate when in standby.
Other issues with the two seagate drives are (a) if any command is sent to the drive, e.g. SMART query, they will spin up, which is very odd behaviour I never seen from drive before, even querying their sleep state with the seachest tools spins them up, the WD drives attached to the same ASmedia controller card dont exhibit this behaviour. Also the slower RPM spin mode which I think is idle_c state doesnt work on my two seagate drives. TrueNAS the software I am using, sends a SMART query every 5 minutes for the temperature monitor feature which is hard to turn off, and is a global on/off only. So if the seagate drives are span down it wakes them up, I ended up manually patching the code so I could blacklist the two seagate drives from temperature monitoring, and also so that the SMART health checks were skipped if the drives are in standby.
With this in mind though my power usage is horrific compared to yours, the system runs headless, 4 spindles, 3 SATA SSD and 1 NVME SSD, and at idle its about 48W, and about 34W with all spindles spun down. 3 fans are in the system,
I also have interesting observations regarding NVME.
In my systems, I have found NVME drives to consistently run much hotter than SATA SSD, and also usually hotter than active spindles as well. In a NUC, I had to resort to active cooling as the NVME was pegged at the 70C throttle limit even when idle. Like yourself I have discovered these things are a bit all over the place when it comes to power states.
I have discovered as an example in windows, ASPM seems to have absolutely no impact on any of the 3 NVME drives in the system. L1 and L0s both no impact on temperatures. I have a Samsung 980 Pro, A WD SN850X, and a PCI express Intel DC P4600 which has its own beefy heatsink.
Essentially the DC P4600 is always below 30C and doesnt get affected by ASPM mode.
The WD SN850X runs in the low to mid 40s depending on ambient and is not affected by ASPM.
I also have tested a WD SN570, and it behaves the same as the SN850X no affect with ASPM it idles at around 45C.
Finally the 980 Pro is also not affected by ASPM, however I can trigger lower power states with this drive, idles very high at about 54-60C.
So windows has hidden power settings that allow you to play with the NVME power states directly, the Samsung 980 Pro will drop by about 7-8C if in the first NVME power saving state, which whilst appreciated its still my hottest NVME drive and way hotter than my SATA SSDs which run in the 20s. Interestingly the second power saving state only drops a further 1-2C.
WD NVME drives seem to consistently not support a deeper power saving state according to various reviews and reports on the net. Luckily my WD drives dont run as hot as my Samsung drive.
I also own a 970 EVO which used to idle at about 65C, I got it down to low 40s by placing it inside a PCIe NVME adaptor with a big heatsink on it, so my experience of Samsung drives isnt great for temperatures. I have decided I am not a fan of NVME drives, they run hot for me and have very high idle power compared to SATA SSDs, yet you have appeared to crack them.
MSI and ASRock both have a z790 mitx motherboard with 3 m.2 slots... Two of which are chipset connected. That would allow you to have a m.2 to sata adapter, an nvme drive and avoid the cpu-pcie/cpu-m2 slots. Both boards are in the $250-300 range though, so the power savings/cost ratio takes a hit.
As for the CPU/Motherboard, the Intel 12th gen really starts to lose it's benefit if it's not able to spend much time in the C6-C10 states (and unfortunately there's no way to know whether you'll reach those states until you try). But generally speaking for a system that's going to be moderately loaded 24/7 I'd personally start to gravitate more towards AMD at this point in time.
I was wondering if you by any chance considered the CSM version of ASUS Prime H770-Plus D4. From what I gathered, CSM in combination with i5 like 12500 or 13500 should allow vPro Enterprise features, which in turn is supposed to bring DASH, KVM/IPMI like remote management capabilities. DASH is by far not as powerful as a full blown ASPEED AST2600 BMC solution, which usually draws additional 5-10W.
At the same time, CSM is also intended to bring enterprise like stability, which could mean fewer BIOS options for tuning C-states and so on.
Taking a quick look at the product page now, the only difference I'm seeing between it and the non-CSM model is access to ASUS Control Center Express. Tech specs page for the CSM variant is identical except for adding "1 x ACC Express Activation Key Card". Manual is identical, with no distinguishing features mentioned. I downloaded both BIOS's (1663) and the checksums were identical, though I suppose features could be flipped via flags.
I wouldn't be surprised if features/functionality/BIOS were all exactly the same, with the exception of the functionality provided by ACC Express software. But no way to know for sure except for someone to try.
The system can reach c10 without the 9600. It's not preped yet, so i didn't insert it.
What really sucks on the board is the min fan speed of 20%. And I don't know why, but my min draw is 11,5W but with the X710-DA2. I will switch the cpu cooler to a passive one. Might be another watt gained.
Just an info to others interested in the X710-DA2: no WoL at least for me. Patching that thing is PURE cancer - do it in EFI. That thing becomes HOT in active mode. You need to either cool it actively or swap the sink. I went with the latter. Turn the card with a pcie kit to stand horizontally. Put on a https://www.reichelt.de/kuehlkoerper-75-mm-alu-1-3-k-w-sk-89-75-kl-ssr-p227795.html?search=Sk+89+7 so i now also own a dremel. You need to make the card STAND on the mobo with distance spacers. Hint: efi shell only with a selfmade efi. Forget about that mobo opening it's efi.
By any chance, for the same CPU or the i3-12th gen do you know of any good m-ATX or itx boards for power such as the above?
- ASUS PRIME H610I-PLUS D4 (ITX, DDR4, but 1G Realtek ethernet might be a major dice-roll)
- ASUS PRIME H610M-A D4-CSM (mATX, DDR4, 1G Intel)
- ASUS PRIME Z790M-PLUS (mATX, DDR5, 1G Intel)
It won't come as a surprise that I really like the Intel 1G Ethernet on the last 2.To be clear, I haven't actually tried any of these: my assumption is that BIOS etc would probably be similar to the H770-PLUS D4 and that I'd be able to mirror the outcome. But I don't know for sure. The Z790M-PLUS packs 4xPCIe and 3xNVMe on it - assuming the DDR5 doesn't pose an issue, it's probably the one I'd gravitate towards. However I suspect that small chipset heatsink might need some airflow.
There could be many other suitable options, mind you, including outside of the PRIME series, and including outside of ASUS. Historically, Gigabyte was always my go-to. It just didn't work out for me this generation.
Setup:
- ASUS PRIME H610M-A D4-CSM
- i3 12100 with Intel cooler
- Samsung 970 Evo Plus 1TB as boot drive (on first M.2 slot)
- Mushkin 2x 16GB DDR4 3200
- Be quiet M12 550
- minimal Debian 12
I transfered Matt's Bios settings to the mATX Mainboard!
Measured at the wall (Fritz Dect 200) = 6,4 Watt (idle)
With a PicoPSU-90 I could reach 5,7 Watt (but much higher consumption at WOL-Standby!)
Thanks for your great work, without your Bios instructions, it would take month to get to a low power state...
My setup:
* Intel Core i5-14600K (I wanted UHD 770 with 2 engines for transcoding - Plex, etc.)
* ASUS PRIME Z790M-PLUS
* Kingston DDR5 32GB 4800 MHz (KF552C36BBE-32)
* Intel SATA SSD 240GB (firmware 400i) (I plan to start playing with NVMe in the next iteration)
* Corsair RM750x ATX 3.1 (CP-9020285-EU)
+ powertop --auto-tune (v2.15), without it the system would never go beyond Package C6.
It seems that Intel 1G onboard is actually Intel i219-V, reported as "00:1f.6 Ethernet controller: Intel Corporation Device 0dc8 (rev 11)", which causes the maximum of C8 and never reaching C10. I tried almost every possible BIOS setting, never reaching better than C8. Finally, I decided to disable onboard LAN, and I inserted one of my "random spare" LAN cards (BCM95709A0907G) which supports ASPM L1 and only then I was finally able to see that it was going into Package C10.
That BCM card is non-sense, the consumption of the setup in C8 state with onboard LAN can be as low as <9 W (something around 8.5 W, measured by Shelly Plug S), while Package C10 with BCM card is 11+ W, so it's not better than just for testing. Trying USB3 adapters caused locks in Package C3 or C6, so it's not good either.
I have tried both Fedora 41 (Custom Operating System - minimal package set) with latest kernel+packages and also Ubuntu Server 24.04 LTS (minimal install), no difference - with onboard LAN enabled, it doesn't get better than C8.
One weird thing I noticed in powertop is that E-cores never go deeper than C6, P-cores go as low as C7. However, it has no impact on package C-state, disabling all E-cores of i5-14600K still does not allow Package C10. With E-cores disabled I was able to see power as low as 7.2 W (while never reaching better than Package C8), so disabling them "saves" around ~1 W.
My previous home server was based on ASUS B85M-G with Intel Core i7-4771, the whole thing was consuming around 60-70 W while "idle".
A huge thank you for your investigation and write up of a build that can be have such a low power consumption.
I am actually also looking for mATX mainboards for a really efficient homeserver. I just have an extra caveat of building it in a passively cooled case (HDPlex H3).
Now, this makes my mainboard choice a bit hard, because - as it seems -, I have to choose between two mainboards:
Asus Prime Z790M Plus
+ Intel 1G Ethernet
- kinda small and flimsy VRM cooling
Asus TUF B760M Plus II
+ cheaper in my country by a fair bit
+ bulkier heatsink
- 2.5G Realtek Ethernet
I am currently lean towards the TUF, as another Ethernet is easier added than stronger VRM heatsink, but I wanted your opinion on how much of a show stopper the 2.5G realtek ethernet controller is.
Thanks in advance!
With that in mind, depending on the CPU you're planning to run, the VRM cooling might not matter. The H770-PLUS I used doesn't even have a VRM cooler across the top VRMs. While I added some small heatsinks to mine, they weren't really needed as the VRMs didn't get very hot to begin with.
My bigger concern with passive cooling would be the chipset heatsink because that can get extremely hot when the chipset is pushing a lot of data. The TUF GAMING B760M Plus II looks like it has the same one as the Prime Z790M Plus (just in black and rotated). Probably not much you can do here short of popping off the heatsink and doing some warranty-voiding modding though.
Putting all that aside, if you're willing to jump through the hoops necessary to get good C-States, the Realtek 2.5G isn't necessarily a show-stopper. Though I'd make sure to buy from a retailer with an easy return policy just in case it's more problematic than hoped.
I have no idea whether this was a faulty unit or a design flaw, but I wouldn't risk buying this board from a shop that doesn't offer a 30-day return policy. ASUS support was completely useless, as is the warranty in cases like this.
CPU: i7-14700
Motherboard: Asus Z790-P WIFI (2.5G LAN connected)
RAM: 96GB DDR5 (2x32GB + 2x16GB)
NVMe: Samsung 970 EVO Plus 1TB
PSU: Corsair RM750x
The power consumption was measured without a monitor.
A few observations:
---- importance of PSU ----
1) I started with a Seasonic Focus 1000w PSU and the power consumption was 14.4w. Switching to Corsair RM750x led to +4w power reduction. The RM750x has a power efficiency of ~80% at 20w, that means that my original Focus 1000w must have a bad bad power efficiency at 20w (10.1*0.8/14.4=56%)!! So, folks please consider investing in a better PSU (reference: RM750x numbers in this sheet: https://docs.google.com/spreadsheets/d/1TnPx1h-nUKgq3MFzwl-OOIsuX_JSIurIq3JkFZVMUas/edit?gid=110239702#gid=110239702)
2) powertop 2.14 does NOT support Intel 13/14Gen CPUs (it initially only showed C3 states). I had to compile the latest powertop 2.15 and that allowed me to see the C6-C10 state.
---- Problematic onboard SATA controller of ASUS Z790-P ----
3) a surprising observation is that if I attach a SSD to the onboard SATA interface, the CPU c-state only gets as far as C6 (no C8, no C10 at all). However, if I attach the same SSD to a ASM1166 PCIe-to-SATA card, I could reach C10. This seems to suggest that the onboard SATA controller of this motherboard does NOT support ASPM properly ("lspci -vv" output of the onboard SATA controller does NOT show any ASPM capability).
---- Cost of adding a GPU ----
4) adding a Nvidia GTX 1050 Ti GPU led to a whopping 16w increase at idle. Soon I realized that nvidia GPU idle watt can be reduced with an optimization "nvidia-smi --persistence-mode=1", with which the 16w becomes 8w (GPU performance mode P8). However, it's still additional 80% of my 10.1w idle when without the GPU. Probably not worth it to leave the GPU in. More research shows that the GPU itself only consumes about 3w at idle, but because of the GPU, the CPU C-states are held at C6, hence the 8w difference (with GPU vs. without).
5) power consumption increased by another 6w when I attached the GPU to the Chipset-attached PCIe slot (initially it was in the CPU-attached PCIe slot). Yes, with all optimization, the GPU adds 8+6=14w if you attach it to the chipset-attached slot of this motherboard. I noticed that C-state changed from max C6 to max C3, which probably is the source of the additional 6w.
Overall, I'm happy with the result and it's a fun experience. I'd really like to add a GPU (e.g. for photo-related tasks), but it's too expensive power-consumption-wise. Anyone has experience with GPU on low-power servers? Are there any ways to free the CPU c-state so that they can reach C8/C10? Note I'm talking about power consumption at idle (the GPU is not used for graphics output, and not connected to a monitor).
I'm surprised that AMD chipsets have fallen so far behind on power usage. I miss the old times when there were multiple good options for mini-ITX motherboards with the early AMD APUs and there was a concerted effort to have the whole package be low-power.
I just saw the new AMD X870 chipset is supposed to have a TDP of 7 W but the motherboards announced so far seem a bit overkill ("The ROG Strix X870-A Gaming WIFI comes with 16+2+2 power stages rated for up to 90A", says alktech).
Looking to upgrade my pfsense and truenas boxes with 10 GbE networking, and came across this post. Taking the advice of going with a board with an intel 1gb ethernet controller, I went with the Asrock b660m pro RS, and a pentium g7400 for both boxes. I wanted an extra full length PCIe port for some expandability in the future.
Going to try the tweaks here: https://www.reddit.com/r/ASRock/comments/1998ozl/how_to_get_higher_pkg_cstates_on_asrock/
to see if I can get some acceptable power consumption. I saw your comment about using an H610M from ASUS and will probably switch to that if I do not have much luck with these boards. Will report back as I cannot seem to find much info on if people were successful in lowering b660m power draw.
Any advice would be appreciated!
- Chinese motherboard CWWK Q670 V1, the board has 3xnvme, 8 sata, pcie5 x16 with the possibility of splitting into 2 x8 (theoretically we can put 5 nvme disks), 2x2.5Gbs
- i5 13500T
- 1 module 48GB DDR5 Crucial Pro.
- 2xSamsung evo 970 plus, 1xLexar NM790
pico power supply (I don't currently have another)
- connected lan in one port
In idle state with Proxmox running about 8-10W
Generally the parameters are nice, but in my opinion the bios is not refined, problems with ASPM in one port, only samsung evo works in it with ASPM enabled, in the rest it is ok with other disks.
The processor only goes down to the C6 state
Appreciate any feedback here!
Enabling L1 ASPM for my ASUS Prime H610i-Plus (i3-12100 CPU) with the Realtek RTL8111/8168 controller saves about 4-5W, allowing the Package C states to dip into C8. Without r8169 ASPM enabled the package C state hangs at C2/3.
You can configure a module service to have this enabled on boot as well. Working fine for me so far.
You mentioned that you chose DDR4 because you had memory lying around. If you hadn't had the DDR4 memory, what would you have used? DDR4 or DDR5? The Aus Mainboard is available with both options. Now I'm considering the DDR5 route.
If you've run out of slots and want to use a 10Gbit network card, it might be worth playing musical chairs with the CPU-connected slot to see what C-state and power consumption levels you hit with various devices attached. Recall that in my SATA card tests, moving one of my NVMe drives from a chipset-connected slot to the CPU-connected x16 slot resulted in a drop from C8 to C6 with a corresponding power increase of 1 watt. Not ideal, and no guarantee that's what you'll see with your specific mix of hardware, but it could be worth a try.
Another option might be to make use of an x1 slot if you haven't yet. The PCIe 3.0 x1 slots should hit somewhere in the rough neighborhood of 8Gbit/s or 1GB/s which doesn't seem too far off from the theoretical throughput of a 10Gbit NIC. However, to find out for sure you'd have to try it, and this motherboard unfortunately doesn't have open-ended x1 slots which means high-risk surgery to either the motherboard slot or to the card to make it fit, unless you have a case that will co-operate with a riser and prefer that route. Alternately you can stick an NVMe drive on a PCIe x1 adapter if you're okay with the bandwidth hit - not always ideal, but at least it remains faster than SATA.
- NAS
- Media Server (movies, music, ebooks, photos, etc.)
- Smart Home
- VM with Windows 11 for gaming (AAA), photo and video editing, and music production
- play with AI (chat, photo, video, etc.)
- backup server for my smartphone and laptop
Priorities by importance:
- quiet
- energy-efficient at idle
- small footprint (Mini-ITX motherboard)
- good price/performance ratio
- upgradability
This is my choice now:
- motherboard (please help here)
- Intel i5 12500
- 64GB RAM (with possibility to add another 64GB probably with mobo upgrade)
- RTX 3060 12GB (ASUS Dual GeForce RTX 3060 V2 OC Edition 12GB)
- 2x 12TB HDD with upgrade to 6x in future (they look the best priced right now in Europe. I just don't know which are the quietest. I've heard good things about WD Red Plus 12TB. Now I have 2x Seagate Ironwolf 8TB (ST8000VN0004) in Synology DS220+ and it's very loud)
- 2x 2TB NVME (RAID1 for Proxmox and VM's)
- 2x 1TB or 2TB SSD (cache)
- 2x 2TB SSD (RAID1 optional fast storage for my current projects)
- SFX PSU (I would choose whatever is most efficient, full modular and at a good price at the time)
- Jonsbo N3 chassis
What do you think about this setup?
I don't know yet how I will set this up from the software side. But it will probably be Proxmox as supervisor and the rest on top of it.
I3-12100 CPU
be quiet! Pure Rock Slim 2
ASUS Pro B660M-C D4-CSM mainboard
be quiet! Pure Power 12 M 550W
Corsair Vengeance 2 x 32GB, 3600 MHz, DDR4-RAM
With this combo you also get 7W idle, but I prefer it over the H770, because it is a business motherboard
245K
Cooler Master MWE Gold 850 V3
Ram @ 1.1v
8125D 2.5G attached and active (6.13 kernel required)
L1 and L0sL1 fully supported and enabled.
Everything on PCH/chipset, not CPU.
18.5W idle.
This board has 2 NVME and 6 SATA on the chipset. G5 PCIE16 supports bifurcation.
1. Powertop doesn't work because the intel_idle driver currently does not support arrow lake. --auto-tune has zero affect.
2. NPU requires binary firmware to idle.Potential fixes:
A. BIOS bug
B. Some setting causing higher c-states which I currently can't troubleshoot.
C. Thinking about trying a different PSU. The one I choose is the 2nd best at low idle according to Cybenetics.
D. 6.14 and 6.15 kernel are supposed to have improvements.
- Fujitsu Esprimo P957 (bought used)
- MB: Fujitsu D3502, Intel Q270, 5x SATA, 1 NVMe, 1x PCIe x16, 1x PCIe x4, 2x PCIe x1
- CPU: Intel i5-7500
- RAM: 4x 8GB DDR4-2400
- PSU: 280W, efficiency (at 230V; 10% / 20% / 50% / 100% load) : 86% / 90% / 94% / 93%
- StarTech.com 6P6G-PCIE-SATA-CARD (ASM1166) plugged into the PCIe x16 port
- flexiDOCK MB024SP-B: 4x 2.5" SAS/SATA SSD/HDD Mobile Rack for 5.25" Bay
- disks: 2x 3.5" HDD 2TB, 4x 2.5"HDD 2TB, 1x 2TB SSD, 1x 256GB NVMe (HDDs are "slow" 5400 RPM spinners)
The P957 mini-tower case has only place for 2x 3.5" disks, but with the flexiDOCK installed in the 5.25" bay you can cramp in another 4x 2.5" disks.
Although the PCIe x16 port and the SATA card both report L0s L1 ASPM capabilities, the system would not enable ASPM and I was stuck at a C3 package C-State. Without the SATA card I could reach C8. Then I found https://gist.github.com/baybal/b499fc5811a7073df0c03ab8da4be904 and which allowed me to force the PCIe port and the SATA card to enable L0s L1 ASPM and the system would reach C7.
Note that the other PCIe ports only report L1 ASPM capabilities.
Some approximate idle power consumption numbers (not sure how accurate my reader is, +-1W):
- 5W / C8: no disks except NVMe, no SATA card, no case fans
- 8W / C3: no disks except NVMe, SATA card, no case fans
- 8W / C7: all HDDs standby, SATA card, 2 case fans (force L0s L1 for SATA card/PCIe port)
- 13W C7: all HDDs idle, SATA card, 2 case fans (force L0s L1 for SATA card/PCIe port)
- 15W C3: all HDDs idle, SATA card, 2 case fans
I started off with an Asus B760M-A WIFI D4, but switched to an Asrock Z690 Extreme, I got very cheap from a friend together with an i5 12600 and a Be quiet! Dark Power Pro 11, because 8 SATA ports... and well, very cheap. But the Asrock was always at 4-7W higher than the ASUS boards, even after changing the hidden BIOS settings and I would still need a 4 Port Sata extension card for all my drives (read here: https://old.reddit.com/r/homelab/comments/1998oh8/how_to_get_higher_pkg_cstates_on_asrock/)
I found a Amazon warehouse deal for 90€ for the ASUS Prime H770-Plus D4 though, so in the end I just got that and a 6 port ASM1166 (more on that below)
My build:
ASUS Prime H770-Plus D4
Intel I5 12600
64GB Kingston FURY Beast (2x 32GB)
2x Samsung 980 Pro 1TB
3x MX500 2TB
6x 18TB HDD (1x WD181KFGX, 5x Toshiba MG09ACA18TE)
3x 140mm Fans (Fractal Define 7)
Corsair RM650
The change from the Be quiet! Dark Power Pro 11 to the Corsair RM650 lowered my consumption by around 2W at around 20W, at 50W they measured the same.
Everything detached apart from 1 NVME, proxmox in idle: 9-10W (Just couldnt get to the 7W... but somehow I also never reach C8, only C6)
Everything attached (no screen, no USB though) drives in idle: 47-50W
Everything attached (no screen, no USB), drives spun down, SSDs active, not in sleep, which will be the usual state for the server most of the time: 19-21W
This build will be used for my new media and streaming server, the SSDs (ZFS raidz1) is used for my cloud and are also used as kind of cache drives for newer "files" which will be later moved to the HDD pool (btrfs+SnapRAID). The SSDs and HDDs are using mergerfs, so for Jellyfin and certain *arr's no paths change, also only single drives need to be spun up and not the whole pool like in ZFS, if an episode or movie on one of the HDDs is being watched.
Inspired by:
https://blog.muffn.io/posts/part-3-mini-100tb-nas/
and: https://perfectmediaserver.com/
Sorry if this goes beyond the usual topics here, but I mean it's a way to save energy as well.
Some issues with ASPM I had:
Some devices for example my Intel Sparkle A310 Eco (not in use anymore) or some pcie nodes didn't want to enter L1 in Proxmox, even though I feel I set everything correctly in my BIOS, until I specifically set the ASPM policy:
echo "powersupersave" | sudo tee /sys/module/pcie_aspm/parameters/policy("powersave" worked as well, no idea what's the difference really, also didn't see a change on my meter).
You can check what's available with:
cat /sys/module/pcie_aspm/parameters/policyUnfortunately around that time I also started to get problems with my ASM1166 (I got GLOTRENDS SA3026-C 6-Port PCIe X4 SATA from Amazon).
The controller seemed to lose connection to the drives. I got some entries like this (dmesg -H):those seemed weird. But ultimately always one drive had these entries:I swapped cables, used different ports, different disks, at one point always one disk wasn't reachable anymore.
hdparm -C /dev/sdx returned I/O errors after a long waiting time and also dmesg was populated with entries like this:In some Unraid forums I read that some firmware versions of the ASM1166 didn't allow ASPM at all, while some have problems using it. Finally I had to flash a different firmware.
I used the trimmed version of the firmware from this post:
https://winraid.level1techs.com/t/latest-firmware-for-asm1064-1166-sata-controllers/98543/63
And flashed it with the silverstone tool from this site (go to File Download "Fix compatibility issue and support Intel 600 series chipset motherboard"), it contains the flash tool "RomUpdWin.exe". (It is also referenced in the initial post)
https://www.silverstonetek.com/en/product/info/expansion-cards/ECS06/
Unfortunately you need Windows for that. Although I found a tool for linux here:
https://dl.radxa.com/accessories/m2-to-hexa-sata-adapter/tools/
I just used it to read my Firmware version, which worked, but I decided to take the safer route as a few people in the thread reported it worked for them with the Windows tool.
I used this guide (it is in German, but the pictures should suffice, it is pretty straightforward)
https://forums.unraid.net/topic/141770-asm1166asm1064-flashen-mit-der-firmware-der-silverstone-ecs06-karte-sata-kontroller/
Apparently this should also work on ASM1064 cards btw.
Until now (a few hours later) the errors didn't appear, usually they came just a few minutes after I spun the drives down with hdparm -y.
I still get some error messages in dmesg -H from the Root port where the ASM1166 is connected to, but everything still works..lspci:Now I can finally start setting up all my services :)
When I calculated the parity on my Snapraid drives, I realized my dmesg put out massive amounts of the before mentioned PCIe errors. While everything seemed to be working and I would have been "ok" with some errors at boot, I couldn't tolerate this spam.
I ordered another PCIe to 6x SATA ASM1166 from a different company, but same problem. Turned out they both use the same firmware version: 221118-00-48-00
So that company Radxa is apparently selling a M.2 to 6x SATA adapter which also uses the ASM1166. I posted the link to the firmware flashing tool for Linux in my previous comment already. ( https://dl.radxa.com/accessories/m2-to-hexa-sata-adapter/tools/ ) Having a backup ASM1166 now I figured I just try flashing the ROM file ASM1166_10250005.ROM from that link, using the tool on linux.
Now the errors are gone, spindown/-up seem to work fine. And my system is even in C10 most of the time (80-85%). Here is the output of my successfull flashing process, it's really easy:
i get about 7-9W with idle, 1 NVME SSD and no SATA controller ~80-90% C10. with an additional NVME to SATA controller from aliexpress i get about 8-10W in idle but the controller is warm to the touch. still 65-75% C10 state, but the controller is clearly using unecessary power for just heating up itself.
also tried GLOTRENDS PCIe to SATA card. terrible, was idling around 18W without any drives. ditched it right away.
when adding 6 HDs power consumption is up to 50W when spinning, just like yours. still need to monitor the actual idle power draw when drives are put to sleep.
all in all ASM1166 is still a ****** IC. mindboggling that this tinkering is necessary in 2025
I love your article. It is really indepth! I actually plan on basing my next build on yours.
Quick question regarding NVMe use on your board:
I would like to use a 256Gb PM981 as boot drive on the CPU-connected M.2 and 2x 1TB PM981's in mirror for Docker Apps/VMs on the Chipset-connected M.2's.
I only have 4 HDDs so other PCIe Slots will not be used.
- -> Will this be fine regarding C-States? You mentioned to also use 3 NVMe's later but you didnt specify how you connected them [?] ...
Thanks a lot in advance!
CPU: i5-12400 (H0 stepping)
MB: B760M GAMING AC DDR4 - Available in Australia - *it matters* board options are limited here :) -
RAM: 2x16gb Kingston Fury
Storage: Samsung SSD 970 EVO Plus 250GB NVMe
WD wd40ezrz 4tb HDD
gigbyte SSD 240gb gp-gstfS31240GNTD
PSU -some 15year old Seasonic but i compared to a Corsair RM750 -the corsair used 1w less
OS:Ubuntu 24.04.2 LTS
Running on Wifi: 11w/12w - (HDD spundown) - 80-90% C10 - some stability issues
Running on Lan (the 2.5gb Realtek): 16w/17w - (HDD spundown) - 90% C3 - no stability issues noticed
summary:
i bought the motherboard with the realtek lan adapter because i wanted to eventually upgrade network switch to take advantage of the speed.
So I ran the `echo 1 > /sys/bus/pci/devices/0000\:04\:00.0/link/l1_aspm` command mentioned in comment above by alex December 31, 2023.
It throws back permission denied errors, even with sudo and root.
it must just be me not understanding how to properly run that command, so this is just a warning to anyone else:
- Don't buy the realtek 2.5gb thinking that command will work for you -
you may get stuck at c3 like me
The wifi instability really threw me for a bit, when running without montior/keyboard/mouse it would eventually become unresponsive and power usage shoots up to 23w.
but when i leave a keyboard connected it doesn't hang, my current theory is that with nothing connected it goes into a weird sleep mode and nothing can wake it up.
if you want to try and replicate my build- don't run 'powertop --auto-tune' i got to 11w without it, and running it also seems to change a setting that causes the hang.
conclusion:
As weird as it seems, i am going to stay on wifi for now.
it is lower power and my current network can't switch the 2.5gb (yet).
plus no ethernet cable means my partner can hide the nas away in garage (because the old case it is in ain't pretty)
But if someone can provide direction on properly executing that l1_aspm command, it would be much appreciated.
some of my issue may have been OS based, i was just using ubuntu for testing.
i am about to switch to HexOS/TrueNAS. I'll report back if anything changes when running that
To (maybe) make life easier, I've uploaded the script I use to automatically find the address of my Realtek card and enable ASPM L1. It can be found at the end of the write-up.
I'm back as promised with my new build:
i5 12500
32Gb DDR4 3000
ASUS Prime B760-Plus D4 (Realtek 2.5G LAN - -> Read for more on that!)
Thermalright Assassin X 120 Refined SE
be quiet! Pure Power 12 M 550W
AeroCool Cipher Case
OS (TrueNAS): 1x 256Gb Samsung PM981 NVMe
Main Data: 4x 6TB Seagate Ironwolf 7200rpm HDD
Apps/VM: 2x 512Gb Samsung PM981 NVMe
(Following: All my measurements were taken with a cheap power-meter and all drives spinning)
Before optimizing: 50-52W (cpu C10, but pkg C3)
So I checked my devices for ASPM in Shell:As expected, I found out that the 2.5G Realtek NIC has ASPM disabled. So I activated it with:Power consumption then: 46-47W (cpu C10, pkg now C6)
After that, to further improve I used:Final power consumption: 42W (cpu and pkg now both c10!)
Last little tip for everyone using TrueNAS like myself...
To make your changes permanent/on system startup:**********
I have not tried spin down on the HDDs but I will in the next days and maybe write a little update. So far I'm very happy! Considering the HDDs are rated for 7.2W in idle (4*7.2W = 28.8W) means that the rest of the system only draws 13.2W of power in idle!
All drives run very cool. So I don't have any complaints about the CPU connected M.2 Slot.
With some more fiddling with truenas, I was able to get the idle power consumtion down to 36-37w with all drives spinning.
I mainly had to change the system dataset to the ssd-pool instead of the hdd-pool, set the smart-service power mode from "never" to "standby" and migrate all my apps that were still on the hdd-pool to the ssd-pool too.
- -> Most of this comes from my old truenas config, where I didnt have a ssd-pool yet.
Regarding spin-down: With standby-mode set to 127 (Max power consumption with spindown) I was able to get the system down to 10.5W. Very impressive!
All in all, I just wanna say thanks again for your blog! While I also read alot on the unraid forum, truenas forum and reddit, your blog helped me to understand the importance of chipsets and pci-lanes aswell as give me rough route for the hardware.
I love your article and want to build a server with an intel platform now. Im planning to go with the intel i5-13500 or i5-13500t as they are roughly the same price as the 12400 and have a higher core count. Also I think the P&E-core problems on Proxmox are fixed now.
When it comes to the board it is quite hard to find used or new boards with the H770/Z790 chipset with DDR4. Usually they are even more expensive on the used market as DDR5 boards and also really hard to find.
What is your opinion when it comes to power efficiency with DDR5 - especially on the idle power consumption? Is DDR5 better or worse?`Do you have any other recommendations?
Many thanks in advance!
I was able to achieve 10W idle on the following:
System:
- Processor: Intel 14600k
- Motherboard: ASUS Prime B760M-A AX (RTL8125 (2.5GbE))
- Storage: 4TB Crucial P3 Plus NVME
- RAM: 128GB DDR5
- PSU: Cooler Master MWE Gold 850 V3 ATX 3.1
- Case: Thundcase 2U MATX (too tight!)
Software:
- Proxmox 8.4
- Linux Kernel 6.8
- Powertop 2.15 (manually built):
- Realtek r8169 (in-tree)
Since the r8169 realtek driver doesn't have APSM enabled by default, you'll need to enable it via:
> sh -c "echo 1 > /sys/bus/pci/devices/0000:04:00.0/link/l1_aspm"
I ran into an issue that took me some time to figure out.
When using the Linux 6.8 kernel with the in-tree r8169 driver, everything works and I reach about C8 and full bandwidth. When I updated the kernel to 6.14 kernel with the in-tree r8169 I achieved the same power consumption C8 states BUT the NIC performance tanked:
From about 1 Gb/s to around 50Mb/s with iperf.
Interestingly enough, when I switched to the out-of-tree R8125 driver: https://blog.kumo.dev/2022/12/07/realtek_drivers_proxmox.html
I experienced the same degraded NIC performance on both Linux kernel 6.8 and 6.14. So I suspect that this issue may be how the 6.14 in-tree driver (r8169) and out-of-tree R8125 driver fail to exit high C-States.
I'll be sticking to kernel 6.8 on proxmox 8.4 with the in-tree r8169 for now since I can achieve 10W idle states.
I tested with an i7-11700K and an i5-11400 and they both display the same behavior.
I tested the same motherboard with an i7-10700 and it idles at C8 and 17~20W with the same PCIe card inserted.
And the motherboard (an ASUS PRIME Z590M-PLUS) makes a lot more ASPM options available when using the i7-10700.
Hi Matt,
Thank you so much for your amazing article.
What are your thoughts on Efficiency cores? In particular I'm thinking about i5 12400 vs i5 13400.
When also aiming for a very low idle power consumption, do the E cores of the CPU with a big.LITTLE architecture provide any benefits? In particular would it be possible to have an even lower power consumption with those E cores or are there any disadvantages to this?
=> It seems like it possible to assign specific cores in Proxmox to a VM / LXC container. By that it might be possible to assign the reverse proxy & other small 24/7 workloads to the efficiency cores and on demand workloads to the P cores.
Thank you very much in advance!
Before I continue, I'll suggest reading through this: https://chipsandcheese.com/p/alder-lakes-power-efficiency-a-complicated-picture
I didn't test power consumption when loading *just* the E-cores, but will note that they run at pretty high frequencies by default - when limiting the voltage to 1.2v, a single-core load resulted in the P-cores at 5.3Ghz and E-Cores at 4.2Ghz, which, if the aforementioned article is accurate, is well out of the efficiency range for that E-core.
Just placing a 1-core load on the CPU brought power consumption from the ~8-9 watt C8-C10 idle state up to 60 watts (2-core load 77 watts, 3-core load 91 watts) at those frequencies. Maybe pinning a single-core load to an E-core (instead of letting it sit on the P-core) would result in notably lower total power consumption. I don't know.
I will say that I've found the E-cores to be a bit of a nightmare overall. I benchmarked tasks that are *much* faster on the P-cores, but ended up scheduled on the E-cores by default (which would have resulted in the total task set taking more days to finish). Other tasks do pretty well on the E-cores. Ultimately I found that I had to benchmark tasks and then write a script to assign tasks to cores. If I go long enough without being able to make use of 32 threads again, I'll probably just end up disabling the E-cores.
Since you're thinking of manually assigning to VMs or containers, my pain points probably won't impact you as much. Maybe someone else has tested total consumption with just an E-core pegged and can shine some light here though.
- MB: MSI B760M-A WiFi DDR5
- RAM: Crucial DDR5 4800 32GB
- CPU: i3-13100 (+ BOX cooler)
- SSD: Lexar NM790 1TB NVMe
- PSU: ThermalTake ToughPower SFX 450W
After not so long BIOS tweaking (enabling native ASPM and A0sA1 for PCI ports), installing Ubuntu Server 24.03.3, powertop --auto-tune and force-enabling ASPM for Realtek, I get just below 10W (lowest 9.6W, but jumping to 11W from time to time) with just Ethernet cable connected and powertop running via ssh, with over 90% in C10.
So far so good, but I would love to get down to 7W, I just don't know what else is there to be tweaked. My 2 suspects are the PSU (efficiency of which at such low load I do not know or have the ability to measure) or motherboard-installed USB devices (USB hubs and "mystic light controller"), though in theory powertop enabled auto-suspend for those.
Any suggestions? (short of buying another more expensive PSU)
Some case fans are brutally inefficient - it might be worth a brief test with them either unplugged or at extremely low speeds in the BIOS.
If the RAM is using an XMP profile that juiced the voltage, you could check consumption with stock settings and voltage (1.1v I think) just to see.
Otherwise, since you're already hitting C10, if nothing in the BIOS helps, I think you're right in suspecting the PSU. If you decide you want to try that swap and need an SFX PSU, I unfortunately don't have an amazing recommendation - I once compared my Corsair SF450 SFX Platinum (which I no longer have) to my RM850x and the SFX used slightly more power which makes it a poor option if you're trying to whittle down those last couple watts.
Unfortunately using L1 instead of L0sL1 was already tried, and all fans short of Box cooler one were disconnected (and briefly unplugging that one shaved off just 0.1~0.2W). As for the RAM, all profiles use 1.1V, and switching to lowest-freq profile (4000MHz) changed nothing.
USB settings allow just disabling individual ports, and they're really badly mapped to physical ones, which already resulted in having to reset BIOS after accidentally disabling all of them (I can see why you're not a fan of MSI BIOS...). I forgot to mention that I also disabled the onboard WiFi and HD audio.
I also thought that RC6 might be to blame, but unfortunately I do not have a related setting in BIOS, neither does powertop display RC6 time for me. Checking manually in filesystem entries though suggests RC6 is enabled.
Since I'm still in the return window, I think I might try different PSU and/or MB; SFX supplies are indeed scarce, however SF750 is now on decent sale here and according to Cybernetics database just 1 pp worse at 2% load than RM850x.
I'm not sure if any of the motherboard components might be causing the extra consumption, nobody in the comments had this exact model.
I have one more question: do you think my SSD reporting "L1SubCtl1: PCI-PM_L1.2- PCI-PM_L1.1- ASPM_L1.2- ASPM_L1.1-" with lspci (both on CPU and chipset slots) is something to look into (and possibly fixable), given that I already reach C10? (I'll add that while this doesn't differ between CPU/chipset ports, with SSD in CPU slot max I reached is C3, so no same luck some ppl in the comments had. I also tried SATA-connected Crucial mx500, and it resulted in the same consumption as NVMe in chipset slot).
Thanks to you, I was able to do an i3 13100 with 24TB full ssd (nvme+sata) which runs now at 9w idle !
Fun fact with the 13100 : powertop only show C1 C2 and C3 but they are in fact C3-C6-C10, thanks to intel's C-states declaration in linux kernel. That gave me headdaches for nothing as I already were hitting C10
- MB: ASUS TUF GAMING B760M-PLUS WIFI II
- RAM: Corsair Vengeance DDR5 32 Go (2 x 16 Go) 4800 MHz
- CPU: i3-13100 (+ stock cooler/fan)
- SSDs M.2: Samsung SSD 990 EVO Plus M.2 4To (x3)
- SSDs SATA : Samsung SSD 870 EVO 4To (x4)
- PSU: ThermalTake ToughPower SFX 450W
- Jonsbo N4 with Noctua NF-S12A instead of stock fan
Running OMV, disabled all unused built-in peripherals (except the front usb)
My only complaintwith this config is about the mb's intel 2.5gb. It draw a LOT of power no matter what I tried. I'm now running on wifi at the same speed, for 5-7w less than ethernet.
03:00.0 Ethernet controller: Realtek Semiconductor Co., Ltd. RTL8125 2.5GbE Controller (rev 05)
After some experiences, you can actually force "LnkCtl: ASPM L1 Enabled", even though the Controller only reports Capability "ASPM L0s L1" with the following command: setpci -s 03:00.0 0x80.W=0002:0003
This immediately dropped power consumption measured at the wall from 14,5 Watt to 9,5 Watt. System reaches C10. However, currently I'm only testing the board with a live ubuntu from stick, no nvme, sdd attached, so I can't tell yet if it's production stable or not.
- ASUS Prime H770-PLUS (DDR4 not available)
- Intel Core i5-14400T
- G.Skill Ripjaws S5 96GB DDR5
- Seasonic Prime Fanless TX-700
- 2 x Samsung SSD 990 EVO Plus 1TB (mirrored)
- 6 x WD Red Pro 16TB (Z1) connected to an SST-ECS06
Initially, I installed TrueNAS but was unable to achieve C10 states. I have now switched to Proxmox and am achieving C10 states after running RTL8125-ASPM.sh. Nevertheless, I only achieve 12W when idle (ECS06 disconnected and HDDs unpowered). I would have expected to achieve even lower values, but I don't know what else I could improve or try. Do you have any ideas?
Power is measured using a Fritz! Smart Energy 200. This has a measurement accuracy of +/- 2% in the range above 5 watts.
If you don't have any luck, I'd normally grab an old SATA SSD or 2.5" HDD, enable Aggressive LPM support in the BIOS (Advanced/PCH section), try installing Ubuntu to a barebones config, get it into C10 again and see what power consumption you're getting - basically getting into component-swap territory. An alternate possibility if you already happen to have a thermal camera might be to let the system run a bit at idle with 0 airflow and see which component is warmest.
I have most of the USB ports disabled in BIOS, only two are left for keyboard and mouse, but I disconnect them as long as I don't need them.
For testing purposes, I first removed one SSD and then the other. However, I did not notice any significant change in power consumption.
I also tested operation with only one RAM module without XMP enabled. The power consumption changed only insignificantly. Those modules run with 1.1 V with XMP enabled so I didn't really expect seeing changes, but it was worth the try.
Nevertheless, I was able to achieve ~10 W because I hadn't set the fan curve for the case fans yet. Now they are turned off most of the time.
My next steps are to test a different PSU and verify the power measurement. I hope to find time for this next week and will report back as soon as I have new findings.
PS: One thing I noticed: I tried disabling the network controller in the BIOS. This had no effect on power consumption at all, which surprised me a bit.
PSS: C-states look very good in powertop, Pkg is around 90% in C10, the cores are between 96-99% C7 and the iGPU is 100% at RC6.
Following this guide I coud reach a low idle power consumption (without HDD): 7W idle (0 VMs & 0 LXCs) and 9.5 - 11W idle with 2VMs & 7 LXCs running.
There is a new driver update available for RTL 8125BG and with that I was able to reach C10 :) ( https://www.reddit.com/r/HomeServer/comments/1otulay/realtek_25_gbit_nic_rtl8125bg_driver_update_to/ )
Barebone: Asrock DeskMini B760
CPU: Intel i5 14500T
CPU Fan: Noctua NH-L9i-17xx
Memory: DDR4 Crucial 2x16GB 3200 MHz CL22
Sata SSD: Samsung Evo 840 256GB (Boot drive)
M.2 SSD: Crucial P310 500GB
External HDD: RSHTECH USB 3.0 SATA + WD HGST Ultrastar DC HC520
Zigbee Device: Sonoff Zigbee USB Dongle Plus ZBDongle-E (caused high idle power consumption more about this later) -> can be solved by switching to SMLIGHT SLZB-06M
Bluetooth Dongle: 5.3 USB Bluetooth Dongle (same issue like zigbee usb stick -> will be replaced by bluetooth proxy ESP32)
OS: Proxmox VE 9.0.11
All detailed power consumption are available here: https://www.reddit.com/r/HomeServer/comments/1otuacb/power_efficient_asrock_deskmini_b760_intel_i5/
Interesting findings:
- In Proxmox when running Docker LXC the idle power draw is increased by 3W.
Question:
- With the current setup I reach C10 Pkg (Hw) for roughly 30%. Is there a way to improve this. This is my first time playing around with powertop an any help is highly appreciated
In general I'm already very happy with this idle power consumption. If you have any further tips / recommendations, please let me know :)
HW:
Asrock DeskMini B760 supporting 2 x m.2 nvme(pcie5.0 and pcie4.0) and 2x 2.5" sata under 9mm;
-i5 13500 cpu, noctua cooler
-tdp set to 65/75W, bios default;
-installed 32GB ram, saved from the Futro S940
-128Gb Sandisk SSD and
-2TB Samsung 990 PRO.
SW: Debian Trixie 13.2
Power:
-default: I had like 8W usage. Nothing plugged in besides the NW cable(1Gb Link) and power.
-8125-dkms from https://github.com/awesometic/realtek-r8125-dkms/tree/master lowered to under 4W.
I saw Debian providing https://packages.debian.org/trixie/r8125-dkms. I might test those too. You can add non-free or just get them with wget and install them. You can try 9.0.15 from trixie or 16 from forky.
-8168 driver: I wanted to skip the install of build-tools and dkms method so I kept trying the 8168 driver:
The grub boot option pcie_aspm=force AND enabling L1 on /sys/bus/pci/devices/0000:0x:00.0/link/l1_aspm I was instantly able to reach C10; around 3.5W
Add pcie_aspm=force to the line GRUB_CMDLINE_LINUX_DEFAULT than update-grub
echo 1 > /sys/class/net/enp2s0/device/link/l1_aspm
BOTH of the above needed for r8168 driver; I might experiment with turning 1.1 and 1.2 on too
___
Also, USB doesn't really make a difference. I tried plugging in kb, mouse receiver, SONOFF zigbee...
So far I am more than satisfied.
Resources:
mattgadient.com Thank you Matt !!!
https://forums.unraid.net/topic/98070-reduce-power-consumption-with-powertop/
Update: this low powers are without any load. First I want to solve the installation from a preseed file for easy recovery,then I will continue on utilizing it as a home server: docker,homeassistant, musicassistant, zigbee2mqtt, jellyfin, qbittorrent, frigate, immich, nextcloud, duplicati; possibly incus or proxmox, but i am planning to live on plain Debian+Docker
I am also searching for a low-power LGA 1700 build.
I hope that I can also get as low as 7W.
Does anyone know a good alternative to the ASUS Prime H770-Plus?
Maybe even a little smaller. I would like to put it inside a 10" rack.
But I would like a similar idle power consumption.
thanks for the awesome article. I just finished building my new server but I am struggeling a bit with the power saving settings. Here is my setup:
- Intel i5-14600k
- ASUS Prime Z790-P
- 2 x 48 GB Crucial Pro DDR5 RAM
- 2 x Samsung 256 MZ- VLV256D NVMe SSDs (Boot Drives - ZFS Mirror) - -> plugged in the chipset connected M2 slots
- 2x 4TB Lexar NM790 NVMe SSd (Flash Pool for VMs and LXCs - ZFS Mirror) - -> plugged in the chipset connected PCIe x16 (x4) slots using NVMe to PCIe x4 Cards
- ASM1166 SATA Controller - -> plugged in the chipset connected PCIe x16 (x4) slot
- 3 x WD Red Plus 8TB HDDs connected to the ASM1166 controller card
I am using Proxmox 9.1 as OS with 2 VMs and 5 LXC containers. One of the VMs is a TrueNAS Scale VM (ASM1166 card is passed trough to this VM). Powertop is installed on the Proxmox host and the Realtec NIC script from the comments is also used. I went to the BIOS and enabled ASPM (L1).
When the HDDs are spun down my system draws about 20-25 Watts (measured at the wall) and reaches about:
C2 :5%
C3: 5%
C6: 20%
C7: 0%
C8: 20%
C10:
I am using a Corsair RM750x (2025) PSU which should be fairly power efficient according to my research.
I have deleted all VMs and LXCs and tried to switch up my NVMes. I saw something interesting. Before I connected my 2 Samsung NVMes (ZFS Mirror) to the chipset connected M2-slots and the 2 Lexar NM790 4TB NVMes to the chipset connected PCIe slots. I could only reach C8 (80%) on the barebones system. When I connected the Lexar drives to the M2-Slot (CPU) and PCIe (CPU) I could only reach C6 max. However, I then connected the Samsung NVMes to the PCIe Slots (Chiptset) and the Lexar drives to the M2-slots (Chipset) I went up to 80% C10. But thats only on the barebones system. I will now try how VMs and LXCs will perform.
I have read somewhere that Docker on LXC can rack up power consumtion by a significant amount. Until now, I spun up a LXC container with Docker for each service ending up with a lot of LXCs. Is there a better approach in regard of energy efficiency?
https://docs.google.com/spreadsheets/d/e/2PACX-1vQC_GxbbZlfinR-3roC3HvlEWPKqX94KhM6PhvFXOv4dXiqZPaFWTf_jAcd6D3z-w/pub?output=xlsx
Code written with help of ChatGPT : https://github.com/vpsh-code/mattgadient/blob/master/extract_comments.py
I just managed to build a Proxmox machine using the Intel Core Ultra 7 270K Plus that pulls remarkably low power at the wall. Checked via a physical Watt Meter, the system hits 17.5W with two SSDs and no LXC/VMs running.
Even fully loaded with three SSDs and an active Home Assistant VM (handling around 25 sensors/IoT devices via an independent local network SLZB-Ultima3 Zigbee coordinator), it comfortably idles at 18.5W, with minor 3-4 second spikes to 21W.
Not bad for a 24-core system with a 10GbE NIC! Here is exactly how I pulled those numbers down.
The Hardware Specifications
ComponentSpecification
CPU:Intel Core Ultra 7 270K Plus (92W part — draws ~4W more at idle than the 88W 265K)
CPU Cooler:Thermalright Royal Pretor 130 Ultra Black
Motherboard:Asus Prime B860M-A-CSM (Firmware: 3011)
Memory:64GB (32x2) DDR5 5600 CL46 Crucial Pro
Storage (OS/Boot):Samsung 870 EVO 250GB (EXT4, Firmware: SVT04B6Q)
Storage (LXC/VMs):WD_Black SN850X 2TB (Single ZFS drive, Firmware: 620361WD)
Storage (Backups):Lexar NM790 4TB (EXT4)
Power Supply:be quiet! Pure Power 13 M 550W (ATX 3.1 for high low-load efficiency)
Network (NIC):10G Network Card Realtek 8127 PXE (Extremely low power with correct drivers)
Case & Airflow:Lian Li O11 Air Mini (Both front fans (140mm) are set to only activate when the CPU is over 50c!)
Operating System:Proxmox 9.2.2 (Utilizing Linux Kernel 7.0)
Step 1: Taming the ASUS BIOS
Out of the box, the idle power consumption sat around 46W. After dialing in the BIOS, it dropped to 36W. Here are the crucial changes required to unlock those savings:
Tab/MenuSettingChange
Ai TweakerASUS Performance Enhancement 3.0Auto ➔ Disabled
Ai TweakerDIGI+ VRM > CPU Power Phase ControlAuto ➔ Standard
AdvancedCPU Configuration > Enhanced C-statesAuto ➔ Enabled
AdvancedCPU Configuration > CPU C-statesAuto ➔ Enabled
AdvancedCPU Configuration > Package C state LimitAuto ➔ C10
AdvancedPlatform Misc > Native ASPMDisabled ➔ Enabled
AdvancedPCH PCI Express > DMI Link ASPM ControlDisabled ➔ L1
AdvancedPCH PCI Express > ASPMDisabled ➔ L1
AdvancedPCH PCI Express > L1 SubstatesDisabled ➔ L1.1 & L1.2
AdvancedSA PCI Express > DMI ASPMDisabled ➔ ASPM L1
AdvancedSA PCI Express > ASPMDisabled ➔ L1
AdvancedSA PCI Express > L1 SubstatesDisabled ➔ L1.1 & L1.2
AdvancedThunderbolt™ > PCIE Tunneling over USB4Enabled ➔ Disabled
AdvancedOnboard Devices > HD AudioEnabled ➔ Disabled
Boot/SecuritySecure BootDisabled
Aura/LEDRGB LightingStealth Mode (All lights off)
Note: A custom fan curve was applied in the BIOS so the three front Noctua fans remain completely off unless the CPU package exceeds 50°C (which essentially never happens at idle).
Step 2: Proxmox Software & Driver Tuning
Software changes brought the CPU package power down heavily, hitting the bottom floor at 80-90% residency in C10 (Pkg%pc10), which equals about 7.5W to 8W on the CPU alone.
1. Force deep C-states via GRUB
Open your GRUB configuration file:
sudo nano /etc/default/grub
Locate the GRUB_CMDLINE_LINUX_DEFAULT line and modify it to include ASPM and C-state parameters:
GRUB_CMDLINE_LINUX_DEFAULT="quiet pcie_aspm=force cpufreq.default_governor=powersave intel.idle.max_cstate=10"
Update GRUB and restart:
sudo update-grub
systemctl reboot -i
2. Compile and install the NIC driver
The Realtek 8127 requires its specific driver compiled for the 7.0.2-6 Linux kernel to achieve low power states. Once compiled, load the r8127 module into kernel memory and run update-initramfs -u to ensure it loads automatically on every boot.
Step 3: The Secret Sauce — The "G3 Mechanical Off" State
Even after all the BIOS and software tweaks, the overall system power consumption stubbornly hovered in the 29W–35W range. No software changes seemed to fix it. The breakthrough came completely by accident.
Throughout the tuning process, applying GRUB and driver changes required constant warm reboots. A warm reboot restarts the OS, but it leaves power flowing to the motherboard's PCIe root complexes, the Management Engine, and the network PHY to maintain link states.
The Fix: Unplug the machine from the wall entirely for about 30 minutes.
This forces the system into a G3 (Mechanical Off) state. It drains all the capacitors and forces the motherboard to completely dump its cached hardware states. When plugged back in, the Asus motherboard initializes the PCIe bus from a totally clean slate. This allows the new r8127 driver and the pcie_aspm=force kernel parameter to handshake perfectly with the hardware, unlocking the ultra-low L1.2 link states that get "stuck" during warm reboots.
After that cold boot, the system landed exactly on that magical 17.5W baseline!
can you provide better instruction on how to compile the R8127 Driver. I compiled it but it doesn't get loaded.