Using the same hardware except for Motherboard/CPU, my total idle system power consumption without a video card installed (using onboard integrated graphics only) is:
- 11 watts: Intel i3-10320 on a cheap Gigabyte H470
- 27 watts: AMD Ryzen 5600G on a higher end Gigabyte B550
- 19 watts: Intel i5-12400 on a mid-range MSI B660
Not bad, right? Your A/C probably wouldn’t even notice one of these machines running 24/7 in the summer. Incidentally, this includes 2 NVMe drives and 2x16GB DDR4 memory, using an extremely efficient Corsair SF 450W Platinum power supply.
…add an AMD Radeon RX 5600XT video card though, and watch the power consumption skyrocket.
Here are some wattages with and without the Radeon 5600XT installed, with monitors plugged into either the iGPU, dGPU, or both. Power consumption is on the desktop at idle.
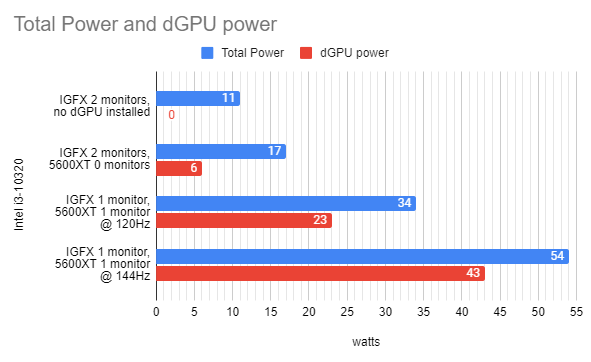
Above: Yikes! Adding the Radeon 5600XT to the system, plugging my monitor into it, and using my monitor’s native refresh rate of 144Hz bumps up the power consumption from 11 watts to 54 watts! At idle! On the desktop! The only game I’m playing is “Let’s see how much I can pay the power company this month”, though to give credit where it’s due, the AMD video card is helping me get a high score.
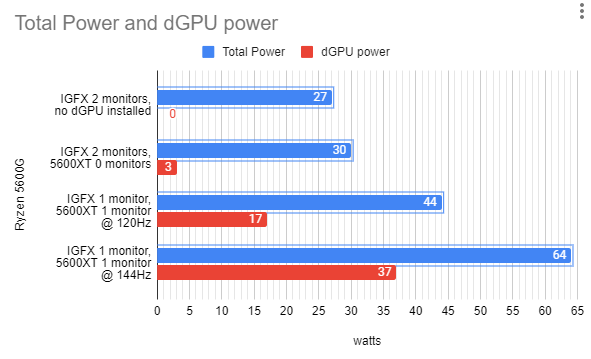
Above: If you want to warm up your room, you can either mine cryptocurrency or plug a high refresh rate monitor into your video card. Your choice.
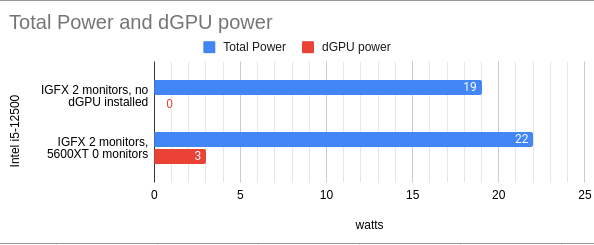
Above: The “12500″ is a typo (it should say i5-12400, though it’s the less-power-hungry H0 stepping).
Results for the above 3 systems are averaged across Windows 10, Windows 11, and Ubuntu 22.10 results. Assume +/- 2 watts on the totals depending on which OS was being used.
Some extra bits when it comes to power consumption on the 5600 XT:
- 1 monitor @ 120Hz is roughly equivalent to 2 monitors @ 60 Hz (the GPU can handle this at 1080p without jacking up the memory clock)
- 1 monitor @ 144Hz is roughly equivalent to 2 monitors @ 144 Hz (both result in the GPU memory clock ramping up to max and pulling similar power)
The AMD video cards are way too power hungry for my taste. Not only did my GPU fans routinely kick on when 2 monitors were plugged in, but this was excess heat I didn’t care to deal with in the summer.
Note that early reviews of the 5600XT listed multi-monitor idle consumption at a hefty 25-28w before BIOS updates and/or driver updates ramped up power consumption substantially, and AMD’s software still reports 25w even today. Single-monitor consumption is quite bad now too – early reviews had it at 7-8 watts and it’s now much more as you can see above, despite AMD’s software still claiming 8w. AMD cards don’t measure the power being used, so the only way to know how much power is actually being used while looking at your desktop is to measure it yourself.
The data is clear: while the 5600XT might be suitable for casual gaming, it’s a massive waste of electricity the 95% of the time I’m not gaming!
Options
In an effort to keep power consumption down, I explored as many options as I could, some of which was alluded to in the charts above. There are certainly more options, but I favor the 5 below. Feel free to skim, as these are a bit long:
OPTION 1 – The “IGFX 2 monitors, 5600XT 0 monitors” option
The most “exciting” option, this setup can be extremely fickle. But hey, when it works it does so with the video card using a meagre 3-6 W power at desktop idle instead of the 37-43 W it was using when a monitor was plugged into the card. To get this to trigger properly, I had to set the following BIOS options:
- IGFX/iGPU forced on.
- Initial Display Output: IGFX/iGPU.
- Native ASPM: Disabled. (only necessary if using Windows – note: in my case, disabled means BIOS-controlled, enabled means OS-controlled)
- PEG ASPM: L0sL1 (or L1)
Assuming your motherboard supports all these (quite a few don’t), your odds of success are reasonably good. I didn’t find #3 to be necessary using Linux (Ubuntu), but it’s 100% necessary in Windows. Ubuntu actually seemed to use 1-2 watts less if it was set to Enabled, but I suggest testing this on your motherboard to be sure.
Here’s how it works and why it’s so power efficient:
- When the Radeon RX 5600XT hasn’t been accessed for a few seconds, the L1 ASPM state triggers and the GPU essentially shuts off.
- When something tries to access the video card, it wakes up after roughly 2-6 seconds (seems to vary depending on configuration).
- After a few seconds of not being used, it goes back to sleep.
Some of the fickle aspects:
- Anything that polls the GPU will wake it up. This includes the AMD Adrenaline metrics overlay, OCCT, HWINFO, and polling stuff in /sys/kernel/debug/dri/X/ or /sys/class/drm/cardX/device/ (Linux). So if you have software running that gathers hardware info in the background, your GPU is not going to sleep, or even worse will repeatedly wake/sleep every few seconds with some corresponding stutter.
- Because it takes a few seconds for the GPU to wake up, you get a little delay of 2-6 seconds or so when starting a game up. In some configurations there’s no discernible impact beyond the extra wait, but but in others it causes enough of a delay that a prompt is triggered asking you if you want to “End Task / Force Quit” or “Wait”.
- Whether Windows 10 or Windows 11 works best varies depending on the configuration. One Intel config needed Windows 10 to work (games would immediately crash in Windows 11). My AMD config on the other hand essentially needed Windows 11 for the dedicated card to be seen as an available option.
- Some Windows programs refuse to use the GPU properly (one of the 3DMark benchmarks would always fail before attempting to run in 1 configuration).
- Windows may or may not see the Radeon 5600XT as a “High Performance” GPU option on AMD (the integrated AMD graphics is listed as both the low power and high performance option), which means you may have to manually select the GPU for each game.
- In one Windows 10 configuration, full screen tended to use the Radeon 5600 XT, but windowed and full-screen windowed modes seemed to swap the game to the integrated graphics sometimes.
- In one configuration, using Windows, the video card would get immediately woken every time it went to sleep. Because there’s a power spike for a few seconds that follows each wake up, the non-stop wake/sleep cycles actually result in worse power consumption than if the video card didn’t sleep at all.
- Navigating options in AMD Adrenaline is painfully slow, as the GPU keeps going to sleep and getting woken up each time you change to a different menu/tab, so you get to wait a few seconds every time.
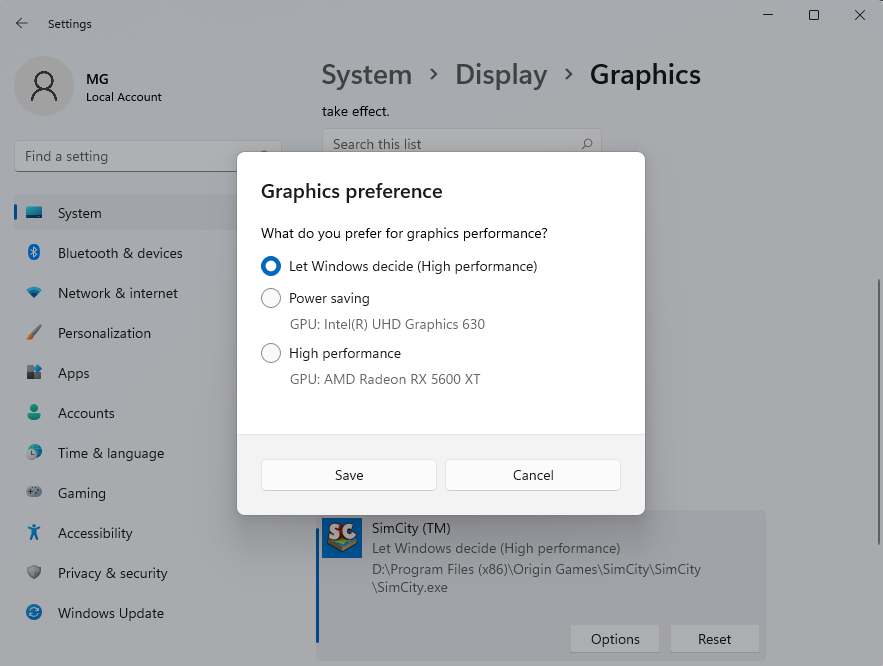
Above: Selecting a preferred GPU for SimCity in the Windows Settings app (Windows 11).
As for overall results using this method…
Ubuntu was the best behaved in my testing here. It wasn’t picky about Native ASPM, it even worked on my fickle Intel/Gigabyte motherboard (which required CSM set to enable other options), and Steam on Ubuntu was pretty consistent in pushing games to the dedicated GPU in various configurations (though Steam itself seems to run on the dedicated GPU unless you start Steam with DRI_PRIME=0 to make it run on the integrated graphics). The “Force Quit / Wait” dialog didn’t show up often when firing up a game (and clicking “Wait” solves it). Oddly, after a game was closed the system often didn’t allow the GPU to go into sleep mode (ASPM L1) until some other UI action took place on the desktop (like closing or minimizing a window), but as far as bugs go that’s a pretty tiny one and since it will resolve with normal usage it’s not one I’m overly concerned with.
Windows liked this option the least. On my AMD config, Win 10 didn’t want to use the dedicated card whereas Windows 11 with the latest updates worked well, though the graphics preference had to be selected for each game. On an Intel config, a number of games would freeze during startup in Windows 11 and essentially refuse to run, leaving Windows 10 as the only option. Thus, if using Windows, I suggest installing Windows 10 and 11 side-by-side so that you can see which one co-operates best with your configuration.
–
OPTION 2 – The “IGFX 1 monitor, 5600XT 1 monitor @ 120Hz” option
This option is pretty straightforward, is pretty common and reasonably well-supported (if you have 5+ monitors, it’s typical to drive them using multiple GPUs), and it doesn’t require much work.
The Radeon 5600 XT gets “single monitor” power draw (up to 1080p @ 120Hz), and the IGFX/iGPU handles the other monitor(s).
Pros:
- Worked well for me in Windows 11, including games reliably utilizing the Radeon 5600 XT.
- Video card doesn’t have to be “woken up” like in option #1, and thus there aren’t hangs/delays.
Cons:
- Doesn’t get the tiny power draw of option #1.
- If using unmatched refresh rates, I experienced periodic desktop flicker/anomalies in Windows.
- Limited to 120Hz at 1080p on the dedicated GPU. If anything resets the refresh rate to the max (driver install, etc), you might be sucking down extra power on the video-card-connected monitor until you notice what has happened.
- Sometimes 120Hz didn’t cut it – whether I had to use 120Hz, 119.98Hz, or 100Hz to get reduced power consumption seemed to vary.
- Ubuntu had issues I’ll mention shortly (at least on Intel, I don’t recall how the AMD Ryzen platform behaved).
Setup is straightforward. Plug 1 monitor into the video card and 1 into the motherboard. In the BIOS:
- IGFX/iGPU forced on.
- Initial Display Output: Auto or PCI-E (I didn’t test forcing IGFX/IGPU here – it may or may not work)
I mention that Ubuntu didn’t like this option on the Intel H470 platform: any attempt to change the refresh rate of a monitor killed the GNOME session, so both monitors stayed stuck at 60Hz.
On Windows, I wasn’t entirely certain as to which display adapter might by used by web browsers for hardware decode, so I set the monitor connected to the IGFX/iGPU as the primary display just in case it has an impact. In Ubuntu on Wayland, this is irrelevant (at the time of this writing) as hardware acceleration is disabled and if you force enable it you get graphical anomalies.
–
OPTION 3 – Option #2 but @ 144Hz using CRU (Windows-only)
One of the reasons refresh rates over 120Hz (at 1080p anyway) tend to cause power consumption issues is that in order to use a “blanking” time that doesn’t result in the GPU bumping up the memory clock, the pixel clock rate which corresponds to the desired “blanking” would exceed the limit of HDMI 1.4.
If that sounded like a whole lot of gobblety-gook, the short version is that there is a reason things are the way they are, we can change them to behave more like the way we want, but if your monitor is plugged in via an HDMI cable, you may run into limits here. On the other hand, if you’re using DisplayPort, you may be able to push up the frequency at higher resolutions.
The big benefit if you can get this working is that you retain a higher refresh rate (to some limit) and reliable low power consumption.
Here’s “how it worked on my monitor”. I suggest being slow and deliberate here, as you can run into a situation where the video card outputs a signal your monitor can’t read:
1 – Change both your monitors to run at a resolution that you don’t plan to tweak (ie run your monitors at 60Hz or 100Hz if you’re planning to tweak 144Hz). This is a fail-safe so that you don’t tweak/break a resolution you’re currently using.
2 – Download Custom Resolution Utility (CRU) from https://www.monitortests.com/forum/Thread-Custom-Resolution-Utility-CRU
3 – Extract files. Run CRU.exe
4 – Refer to the pictures below for the next bits (click for larger images).


- Select one of your monitors from the active list that you want to tweak.
- Select the resolution/frequency pair you want to change. In my case 1920×1080@144Hz then click “Edit”. If the resolution you’re trying to adjust isn’t listed here, it may be in the “Extension blocks” at the bottom (click corresponding “Edit” button to see).
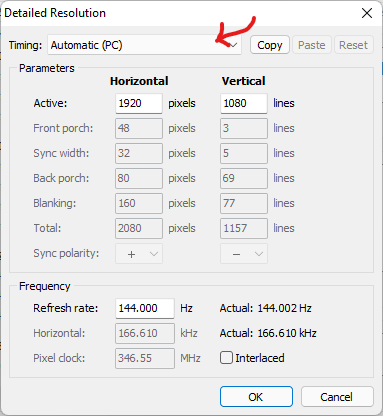
- You will be at the “Detailed Resolution” screen. Write down all the numbers somewhere for safekeeping.
-The long way of doing this is to increase the “Blanking” “lines” a little bit, apply, and test. Eventually you will reach a point where power consumption is fixed, or the monitor fails to read the signal. Or…
-The short way is to change the “Timing” dropdown from “Manual” to “Automatic (PC)” as I did in the example above. This will often plunk in settings that work (if not, you’ll have to revert to the long method anyway, probably tuning based on the original numbers you wrote down). - Hit “OK” and “OK” to save/exit.
- If you have more monitors to do, start CRU.exe again and go back to 4a. If you’ve done all the monitors you plan to adjust, continue to step 5.
5) Run restart64.exe to restart your video card drivers. Hopefully you didn’t tweak/break a refresh rate you’re currently using….
6) Try changing to the new resolution in Windows display settings. If it shows up correctly, repeat with the next monitor.
7) If it works as expected and power consumption has dropped, you’re done. If your monitor can’t read the signal, revert the change (or wait for the Windows countdown to expire and revert automatically. If you plan to tweak more in CRU, change your monitor resolution back to something else before you adjust more (ie change to 60Hz if you plan to tweak 144Hz).
–
OPTION 4 – Building on Option #3 – 2 monitors on the video card at 75-86Hz instead of 60Hz. (Windows-only)
Once comfortable with CRU, you’ll notice that you can add/delete/modify various resolutions.
For example, inside my “Extension blocks” I had resolutions available that I’ll never use, so I deleted one and created a new 1920×1080@75Hz resolution on each monitor, which allowed me to hook both monitors up to the video card while retaining low power.
Through trial and error I eventually got an 87Hz variant to work, though I had to use a blanking time that didn’t make any sense. I actually settled on 85Hz because I didn’t trust the video card to reliably operate at the max.
Keep in mind that while a FreeSync monitor will probably handle any resolution between the min/max, non-FreeSync monitors might just blackscreen on anything unsupported.
–
OPTION 5 – Skip the video card and use the integrated GPU in a Ryzen G-series.
Using the integrated graphics of the 5600G, a 3DMark TimeSpy graphics score of around 1300-1500 can be expected if you’re using typical 3200-4000Mhz memory and are willing to entertain a mild iGPU overclock.
Sure, it’s not the 5500-7500 score you’d get with a dedicated Radeon 5600XT, but it’s quicker than some bottom-end dedicated cards (GeForce 1030) and is about triple the score that the Intel UHD 630 obtains.
A couple issues worth mentioning though:
- Under heavy load, I found that screen stutter is more likely with the integrated graphics in the Ryzen 5600G compared to the integrated graphics in the Intel i3-10320 (at least in Windows).
- In Ubuntu, I found that if I used an HDMI port on my AMD/Gigabyte motherboard, the displays would not sleep (immediate wake). Using only the DP on the motherboard didn’t result in this issue, but the only manufacturer who seems to include 2xDP on AMD motherboards is ASUS in their CSM line.
Recommendations
First, you’re probably going to need a Kill-A-Watt or some other power consumption meter. Put it somewhere you can monitor it while testing so that you can see the behavior every time the video card sleeps/wakes.
Windows
If using Windows with an iGPU available, putting a monitor on each of the iGPU/dGPU really makes a lot of sense as long as you can handle the one on the GPU being at or under 1080p/120Hz. Windows 11 in particular handled this configuration well. Consider trying out CRU if your dGPU won’t drive the refresh rate you want at low power. If the power consumption is beyond what you’re willing to accept and you want to attempt the integrated-only option in Windows, make sure you use a power meter to check that you aren’t hitting the immediate-wake-after-sleep situation – not only will it use more power in the long run, but I don’t know if there are implications to the GPU sleeping/waking non-stop for hours on end.
If using Windows without an iGPU available, set monitors to the same resolution at 60Hz and slowly increase the refresh rate to see how far you can go before power usage spikes. It’s very possible you might not be able to exceed 60Hz without the use of CRU (possibly creating custom resolutions as I did to get 85Hz/87Hz).
Linux
If using Linux with an iGPU, as long as you aren’t using any software that will monitor/poll the video card, I’d suggest you go for the iGPU option first and learn how to utilize DRI_PRIME=0 and DRI_PRIME=1 environment variables to wrestle your programs into obeying your GPU intentions (which can be done in a variety of ways including via Terminal, via custom .desktop files, on Flatpaks via Flatseal, in Steam game launch options via DRI_PRIME=1 %command%, etc). Personally, I threw DRI_PRIME=0 into my /etc/environment to use it as a default unless I specify otherwise. If your BIOS doesn’t expose ASPM options and they aren’t enabled, you might get lucky and they may be available to the OS: check out the pcie_aspm=force kernel option. The arch wiki has details at: https://wiki.archlinux.org/title/Power_management#Bus_power_management .
If using Linux without an iGPU, I unfortunately don’t have much guidance to provide in terms of reducing power usage of the video card when 2 monitors are plugged in. In all likeliness there’s a way to create custom resolutions of some sort that may lessen the pain (perhaps via X settings, perhaps by overriding the monitor EDID, or perhaps by some other method), but I didn’t feel like delving into this one just for fun.
–
Final Thoughts
Since dedicated GPUs that are highly power efficient at idle probably aren’t high on the priority list for AMD/nVidia, hopefully we simply reach a point in the future where integrated GPUs are sufficient while still being efficient. The upper end of AMD’s 5000G-series is honestly pretty close for casual gaming at 1080p – if I didn’t already own a couple 5600XT video cards, I might have gone that route (though displays not sleeping in Ubuntu on that motherboard remained an issue).
Come to think of it, if you look through the history of the “hardware” section on my site, I’ve used a lot of Intel integrated graphics over the years, and the integrated GPUs in Intel’s 12-generation aren’t that bad, though the desktop iGPUs don’t compare to either AMD or Intel’s own mobile iGPUs (which can be found in laptops and a number of NUC systems).
Perhaps in a year or 2 from now, AMD will have a 6000G series with sufficient RDNA2 cores. Or maybe in an effort to get less clobbered by AMD, Intel will pack enough Xe cores into a CPU to make it a reasonable gamer. Until then, little tricks like using integrated graphics to handle the display while forcing dedicated GPUs to sleep via ASPM seems to be the ideal way to save power, reduce heat output, and keep those fans quiet… at least when it works.
Why not use two computers? One for gaming and one for everything else. Monitors usually have multiple inputs, so using several computers shouldn't be an issue. Obviously the gaming computer would remain off or in standby whilst not in use.
This is costly if you buy another computer, but many people have older computers hanging around, so...why not?
I use up to 4 monitors at the same time (3xQHD @ 75 Hz and 1xFHD @ 60 Hz) and it seems like I am forever banished to the realm of high idle power consumption.