Scroll down to the pictures if you want to get right to the fix.
The Symptoms:
- The actual boot-up is pretty quick. As soon as you log in, it slows down to a crawl.
- The desktop takes forever to load after boot.
- Programs take forever to start immediately after boot.
- You may hear the hard drive ticking (thrashing) during this slow period.
- It may appear as though the hard drive is swapping during this slow period. You might think the page file is swapping like crazy.
- After 15-20 minutes, everything’s speedy again.
Sound like the problem you’re having?
If the answer to that is “yes”, here’s the next question…. Are you running a Windows bootcamp partition? If the answer to that one’s “yes” too, you’ve just found the cause.
—
Actually, it’s not bootcamp’s fault. It’s Apple’s built-in Spotlight search (represented by the little magnifying glass in the top-right corner of your screen). Every time the computer restarts, it tries to rebuilt the entire search index on your Windows BOOTCAMP partition. This takes a really long time, and the rest of your computer slows down while this rebuild takes place.
So how to we fix it? We disable Spotlight’s indexing on the BOOTCAMP drive.
It’s a bit of a convoluted process, so I’ve tried to make this pretty simple. Here are the steps:
1) Boot into Windows (your bootcamp partition).
2) Run the “Command Prompt” program as an Administrator. Here’s a picture to help:
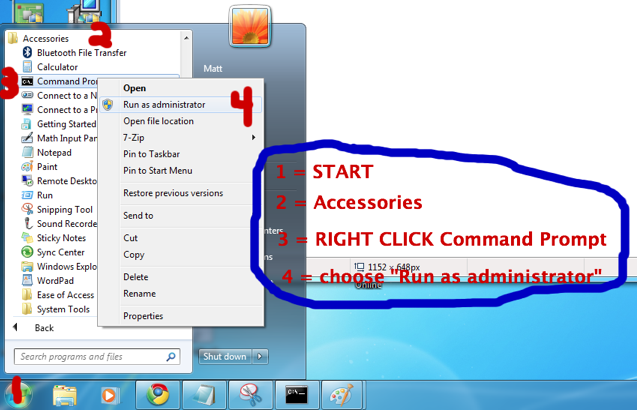
(1) Click “Start”, (2) go to “All Programs / Accessories”, (3) RIGHT CLICK on the “Command Prompt” program, and (4) choose “Run as administrator”.
3) Now, we have to create an empty file called .metadata_never_index on the C drive, to tell Spotlight not to index/search this Windows drive anymore. Here’s how we do it:
3a) Type cd and press enter.
3b) Type type NUL > .metadata_never_index and press enter.
Picture below to help:
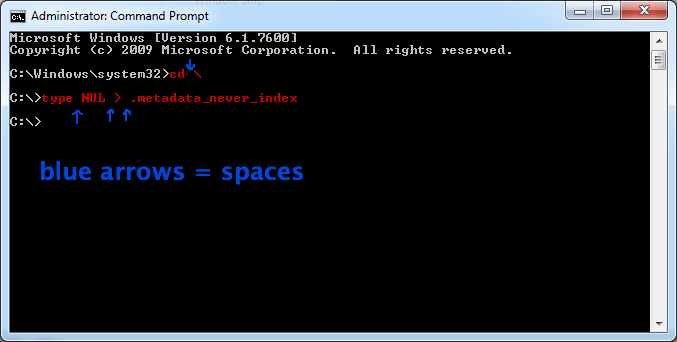
The stuff you type is in red. I put little blue arrows to show where you need to leave a space (spacebar).
Make sure you use the proper (backslash), the proper > (greater-than sign), and the proper _ (underscore).
4) Without the fancy coloring, here’s what it’ll look like:
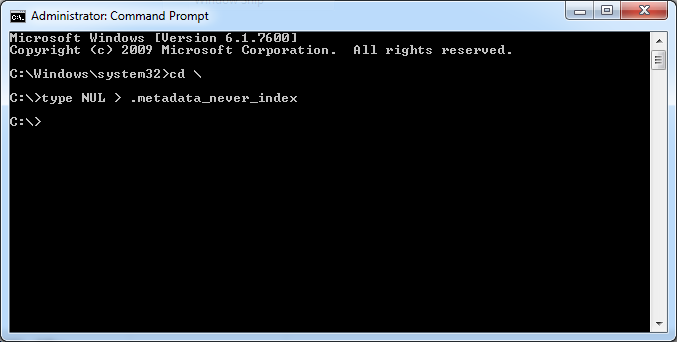
This is what it looks like, without color.
5) DONE!
—-
Now you can close Command Prompt, and restart back into Mac OS X again. You should notice the delay is gone. The desktop will show up quickly, and your programs should be nice and speedy once again.
Note: While this speeds up your Mac again, note that when you try to search through Spotlight or Finder, it won’t search the BOOTCAMP partition anymore (it’ll only search the contents of your Mac drive). You can still read/access the Windows drive, but you can’t search it. This generally doesn’t matter for most people – usually the only time you want to search for a Windows file is when you’re booted into Windows already anyway (which you can still do), but keep it in mind.
If you ever want to UNDO the change, all you have to do is delete the .metadata_never_index file. You could do it through the command prompt, or possibly through Windows Explorer (you may have to change the settings to un-hide everything for it to show up).
—-
Finally, for those who are wondering why it’s such a convoluted process to create the .metadata_never_index file, there are a few things at play. First, OS X won’t write to an NTFS partition, which all the latest editions of Windows tend to use. So you can’t create the file without booting into Windows. Second, Windows programs won’t let you create a file that starts with a period, which is why it’s being done through a command prompt. Windows also won’t let you put anything on the root drive unless you’re running as administrator.
There are other ways you could go about doing it, but this is the most concise way I could think of. Anything else involves either something like Macfuse/3G-NTFS (which most people don’t have), or by using notepad to create a file and renaming it (which you’d have to do through the Command Prompt anyway). You could replace “type NUL” with “echo.” if you wanted, but you’d end up with a 3-byte line break in the file, whereas this way you get a 0-byte file.
It sounds like you entered:
NUL > .metadata_never_index
That won't work, and will give you the error message you mentioned. You MUST enter:
type NUL > .metadata_never_index
(you have to type in the word "type").
Alternately, if you're not having any luck at all, you can try:
echo. > c:\.metadata_never_index
...making sure to leave a space before and after the > sign. It's not as clean an option, but should still work.
That's actually what I'd originally tried. However, the change doesn't carry over upon restart.
The problem is that the NTFS partition isn't writeable, so it can't actually save the changes (those exclusions must be saved to the very drive you're trying to exclude). When you add a folder to the exclusions on another drive, it's added to /Volumes/volume_name/.Spotlight-V100/Store-V1/Exclusions.plist . If the volume isn't writeable, it can't make that change (or even add that path).
It's almost certain to work if the volume is FAT/FAT32 (and is indeed much easier in that case), but won't if it's NTFS.
del c:\.metadata_never_index
However, it may show up by simply browsing My Computer and going to the C drive, in which case you could just drag the .metadata_never_index file to the Recycle Bin.
Well done.