So… saw a deal on a used front-load washer (in need of repair – suspected bad bearings), figured I’ve replaced a zillion bearings on cars before, so thought I’d buy the washer and see if I can fix it.
Now technically, you’ll find that all the major Whirlpool parts outlets include these as part of a $400-500 rear tub. Yes, Whirlpool wants you to buy the big honking tub because 1 or 2 $10-20 bearings stopped working. Presumably you’re then supposed to throw your old tub away. If I ever start an “I hate the environment” club, Whirlpool’s the first company I’m asking to join.
So bearings are a bit of a pain to find. Well, maybe not that bad. These are the bearing numbers:
6205
6206
(I pulled the numbers from http://www.hometask.com/washerrepair.aspx where they used to list bearing numbers for a number of Kenmore & Whirlpool Duet machines). It’s worth noting that you can buy seals or seals+bearings directly through their site as well.
Otherwise, you can find bearings online for anywhere from $3.50 up (depending on the quality of bearing you’re looking for – I doubt I’d opt for anything less than something made in Japan which is a good bit more, or a stainless steel bearing which starts at around $20), or find them at your local bearing shop. Now finding a new seal is a pain, though the site mentioned above carries them.
—
Installation:
I was going to write up a big massive guide with pictures, but as it turns out, others have already put together impressive YouTube videos. The one I’d recommend using as a guide can be found at: https://vimeo.com/24810291
Again, to give credit where it’s due, this excellent video was created by Jerrod from HomeTask – and again, they sell the seals and bearings for the Whirlpool Duet WFW9200SQ02 as well as other models.
They also have a short version available on YouTube here: http://www.youtube.com/watch?v=Rd5NKbpVSRM
If you’re interested in getting a general idea as to the process, I’d suggest the short YouTube video. When you’re actually ready to buckle down and start disassembling, watch the long one.
—
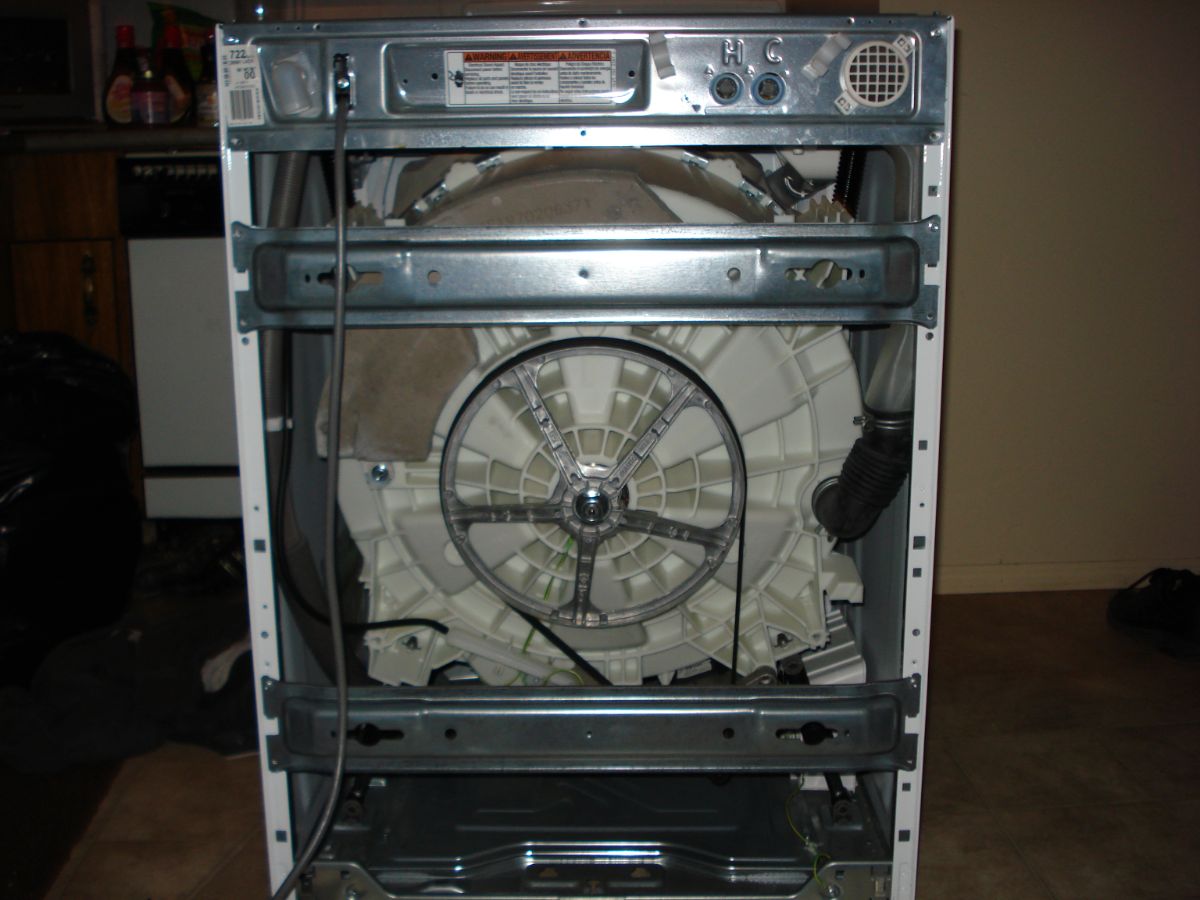
In case you wanted some pictures anyway, I took a few during disassembly before I realized that my pictures were never going to compete with a video. Here they are if you want to see them anyway.
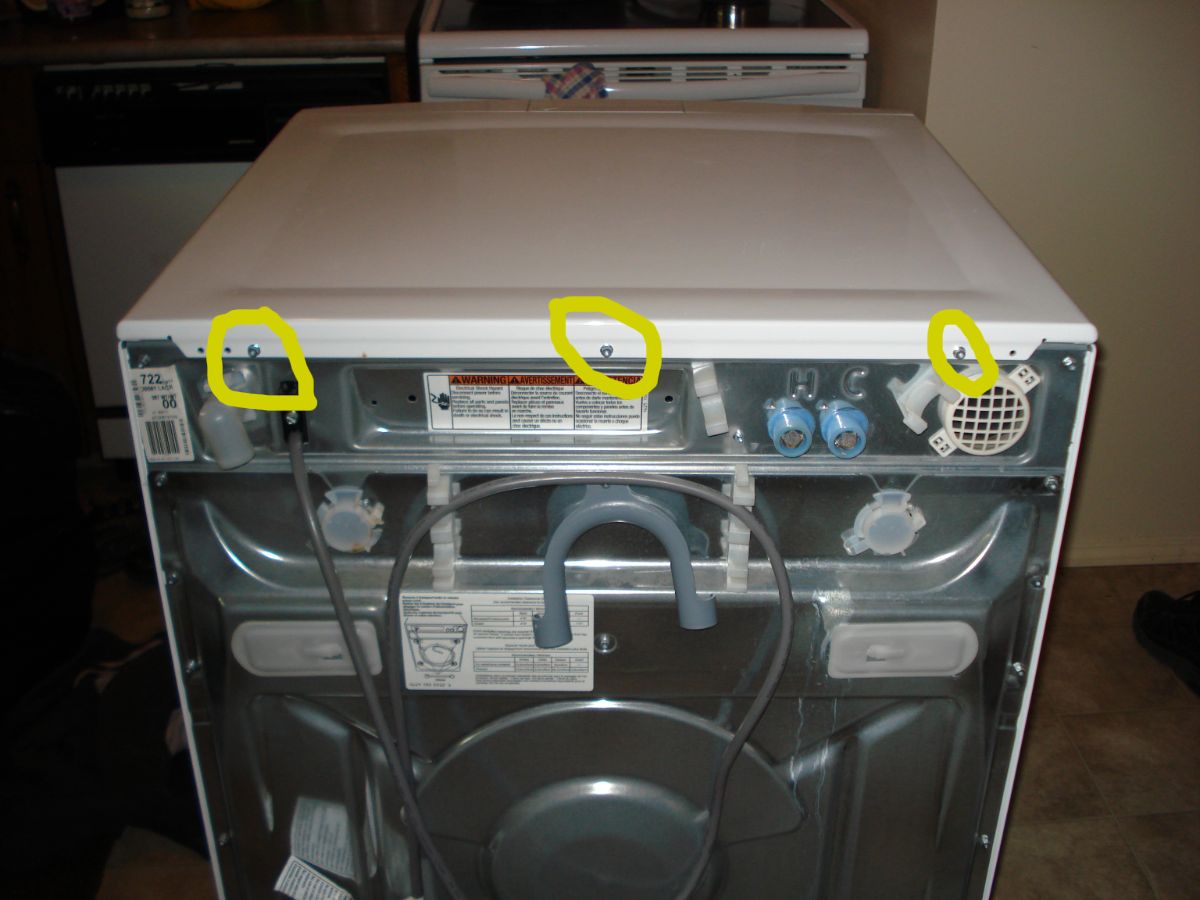
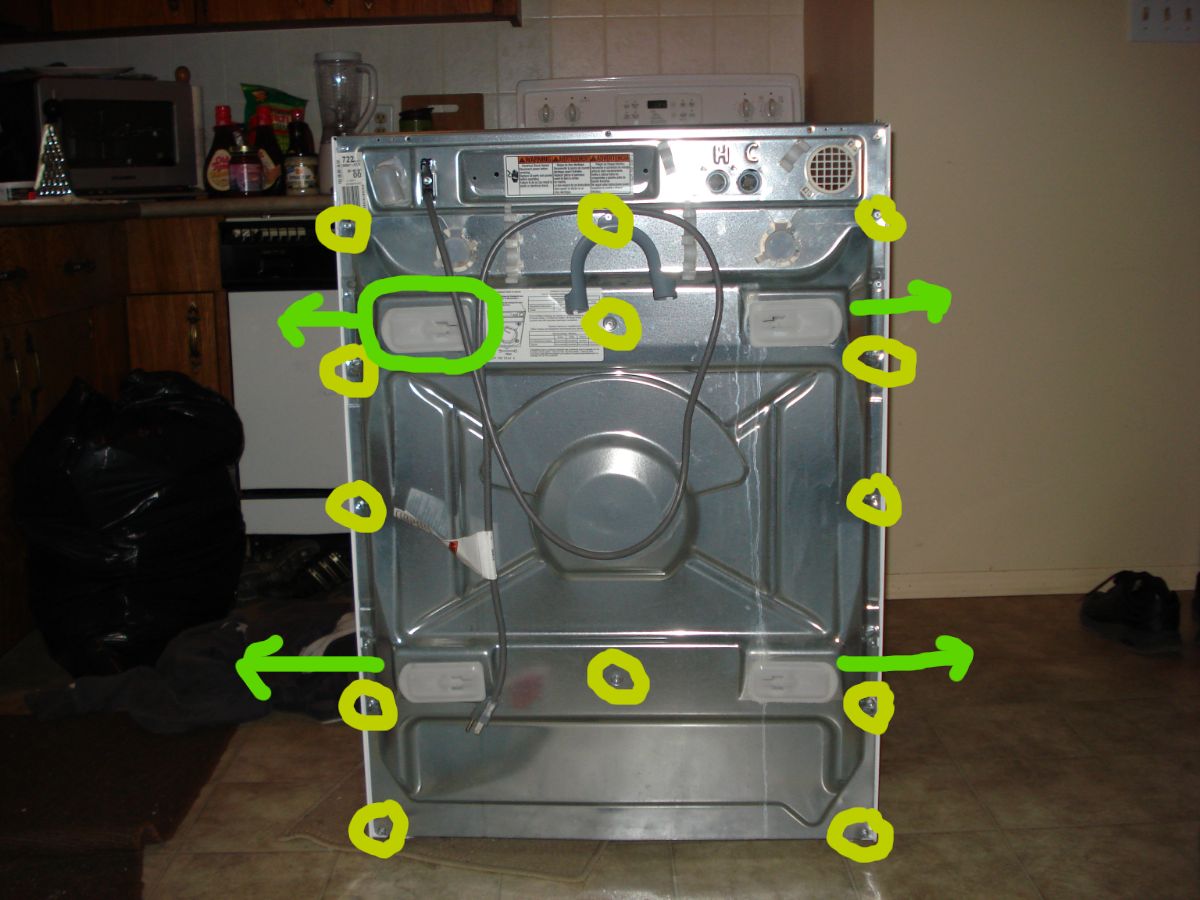
A few notes (watch the video first, or you won’t know what I’m referring to):
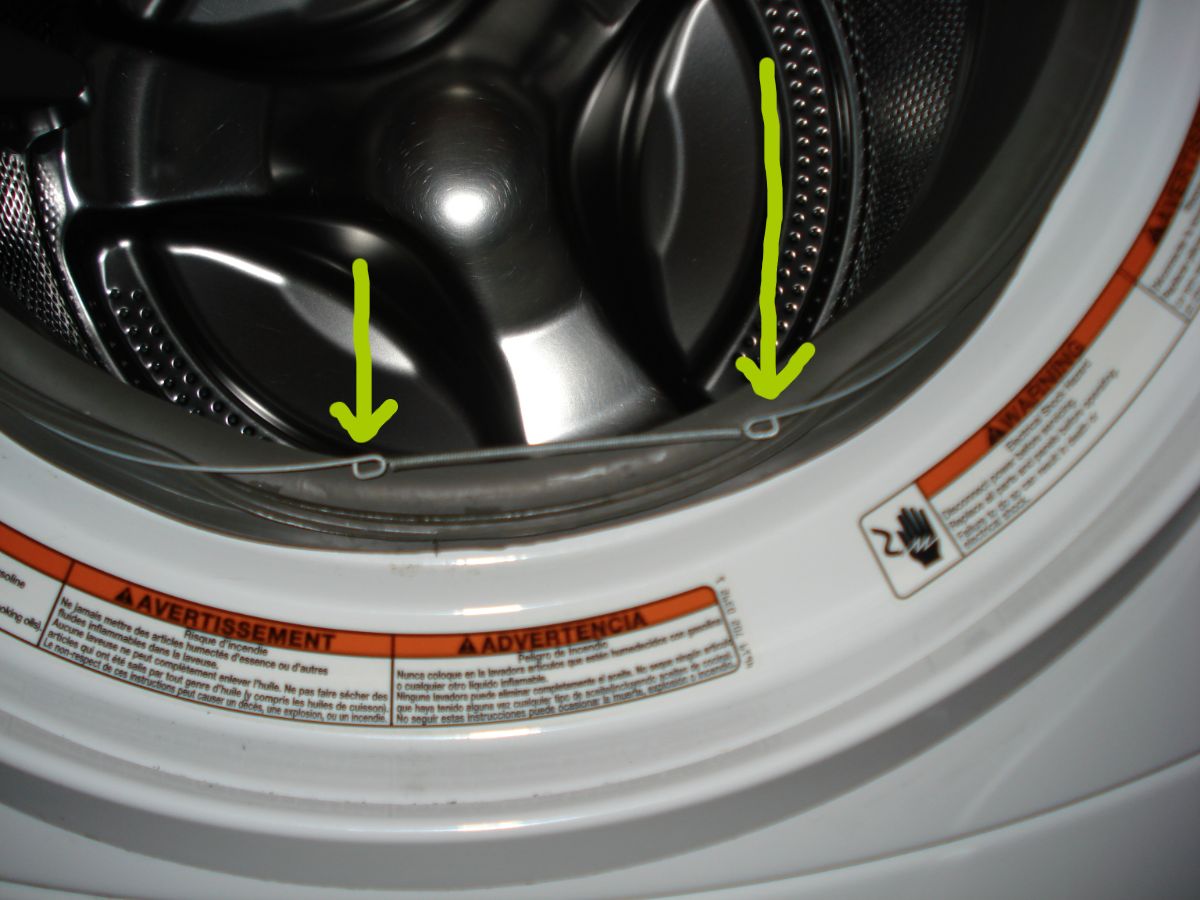
- The 4 shocks that connect the tub to the bottom of the cage… In the short version of the video, he mentions that you just twist and they come out. I found that there’s a little clip/lock on opposite sides of each shock (not opposite as in top/bottom, opposite as in the side you can see and the side you can’t) and to release them you’ll have to put a little screwdriver in the slot and pry a little to open each one. Ideally you’d have 3 arms and do both clips while you twist – however since most of us aren’t that fortunate, I twisted as far as I could without snapping it, and while twisting, did 1 clip/lock, did the one on the opposite side, went back to the 1st side, etc. As long as you’re twisting, the clips/locks will catch a little each time, it’ll twist a little further, and eventually the whole thing will twist 90 degrees and come down.
- The video doesn’t show every possible wire/connector/hose that you disconnect. They’re generally pretty easy to figure out, but make sure everything’s disconnected from the tub before you drop it – the thing’s heavy enough to rip/destroy anything you forgot to detach.
- For the front drain pump – in the video, it’s a screw that comes out. On my model, there are no screws – just a big rubber “latch” on the front that pops out toward you (you can wiggle the pump assembly out from there).
- The main nut on the shaft (15/16 “) was very tight on mine. He uses a ratchet with a pipe – I needed an impact gun.
- He’s not kidding when he says lifting the tub isn’t for the feint-of-heart. I think I pulled 2 or 3 muscles. I’ll either have a helper for reinstallation, or I’ll remove the counter-weights.
- The shaft was seized to the bearings on mine. Thus, I needed a small sledge hammer to pound the shaft through once the tub was split (a regular hammer didn’t cut it). If you do this, make sure you partly thread the bolt on (to protect the threads), put the socket on the bolt (to protect the bolt head), and hit the socket (preferably an impact socket, but wear gloves & eye protection regardless in case it shatters) with the hammer. If you just smack the shaft directly with the hammer, you’ll destroy the threads.
- Take Pictures As You Go!!! Very important, and I can’t stress it enough. Particularly with the wiring, if it takes you a few days in total, you might not remember where everything went. Just about every cell phone has a camera nowadays, so even if you don’t have a regular camera, you should have an option. It’s a good idea to label things with tape (or write with a sharpie marker where appropriate) as well. A few extra minutes being careful in this area might save you hours troubleshooting later.
- Keep the screws separate. I like to take a piece of duct tape, and tape screws to whatever panel they came from. I duck-tape clamps to their respective hoses so they don’t get lost. As a side note, for some reason, my rear panel had a mix of fine/coarse threaded screws. By the time I realized it, I’d already pulled 5-6 out and had to guess which went where. Every time you pull a screw it might be worth checking to make sure it’s the same size/type as the other screws you just pulled.
My original bearings were… well… in bad shape. It’s clear why the previous owners couldn’t stand the noise from the unit anymore:
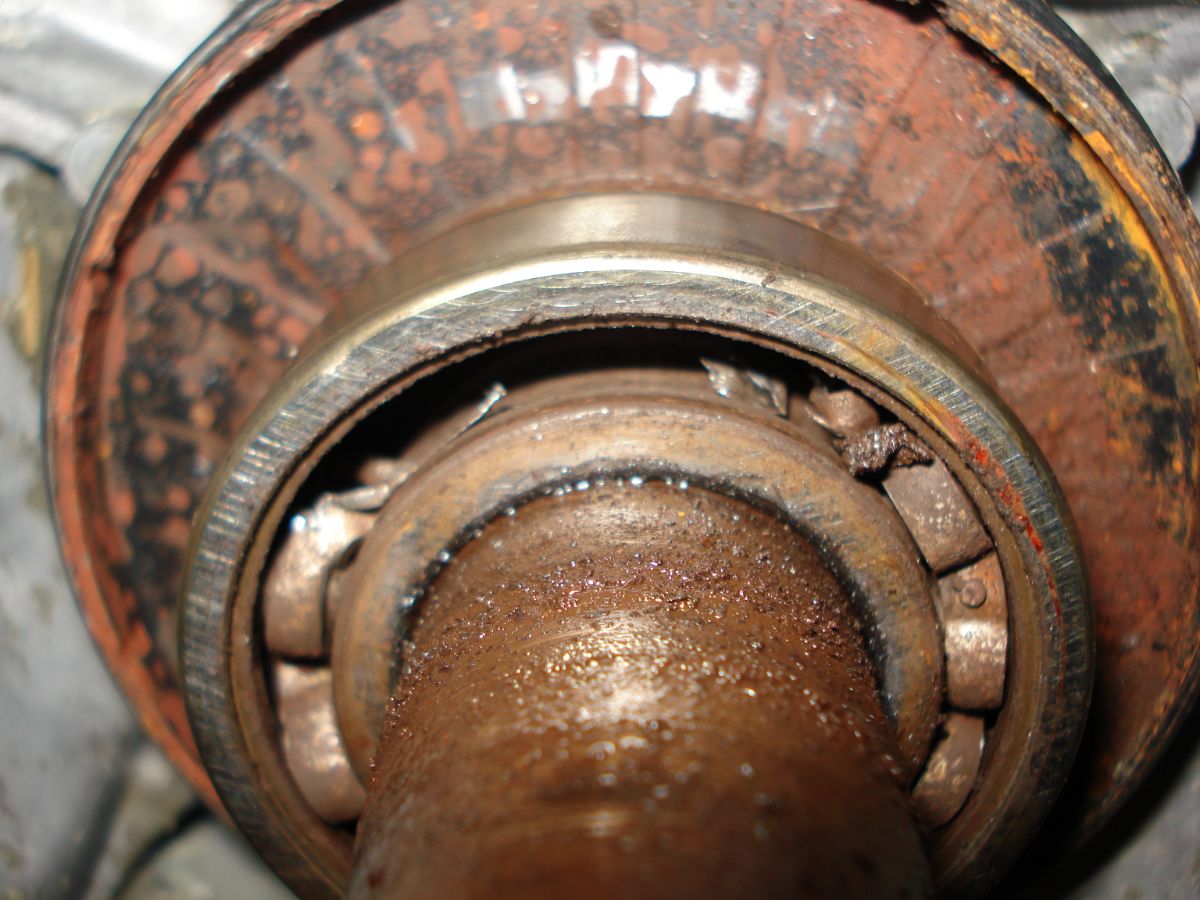
These are the inner bearings, and they’re obviously toast. Things got so bad that some of the bearings wore through the cage and fell out (there was a mess of rusted metal shavings left behind). What’s left of this bearing was seized to the shaft, so I had to use a grinder/dremel to cut away until I was close enough to the shaft to snap it off.
You can see the seal behind the bearings (black, covered in rust) – upon removal, it actually looks to be in great shape, but obviously it didn’t do it’s job.
The outer bearings were in surprisingly good shape, but they’ll be replaced anyway.
Thoughts:
on The Process:
-Despite the many things that need to be disconnected/labelled, it’s a pretty quick process.
-Once I got to the shaft/bolt/bearings… let’s just say it took about 80% of the time I spent.
-While you could use a hex screwdriver for everything, the 7mm socket on a ratchet is probably a better idea where possible (easier on the wrists, and less chance of stripping). You WILL need the hex screw for a couple items though, so don’t go thinking you can do it all with the socket.
-Bearing replacement reminds me very much of bearing replacement on cars (the process, and the headaches I ran into). If you’ve ever swapped brake drum bearings, this should be comfortable territory for you.
on Whirlpool…
-Very disappointing that they don’t sell the bearings & seal separately. Clearly a conscious effort on their part to rake customers for cash.
-Based on reviews I’ve seen around the web, bearing failures are very common. From the sounds of it, the bearings/seals that Whirlpool uses aren’t that great to begin with, and if you use non-HE detergent, it’ll suds up and quickly get in behind the seal and start wrecking the bearings. You HAVE to use the HE stuff.
-Another common issue on these washing machines (usually noticed when draining) is that either they won’t drain, or you’ll get a nasty noise from the pump. There’s a “catch” by the pump (filter) which has usually picked up coins/socks/etc. I found a penny and a foam bra insert left by the previous owners in my washer. If you’re doing the bearings you’ll be pulling off the pump anyway, so you may as well open the catch and clean anything out of it.
-I wouldn’t buy another Whirlpool unless it were being sold used for cheap (in need of repair). Unless of course they change their ways (for starters, have the bearings as a serviceable item which they sell parts for).
on The Video (linked further up)…
-A fantastic video, and a big thanks to Jerrod from HomeTask for putting it out there to help people around the globe repair their own machines.
-Again, make sure everything’s disconnected from the tub before you drop it. The video isn’t quite as thorough when it comes to all the connectors.
-If the video helps you, by all means consider buying the seal (and possibly bearings) from his site. If for whatever reason that won’t work for you (need a specific method of international shipping that isn’t listed on the HomeTask site for example), it’s possible to find kits on eBay, though I suspect the quality of Jerrod’s seals is probably better than the average eBay kit (and cheaper too).
Finally, I’m not in any way associated with the HomeTask site. The video’s simply awesome, and I think HomeTask deserves some positive word-of-mouth for putting it up. If you find other videos that you believe are super-helpful in repairing/maintaining/etc a Whirlpool Duet WFW9200SQ02 Washer, have some tips of your own, or found additional places for bearings/seals/etc for these washing machines, feel free to post it in the comments below.
For me, the disassembly was pretty easy. My bearing and seal looked almost exactly like the images above. On mine, only the inner/front bearing was bad, the other one was in good shape but I still replaced both. My bearings were also different than mentioned above. The rear bearing is the 6205; but my front bearing was a 6307. It so happens that I work for a company that sells bearings to bearing dealers so I have access to the bearings but I opted to buy the kit from the HomeTask/Yellow Van Handyman Service to be safe. It's a good thing because I had bought the 6206 and the 6205 from work and the 6307 that my washer actually uses is much bigger than the 6206. Also, the factory bearings didn't have any ID numbers on them for some strange reason; which would have made it hard to find the right size bearing. And as I understand it, the seal is only available from repair companies like Yellow Van. Anyway, the spindle and bearing races were very rusted with heavy build up on them from the leakage. After getting the bearings out, I spent more time cleaning, brushing and polishing the races and spindle than I did tearing the washer down and reassembling it. I suspect, that is probably the main reason that Whirlpool pushes the tub assembly as the only repair option; they know the damage that has been done to the tub because of the poor seal design. What I'm angry about is the fact that this issue is obviously the result of a design flaw; and from what I can tell, thousands of customers are affected as well as most if not all of their brands and yet they haven't done anything to make it right.
Our washer is only three years old and has never had anything but HE detergent ran through it.
Anyway, it's working like new again after the bearing replacement; I guess we'll see how long it lasts this time around. By the way, the new seal was different than the original. So, either Yellow Van sent the wrong seal or Whirlpool redesigned it (I suspect the latter, which I've found is pretty common with appliance issues like this).
The only issue I had with my repair was after hooking up the washer, I was getting some smoke and a burning rubber smell. After checking everything that I could access without tearing it back down, I decided it was the new seal and assumed I must have gotten the spindle too tight. So I removed the back panel on the washer, loosened the spindle nut, gave the spindle a couple of pecks with a hammer and snugged the nut back up. That seems to have fixed that issue. Hopefully, the new setup will last a lot longer than the OEM bearings did but if not, I'll be able to fix it a lot quicker the next time around.
I have just found out my Duet drum has ground off the front lip on the front tub and the drum feels way too loose so I know this is the issue. Getting to this tomorrow and will be ordering the kit from the Yellow guy.
Thank you very much for posting this info!!!!
Picked up another Whirlpool (a GHW9400PW0 - very similar to the WFW9200), used, which had a similar issue. It wore a hole right through the tub.
However, the cause was a broken spider (the Y-shaped arm that grips the stainless steel drum). Bearings in that one were actually fine. Thus, I'd suggest that before anyone orders bearings, they pull apart their machine and check the spider, just in case it's the culprit.
Before anyone asks about the spider... to my knowledge nobody sells replacements (only option seems to be to buy the whole stainless steel drum which includes the spider). In my case, I ended up repairing the spider, and so far it's been working fine. It wasn't a fun repair, but if anyone wants to know how I went about it, leave a comment and I'll either give a brief reply here or put together another post.
If you're a bit queezy about ordering online though (or in a huge rush), you should be able to find a local bearing shop if you don't need the seal (check the condition of yours first). The bearings are pretty standard sizes (look up the # for yours on the handyman site, or take your old bearings into the bearing shop).
Alternately, if you're more comfortable with eBay, sometimes there are kits listed there (bearings and seals) - I had picked one up for another machine that way. Seal seemed fairly cheap, and took forever to get to Canada despite paying extra for 2-day international shipping, but has worked fine.
In any case, regardless as to where you get it from, feel free to post back with the experience. Best of luck!
When you pull out the basket, I would check the shaft first before replacing the bearing. In my case, I probably left the original bearing in.
That said, keep in mind that just about any bearing will start to deteriorate quickly if soapy water gets in there and washes out the grease. Lube up the seal a little (particularly at the edge that meets the shaft), make sure it's tight, and be sure to use HE detergent so that you don't have the thing submerged in suds (which would inevitably seep through over time).
Incidentally, since you mentioned roller bearings... I'd personally shy away from them - they might work if the drum were held at a perfectly horizontal position, but since the drum is held at a downward angle & has a considerable load, I'd expect a roller bearing to wear hard at the lower edge. Ball bearings really should be fine.
Good luck.
Good luck.
I’m in the planning stages right now for my repair job. The washer doesn’t get much use, but recently I started hearing unusual sounds. It’s hard to spin the basket manually in one direction, and in the other it spins freely for a bit but then gets tight at points. Almost certainly the bearings.
My washer is just over 9 years old so I’m concerned that the spider might also be on its way. Unfortunately I can’t pull this apart and then order the parts and take weeks to piece it back together…I kind of need to plan it out and take it offline and repair it within a weekend, two tops.
The outer tub has a 10 year warranty, and the bearings come as part of the outer tub. I called Whirlpool, explained the situation and asked if the bearings were covered in the 10 year warranty on the outer tub. The lady didn’t seem to know what I was talking about, put me on hold, and came back and said that the bearings would be covered under the 10 year warranty. But I’d need to get a Whirlpool tech to come out and see the problem for $85.
I didn’t mention the spider, but now that I think of it, its sold as part of the inner wash drum, which has a lifetime warranty. So wouldn’t the spider also have a lifetime warranty?
The questions I’ve got at this time:
1.)Any suggestions for getting the parts from Whirlpool, inner and outer tubs? The worst scenario is I take ½ day off work, pay a tech $85 to just look at it and tell me what I already know, and then Whirlpool tells me that neither the bearings nor spider are covered. Or am I better off forgetting the vague Warranty, and just ordering bearings and a seal?
2.)Any suggestions on where to get bearings and Seal in Canada? I agree Jerrod and Hometask have a great video. The $79 they charge for the kit is a bit steep considering how inexpensive bearings and a seal go for. But once you factor in shipping to Canada, customs, etc, its getting close to the $150 point.
I really appreciate any thoughts or suggestions anyone can offer.
Thanks,
Marc
1) Since you're still within the 10 years & both the inner and outer tubs are covered, the bearings and spider should both be covered too - as far as Whirlpool is concerned, they're *part* of the tubs. As for suggestions, you can try calling them again but it's really going to depend on who you get on the phone. I've heard varied stories in terms of success. One individual managed to get Whirlpool to simply mail them a new outer tub after explaining that they knew it was a bearing, though that individual also explained they were handy and were going to fix it themselves. If you're having them do the work, you're probably going to have to shell out the $85 for a tech to take a look first. But YMMV. Try giving them a call again, perhaps ask to speak to a manager, and explain the situation - if you get someone decent they might be willing to work with you to get things resolved.
2) If you go the bearing route, I've ordered bearings from vxb.com in the past. They're in the US, but they'll ship USPS (which will go to Canada Post). I got a couple Nachi bearings (made in Japan) for under $20. Total after shipping was under $28. You can get basic/cheap bearings for even less. As long as you're under the $20 mark, Canada Post won't charge you duty. Otherwise, call around locally. I've grabbed bearings from a shop in Winnipeg too, though they were considerably more expensive (about $50 for both) and they weren't anything special - not as good as the Nachi bearings anyway. Make sure you verify your bearing numbers from Jerrod's site though - when you order from him I'm guessing he probably verifies your washer's model number to make sure you get the correct bearings - you won't get that luxury with a bearing shop.
As for a seal... I never really figured out where to even start looking aside from Hometask & eBay. If you're lucky and your original seal isn't in terrible shape, you might be able to clean it up and perhaps soften it a little by soaking it in some ATF or some Automatic Transmission Conditioner overnight (Canadian Tire sells some Motomaster tranny conditioner, designed to soften seals). I did try a soak on one seal that wasn't in bad shape which softened it up a little, but I have no idea how it'll hold up in the long run. I also used a good bit of synthetic grease though during the reinstall. Note that I've also had a seal that was stuck in the tub so badly that I had to destroy it to remove it, so don't count on this as a guaranteed option.
To be honest, since you're still under warranty I'd probably be inclined to try the Whirlpool route first. Since you'll probably get a brand-spanking-new outer tub out of the warranty, you may as well. And if the spider is toast too, they'll undoubtedly see it during the bearing repair and then you'll get a new inner.
In any case, good luck.
Thanks
But there were two interesting points that came out of it:
1.) They get the seal custom made which costs them quite a bit (surprising I’d have thought you’d be able to buy that somewhere)
2.) The replacement bearings they sell are ‘made in China’. I find this interesting because I’d seen another Duet repair website that claimed the reason why they failed was because the original bearings were cheap ‘made in china’ bearings, and that quality bearings come from well known Japanese companies, such as Nachi which you’d mentioned, or NTN, also Japanese.
This just gets me to wondering what the best bearing replacement is. Someone had mentioned stainless steel bearings. Someone else had mentioned replacing them with C3 bearings (tighter clearances).
Ironically on the NTN Canada website faq, one of the faq’s is “Is it safe to use a C3 fit in place of a standard fit”… answer in short, probably not a good idea
Wish I knew more about bearings, and which make the best replacement. Name brand is a good start, but there’s still so much variation within a given NTN or Nachi bearings size.
I know I’m thinking about this too much
Thanks again,
Marc
That said, I went with the Japanese ones because the price was still quite reasonable and I felt like the tiny bit more I was spending was getting me a little more peace of mind (and I cringe a little less when I realize I've just jammed way more laundry in the machine than I should have). But chances are I could have grabbed the cheapest made-in-china stuff on eBay and been fine. Worst case scenario if I went toooo cheap would be that I'd be replacing the bearings again. And that wouldn't be the end of the world - pulling apart a machine the 2nd time is way quicker/easier than the 1st.
Thanks,
Joe
If you don't think it's location will result in a negative impact on the structural integrity (ie bearing housing won't work itself out or anything equally disastrous), and if not enough wore that you can see light through it, I probably wouldn't worry too much about it, personally. However, if you *can* see light through that spot, you may want to consider either replacing it, or at the very least building it up with some sort of waterproof compound or epoxy in the thinned out spot.
You can disregard the questions previously; I removed the shaft and stainless tub which I had to drive out. The plastic ribbons seem to be from around the molded bearing housing which covers the outer edges of the housing outside and in the back of the outer plastic drum.
My next questions are how bad does the bearing shaft need to be before you would replace the spider and shaft. The outer bearing was damaged to the point the roller balls split into pieces. I haven't seen this before in anything I have disassembled. This caused the bearing shaft to gall and cannot be polished clean. I used emery cloth trying to smooth the surface, but the gouges are too deep. A new bearing will slide over the damage, but I’m not sure if I will create a possible weakness that will lead to another failure.
Another issue is when I removed the counter weights (I'm a bit of an old man woos) I noticed the front weights had small cracks and there were small pieces of cement that had chipped and fell to the bottom of the washer case. The weights feel solid and don't have a broken feel but I'm concerned that if I reinstall the weights they could also fail.
Thanks for responding and your video is very helpful,
Joe
1) Is the shaft itself structurally sound (no cracks started, and not worn too thin)?
2) Will the inner race stick to the shaft? Or is the shaft worn so badly that the bearing assembly will spin on the shaft?
If it fails #1, not much choice but to replace it. If it fails #2, depending on the extent of it, sometimes you can scuff up the shaft a little bit where the bearing sits and get by - a small chisel at an angle and a hammer can put in some nice sharp ridges (almost like splines) to keep it from spinning. In a pinch, you could shim up that part of the shaft where the bearing sits with something really thin like a cut up coke can but I really tend to shy away from shimming unless it's a temporary fix until I can get a new part. You absolutely do not want the bearing itself spinning on the shaft or it will wear the shaft down like nobody's business.
As to the counter weights, small cracks aren't uncommon and if they're superficial I wouldn't worry too much about it. Same goes with tiny chunks breaking off - between the vibration and the varying humidity levels I wouldn't expect the things to go on in mint condition forever. If the weights themselves seem fairly solid altogether, I'd just toss them back on, maybe putting a little silicon or GOOP over cracks that look like they might get worse over time just to fill it in a little and reduce the effect further vibration will have.
However, if those counter weights have degraded to the point where you think they're going to bust apart mid-wash sometime, you should probably replace them altogether. They're pretty heavy and if one were to come off and smash the drain pump, MCU, or motor spindle, I don't know if they'd quite survive. The tub would probably shake like a banshee with a missing weight too, possibly smashing some lovely dents into the top/sides of the machine all while killing the shocks and ripping the front seal due to the incorrect angle the assembly would now be at. So if they're degraded to the point where you know-they're-on-their-way-out, I'd replace now rather than later.
Before going to that extent though, a few things I'd try:
- if you're only using 2 boards to elevate the outer tub, try using a few more around the sides. Since the tub is plastic, it has a tendency to flex/vibrate which isn't what you want the energy from your hammer whacks going towards. Using more boards should help keep it sturdy and reduce the vibration. Be sure not to have boards under the "tabs" though, as you don't want them to snap. Have the "tabs" between the spaces of the boards. And of course make sure the SS inner basket is elevated well above the floor.
- if you've got an oxygen/acetylene torch and are experienced using it, you may want to try heating up the inner race of the bearing you can see (the outer) a little bit. Chances are it's not the one seized (the inner probably is), but it may help. Be really careful though - if you heat it too much you'll end up heating up the housing which will melt the plastic which will render the outer tub unrepairable.
- more penetrating oil, more time (be very careful if combining with the torch mentioned above - fires aren't fun). If you're lucky, some will eventually seep past the outer bearing and get to the inner, though whether any actually does or not is going to depend on how tight the outer is against the shaft.
Beyond that, there's not much else I can think of off the top of my head. In the end you may just have to make sure it's well braced, ensure the nut's protecting the threads, hit really hard with a heavy hammer and hope the shaft breaks free (or the bearing falls apart) before something else literally breaks.Good luck!
Big problem the spider arm disintegrated. Only can get it as part of SS drum. Drum has lifetime warranty but only if Sears tech orders it. He will be the day after Christmas for the price of a service visit...but may also assemble the washer for me, since he is here.
I'm considering getting the bearings replaced before he arrives since I doubt those will be replaced. Anybody have any warning or advice I should consider before getting that started?
Greg
BUT, there is still clunking noise when washing. It is MUCH less than before, but still banging.Any ideas on what to do next.
Any helps appreciated
sam
was wandering if the washer is not level would that cause the problem? Is the washer safe to use now?
As for other brands, unfortunately I don't have enough experience to make much of a recommendation. Miele is well regarded but their stuff tends to cost a fortune. Bosch is popular when it comes to dishwashers, but I don't know how good their laundry appliances are. A bit of web searching might help you find a few reliable brands. Either way, you might want to avoid Maytag, Inglis, Amana, etc., as they're all owned by Whirlpool Corp. Best of luck.
I disassembled the unit again. The seal had black dust on it I could wipe off with my finger - definately wearing the rubber seal lips, darn it.
Just did the bearings in my Whirlpool 1485BD after reading all of your comments, thanks!
Bearings in mine were 6206ZZ and 6207ZZ ball bearings. These have non contact steel shields.
I've had a little experience with washing machine manufacturers, and more with bearings, and know that they use the cheapest possible bearing, not the best bearing for the job. They just need it to last 1 year.
After looking at failed bearings, quite obvious the reason they failed was due to water in them.
I replaced bearings with Japanese made rubber sealed bearings which will seal out water much better, and last longer, and will be available at any bearing shop or distributor, most common type of bearing in the world.
Only hurdle i hit was that my tub was not held together with clips, but was glued. I carefully pried it apart, and joined it back together after refit with a combination of silicon adhesive, self tapping screws, and several generous layers of silicon sealant on the outside of the join. Fingers crossed, no leaks yet.
Note that I tend to use a little grease on the seal where it meets the basket. It shouldn't be necessary, but keep in mind that if you do go that route, you risk some grease getting in with the laundry - running a cleaning cycle to start off might be a good idea in that case.
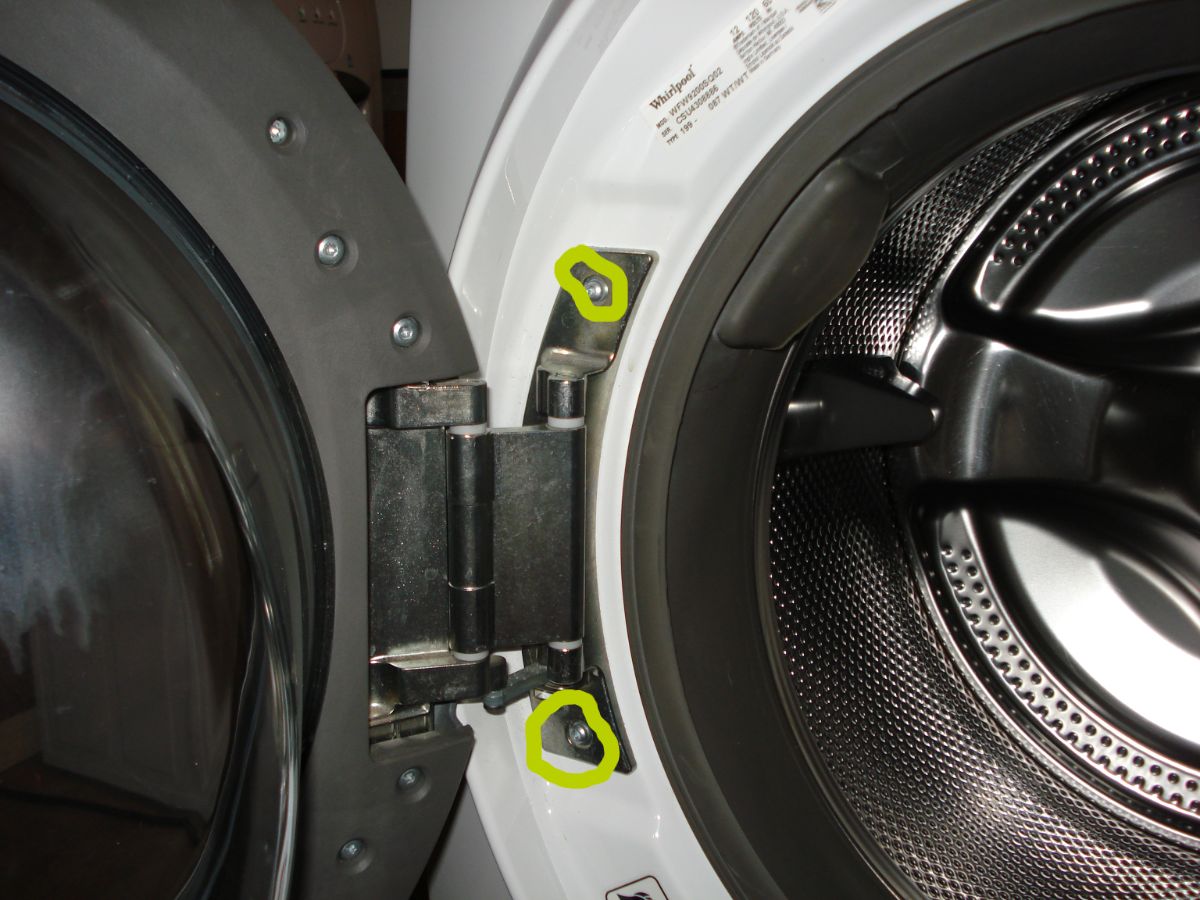
I did also order the tub seal. For an extra 22 bucks or so from PartsSelect, I figured it was worth the peace of mind. The video was right on for the steps to disassemble, but like others stated, there is no need to remove the door, even though it is only 2 screws. Probably worth it just to get it out of the way, but for the repair, its removal is not required.
Upon disassembly, sure enough, the inner bearing was shot but I was surprised to find SKF bearings. My washer was made in Germany, but I figured Whirlpool would have been cheaper on the brand. For the record, the replacement bearings were not SKF, they were made in China, but if I get another 4 years out of them, that's good enough. At least I know what to listen for.
A little tip, when not in use, leave the washer door open a few inches to aid drying out and run the clean cycle periodically. We learned about soap scum in our old washer the hard way. With this one, we've left it open when empty and run a clean out cycle once a month and the inside was like new. A little soap scum in some of the corners of the tub, but nothing like what is shown in the video. I hit it with a pressure washer, but quite frankly, that was not really even needed.
My washer was completely out of the 1 year warranty and as usual, Whirlpool was completely useless in directing me towards a repair. The best they can do is schedule a repair appointment. At $85 just for someone to show up and an estimated $750+ between parts and labor, why would anyone even bother? This cost me about $125 all told and my washer sounds like new again.
I used a little grease on the basket shaft and to help ease the bearings and seal into place. Do yourself a favor and get some sockets that match the outer races of the bearings to help tap them into place. Working around the edge works, but pounding on all sides at once works better. For the seal, after a little grease along the outer edge, I was able to push it most of the way in by hand and then gently tapped it the rest of the way. Do not dent of crease the seal, that's how they end up leaking.
Watch the hose upon reassembly. Whoever invented the spring clamps they use should be drawn and quartered. Like a dope, I caught the edge of the very bottom drain hose under the clamp on the back side from where I was working. It felt fine and installed properly until I started to run the rinse and spin. A lot of paper towels later, I re-set the hose and all was well. A minor set back that could have been avoided with proper screw type hose clamps. These spring clamps should go down in the history of bad engineering ideas along with the flathead screw.
All in all, it took me about 4 hours to complete including the hose issue, cleanup, and watching the 20 minute rinse and spin. After that initial cycle, I had a little bit of a groaning noise at very slow speeds. It stopped on its own after another cycle, but I opened the back up the following morning. I removed the belt and reset it one groove out towards the back of the washer. The belt was riding on the very back edge of the pulley. I also just double checked all the connections, shocks, pulley bolt, and the motor bolt. Everything was good. Either the belt was making a little noise riding on a bit of a new spot on the big pulley or the basket just took a little time to set with the seal, I'm not sure but the noise is gone.
Good luck. It's an easy repair for the moderately handy. Keep track of the screws (fine vs. coarse), give yourself enough room to work, and do it on a nice enough day to clean out the tub and basket outside.
Thanks!
Once you've cut/knocked that piece out, you might be able to jam a sharp screwdriver between the remaining section of the bearing and the housing and pry it enough that it starts separating from the housing (at which point you can probably start pounding it out again). Obviously wear some gloves since you'll have a lot of sharp edges and keep your face/eyes away in case when you're prying, a jagged piece snaps out and goes flying.
If even at that point it's not working, cut out another chunk on the opposite end. At that point the remaining part of the bearing would essentially be 2 disconnected semicircles (slightly less than a half circle each), and a screwdriver/hammer shouldn't have much difficulty getting them out at that point.
Good luck.
Thanks
Lorin S
If the spider looks good (not deeply corroded or pitted), you'd normally just reuse it though. They usually either look really-good or really-bad depending on the type of water, and amount/types of detergent that were used.
Surprisingly, the basket, including the spider looked to be in good shape, so I reassembled the whole thing with the new tub parts. It all works pretty well, but I get a knock at certain spin speeds, which I attribute to a worn basket shaft (the pulley nut is tight). So I managed to get Whirlpool to send me a new basket under the lifetime warranty. I'll have to tear down and reassemble the whole thing, but I think it will be worth it.
I'm curious though: does tightening the pulley nut put enough pre-load on the bearings to soak up the side play? Would a wave washer between the pulley and the bearing help?
- bearings came apart or are worn badly enough to cause a lot of play
- spider is broken
- main nut came off (not very likely unless it was apart previously and wasn't tightened enough)
- motor seized and shavings are unrelated
Probably one of the first 2. When you do turn it by hand, do you hear a constant crunching? If so, that would tend to indicate the bearings. If not, I'd lean towards 1 or 2 of the of the spider arms having broken with the stainless steel basket now rubbing along the plastic tub. You probably won't know for sure until you start pulling it apart though. Either way, I wouldn't suggest running the machine until you get it looked at, or the basket might rub a hole through the tub (or if the spider is the culprit, breaking during a spin is likely to cause some serious damage).I just did my bearing and seal today and I have the same squeak you described in your post. Could you tell me what you did to correct the issue?
Almost out. But something in there will not let it go.
Have pounded with a maul. Some metal rings and balls have fallen out.
Should I just prop it up again and pound with a bigger sledge and protect threads and surfaces too?
Whirlpool Duet
Thanks
Just wondering how old you washer is & if you have any 'mechanical' background. I'm still too 'chicken' to undertake this endeavor by myself.
- Sheri
I had the same thumping sound. In my case, I loosened the spindle nut a little. The sound went way. As a quick check, I removed the belt from the pulley and turned the basket. I had a little friction. When I loosened the nut, the basket spun more freely. As a result, the sound went away. I am told another option is that the spindle shaft could have some ridges from a rusted bearing. If that is your problem, I was told that you need to smooth out the ridges so that bearing fits better/balances better. Mine runs factory quiet now. Thankfully, I did not have take the tub apart again. Good luck.
Jeff
http://www.princessauto.com/en/detail/bearing-6205-1-2rs/A-p3850708e
If the bearing isn't on the shaft and is instead stuck to the tub (if the shaft came out without the bearings), it'll be a little more tricky - you'll probably need a wedge and a small sledge to get the outer out - angle the wedge so it hits the outer race, but be sure it won't slide outwards too much and start making a hole in the tub. As the outer race starts coming, rotate around so it doesn't become cockeyed. Inner can be done the same way, although it's often easier to use a large socket that fits the bearing and pound the socket. No torch option here - you'd end up melting the tub.
The noyse at high speeds is annoying.
Thanks in advance.
Alejandro
If your machine makes grinding or thumping noises when empty DO NOT USE IT as it will fail on you and can even be a fire hazard if the drum support gives way completely.
When they say 3KG they mean *wet* not dry!!!!!!!!!
I don't sell anything. At the time I wrote up this post, the spider for the WFW9200SQ02 could only be found as part of the entire tub assembly (spiders for some other washer models were available, but not this one). It's possible that may have changed at some point, but I'm not really sure. You could try contacting Jerrod from HomeTask (the guy who did the video) and see if they have a source. Otherwise you could see if AppliancePartsPros or RepairClinic carry any nowadays. I suppose you could also try giving Whirlpool a shot just in case they've had a change of heart since this was written and have decided to start offering the spider as a separate repair item (one can always hope!).
If you can't source a replacement, trying to repair is a possible option if it's just cracked along 1 of the arms - I've done this but it was a really tedious process and a massive pain - finding a shop that can weld aluminum would be a better bet if trying the repair route. If more than 1 of the arms are cracked/broken, repair likely isn't an option at all because even if you find someone who can do a really great welding job, it'd be really hard to align perfectly.
Sean
Thanks
If your seal seems like it's in reasonably good shape you may be able to reuse it. Otherwise unless Whirlpool has started making them available as a separate part you may have to look around on eBay, the site mentioned above, or at some smaller repair sites - currently searching for "wfw9200 bearings" on eBay brings up a couple kits with seals + bearings... you may be able to tweak the keywords around for a few more, or possibly to find seal-only.
Thanks for posting this. I have a front loading Whirlpool ( actually two, when the first one packed it in I bought a second one used ). The first sympton that something was going wrong with the first washer was that it wouldn't spin anymore or only sporadically. Bought the second one ( same model and size ) from a guy on kijiji ( Craigslist sort of thing ) and I'm guessing he knew the bearing was on the way out. You could hear a slight knocking sound when you turned the drum. Kijiji guy says it's the suspension springs with no load. Worked fine for about a month, but the knocking became more pronounced, and then it wouldn't spin as well. Found your post Matt, and watched the Yellowman ( Jarrod ) Bought the new bearings from a local source for the newer to me machine ( 6304z and 6207z ). $65 CDN. I only had to disassemble my washer until I could separate the two halves of the tub. That way I didn't have to take any of the wiring etc. apart, just split the drum and removed the back half of it from the machine. There is a fair bit of movement of the drum even with the springs and shocks still connected. Reused the rubber seal as it was in good shape , but my bearing ( inner ) were spewing grease on some of the loads. Characterized by black, greasy dots ( from the holes in the metal drum ). Bearings swapped out and the machine is running much, much better than originally, and way better than the other machine I replaced.
Thanks again Matt, and a shout out to Jarrod as well.