If you’ve read some of my other entries, you’ll know that I have an affinity towards the high capacity (4-5TB) 2.5 inch drives due to the low power consumption. Unfortunately as storage has grown, my Bitfenix Mini ITX case was running low on drive bays. This left me with 3 options:
- Go with a larger case.
- Use drive adapters to maximize available space.
- Do some heavy case modding.
Being somewhat happy with my case and not wanting to start chopping things up just yet, I went with the 2nd option.
I already had the 3.5″ bays covered – the taller adapters designed for 2 SSDs can handle a couple 15mm drives if you dremel notches in the top for screws. As long as the case has sufficient space between bays, no problem there.
The 5.25″ bay on the other hand… theoretically there’s enough space for 4 of the 15mm tall 2.5″ drives in a bay. Trying to find an adapter to do this on the other hand was not easy. I came up with 2 options here…
Option 1: The metal powered units with sliding “hot swap” drive 2.5 inch cages in a 5.25 inch bay
You’ve probably seen these. They’re sold by Mediasonic, Icy Dock, etc. In case you haven’t, they look something like this:

Above are the Icy Dock ToughArmor MB994SP-4SB-1 and Mediasonic HT21-104 , though you’ll probably find a few similar items on Amazon/eBay/AliExpress.
Had these been in the $15-25 range and looked to be reliable, I might have gone this route. Unfortunately the Icy Dock variety fetches a premium price ($100-range), and the Mediasonic is plagued with negative reviews including one where it apparently killed a drive and others where not all bays were working. The other downside revolves around the extra circuitry and components involved – saving a few watts by going with 2.5″ drives won’t help if the enclosure uses a few watts for the fan and circuitry, and it’s also hard to know what reliability might be like without tearing the thing open and looking at the construction and components.
Option 2: Mod one of the standard cheap 5.25 to 2.5 inch hard drive adapters
This is the option I went with.
Between Amazon/eBay/AliExpress/Gearbest/etc, you’ll generally find these in the $10-20 range – possibly less. They’re designed to hold various combinations of a 3.5″ drive and between 2 and 6 of the 2.5″ drives.
Olmaster seems to be the branded variant, but there seem to be a number of other non-branded variants out there too. Some appear to have a hole for a 3.5″ floppy drive.
Here’s a shot from the manual which shows the layouts well:
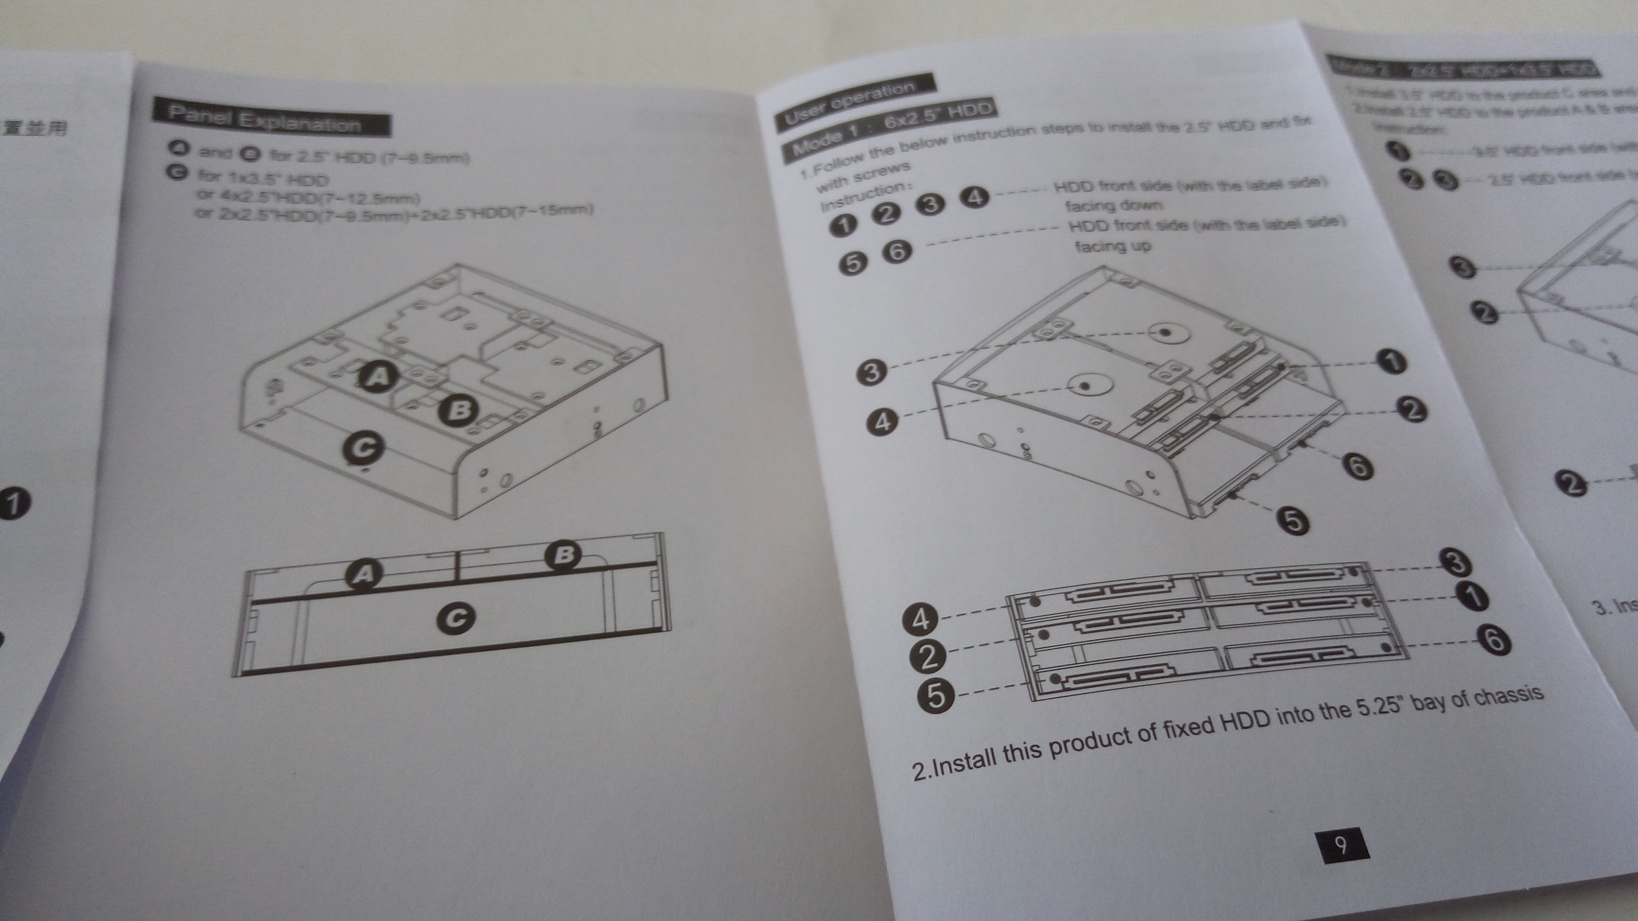
The downside is that the max number of 15mm drives in any of the combinations is 2 at a time (along with 4 thinner 2.5″ drives for a total of 6 drives). Since I wanted 4 of the thick drives, some modding was required.
Step 1: Modding Tools and Decisions
A few items required to perform this mod:
- A 15mm hard drive (for spacing)
- Utility knife or other thin cutting tool (ideally not a dremel as cutting disks are wide)
- Glue (epoxy, possibly superglue)
- Optional: Soldering iron
You’ll likely be leaving the bottom rack alone, so the primary decision revolves around orientation of the top rack. You’ll have to decide whether you want the “top” drives upside-down (screwed in from the top – do not need to remove bottom drives to replace), or right-side-up (requires removal of bottom drives to replace). As I’d already been running my drives right-side up, I continued accordingly and thus the following instructions are for right-side up.
Step 2: Cutting out the top rack and removing excess tabs
I’ll start with a picture.
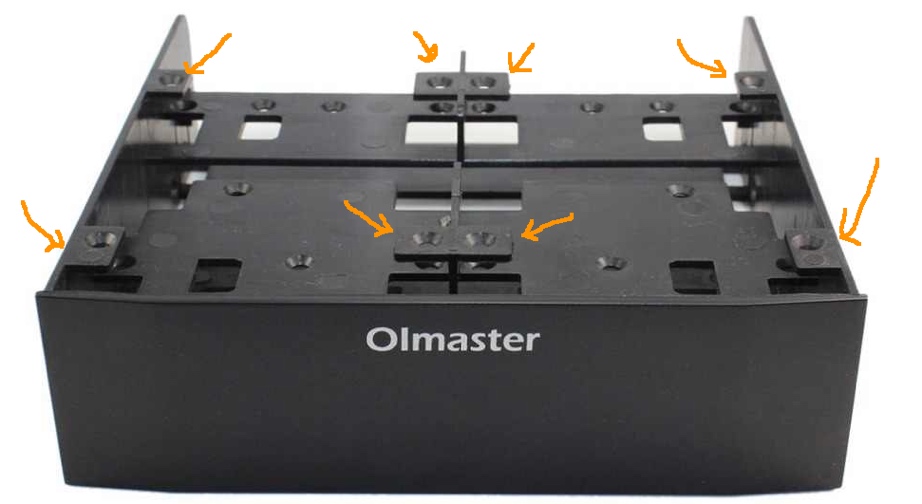
The highlighted screw-tabs are removed for a “right-side-up” install.
Note: If doing an upside-down mod instead, you would just be raising the upper rack to be flush with the top, and thus you could leave the tabs on the sides since they won’t end up in the way (there are cutouts). However, you’d have to cut off the center spacer which means the center tabs will be going regardless.
With a sharp knife, I found 3 methods that all worked suitably well:
- “Scoring” along the tab until enough had been cut away to snap the tab (similar to cutting drywall).
- “Sawing” the tab.
- “Seesaw-ing” the knife along the tab.
Once the tabs are removed, the top rack/shelf pieces get cut out as seen below.
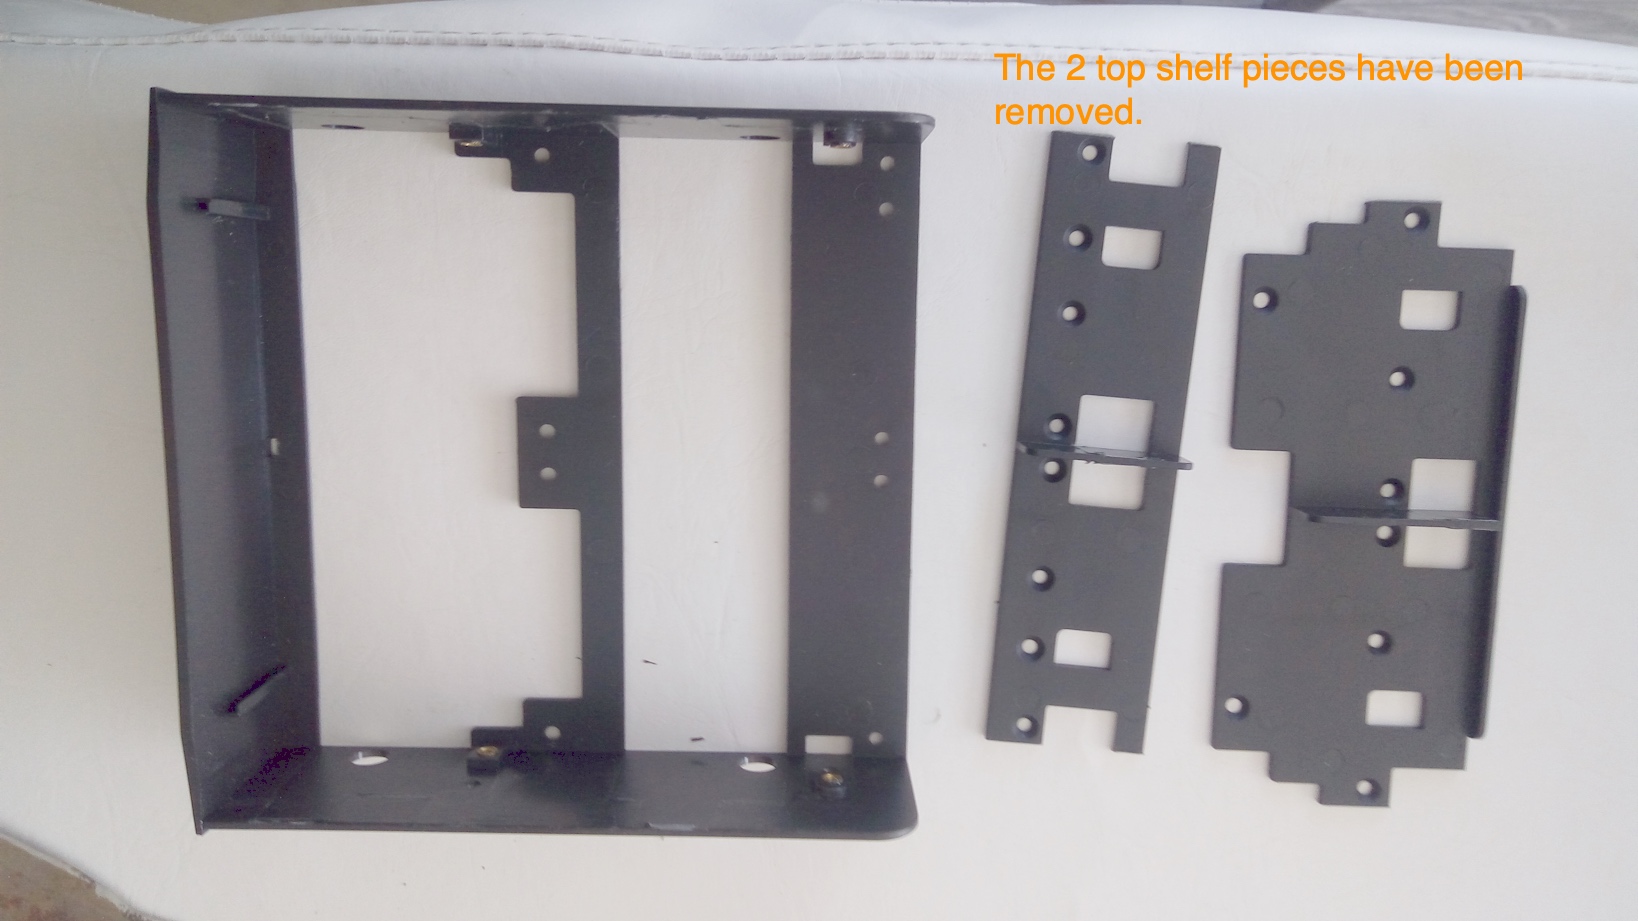
I didn’t remove the center drive spacers from the shelves, though you could if you wanted to. The risk of leaving them is that if not perfectly aligned they may interfere a bit with the bottom drives. The risk of cutting them is (a) opportunity to break something, and (b) opportunity to compromise the little structural integrity this thing has.
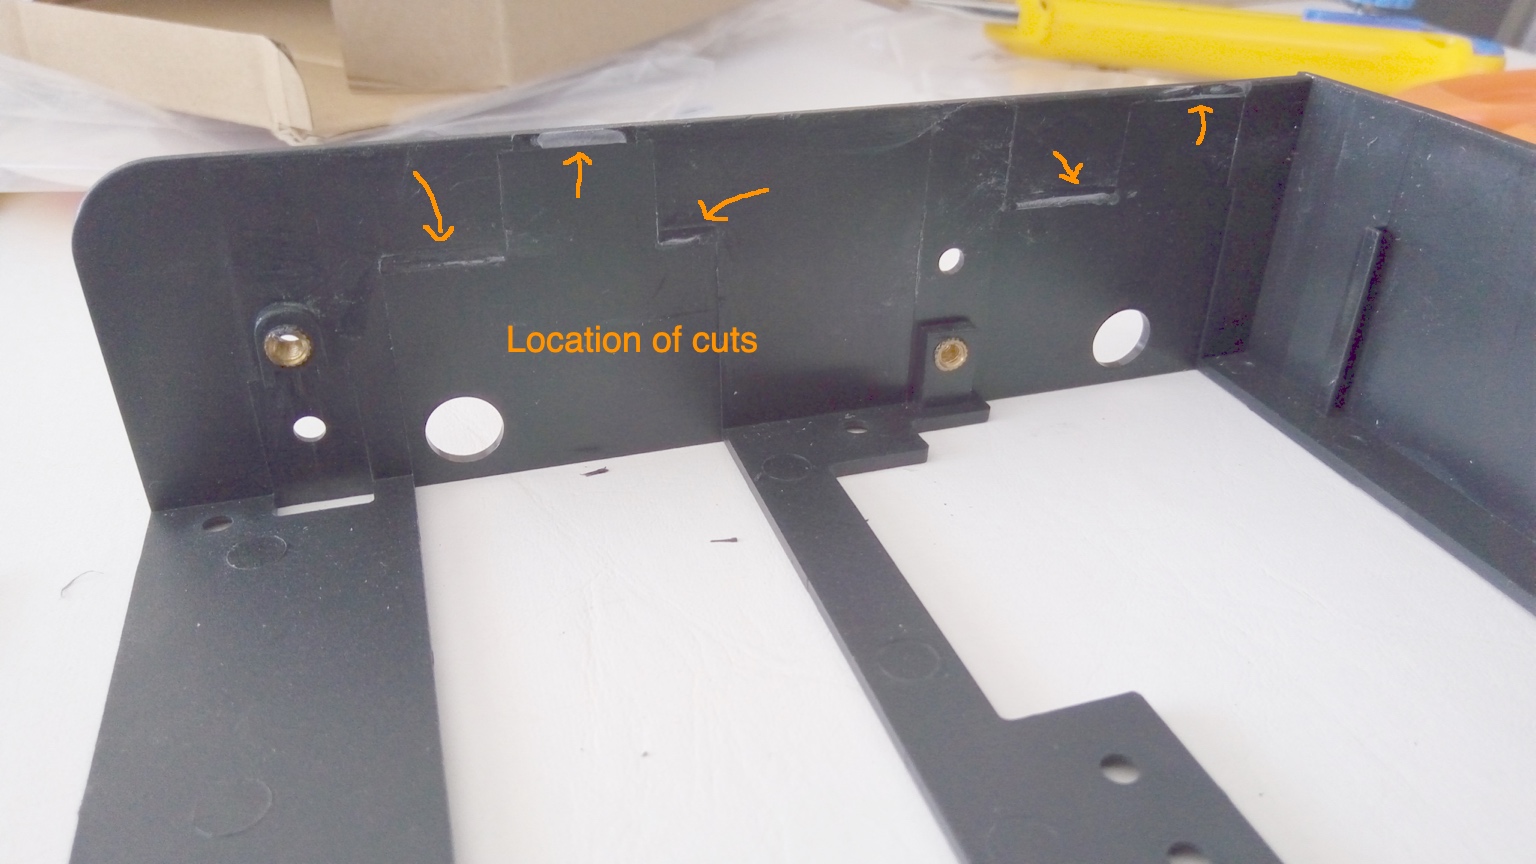
Here is a shot of the base at this point so you can see where the cutting took place.
Step 3: Re-aligning and positioning the shelves
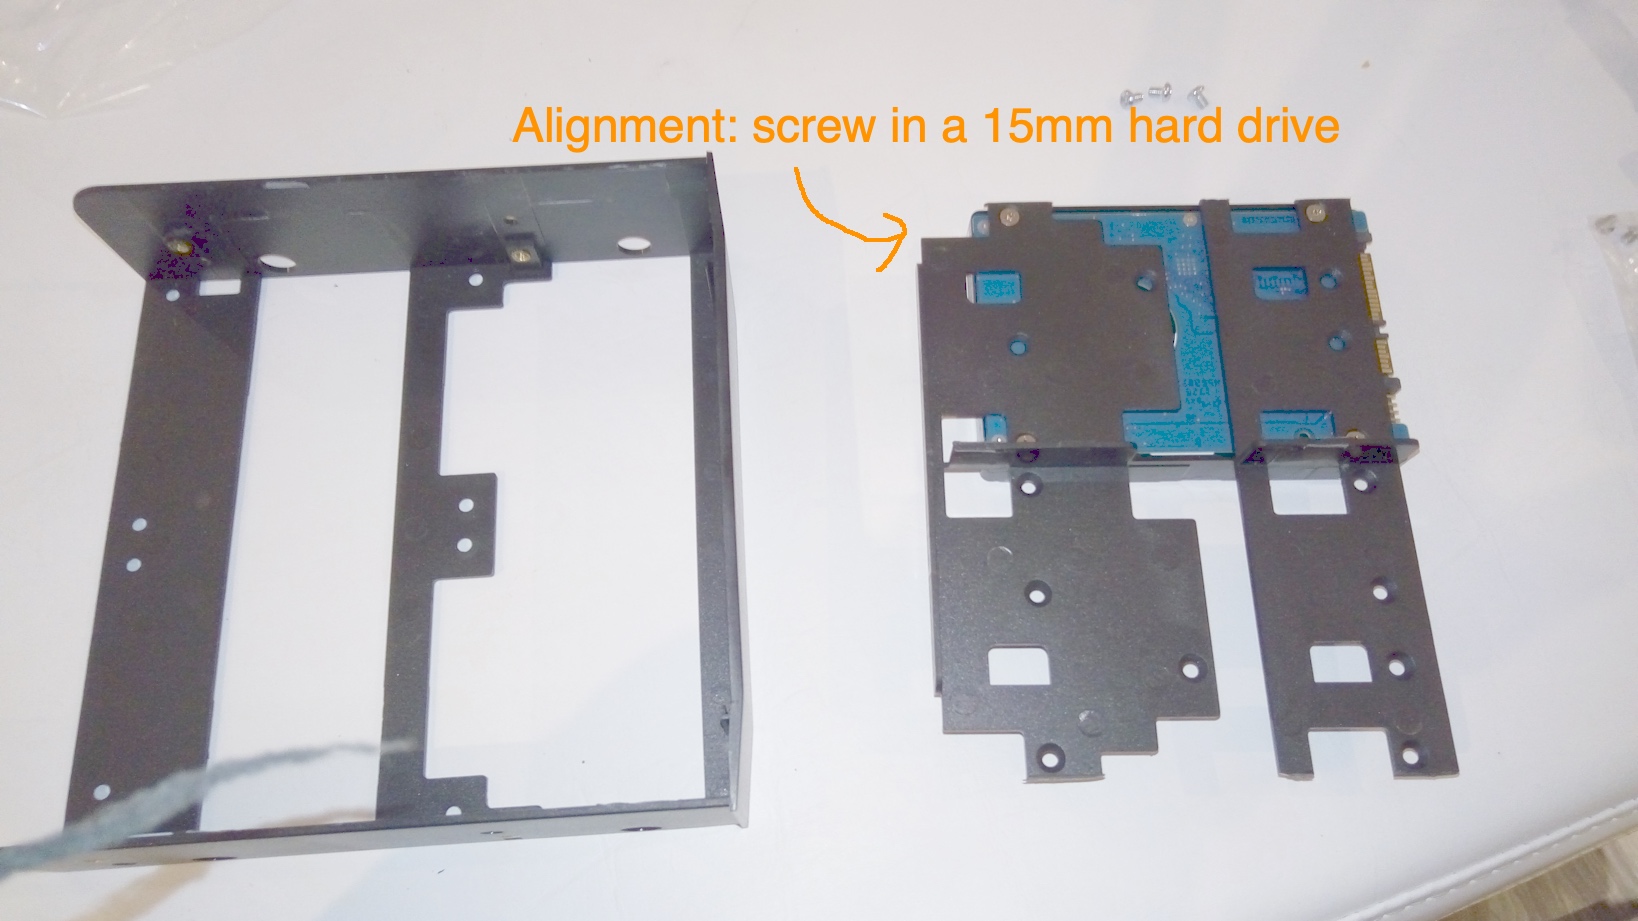
Now we have to align the shelves we just cut. Easiest way to do it is to screw in a 15mm hard drive.
Make sure the shelves look exactly as they do below. Bevels are facing us, smaller shelf is closest to the hard drive SATA ports, etc.
Because the screws are bevelled, as long as you do them all before completely tightening, the racks will self-align to the drive. If you really wanted to be sure you could screw in 2 drives.
At this point, we can leave the hard drive where it is, take the “main” part, and simply flip it onto the hard drive / shelves.
Like so:

Note that I positioned the the drive/shelves closer to the front so that I could glue them to the front also for some extra support. You don’t have to do this (you could simply align to where your cut marks were).
Another option you could consider… If you want enough space for a hypothetical 17mm drive, you could place a shim under the hard drive as there is actually a fair bit of extra room if need be.
—
Examine the picture.
Examine your drive.
Remember, our unit is now “upside down”, and thus the drive is too.
The hard drive SATA connector is facing the rear so we can reach it with cables.
We have access to the screws. All bevels (both racks) are facing us. We could feasibly attach a rear drive at this point (we won’t, but we *could*).
Now double-check. We’re about to start gluing.
Assuming everything looks good…
Step 4: Permanently attaching the shelf in the new position
If you have a soldering iron and love burning-plastic-induced-headaches along with the smell of burning plastic (who doesn’t?), you can start with a mild plastic weld.
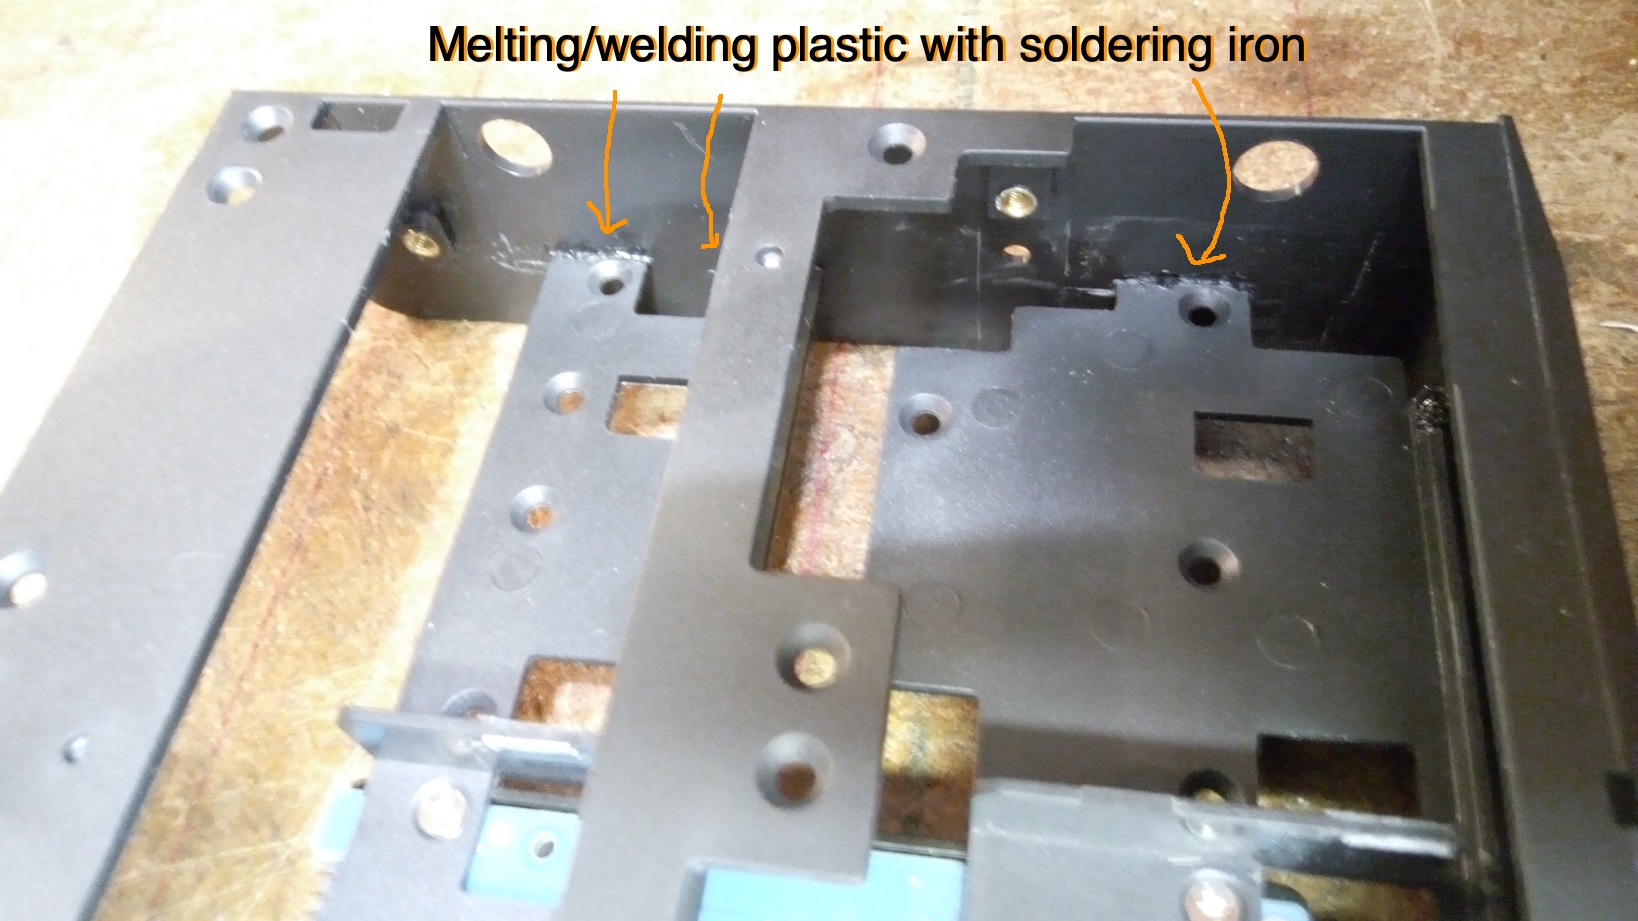
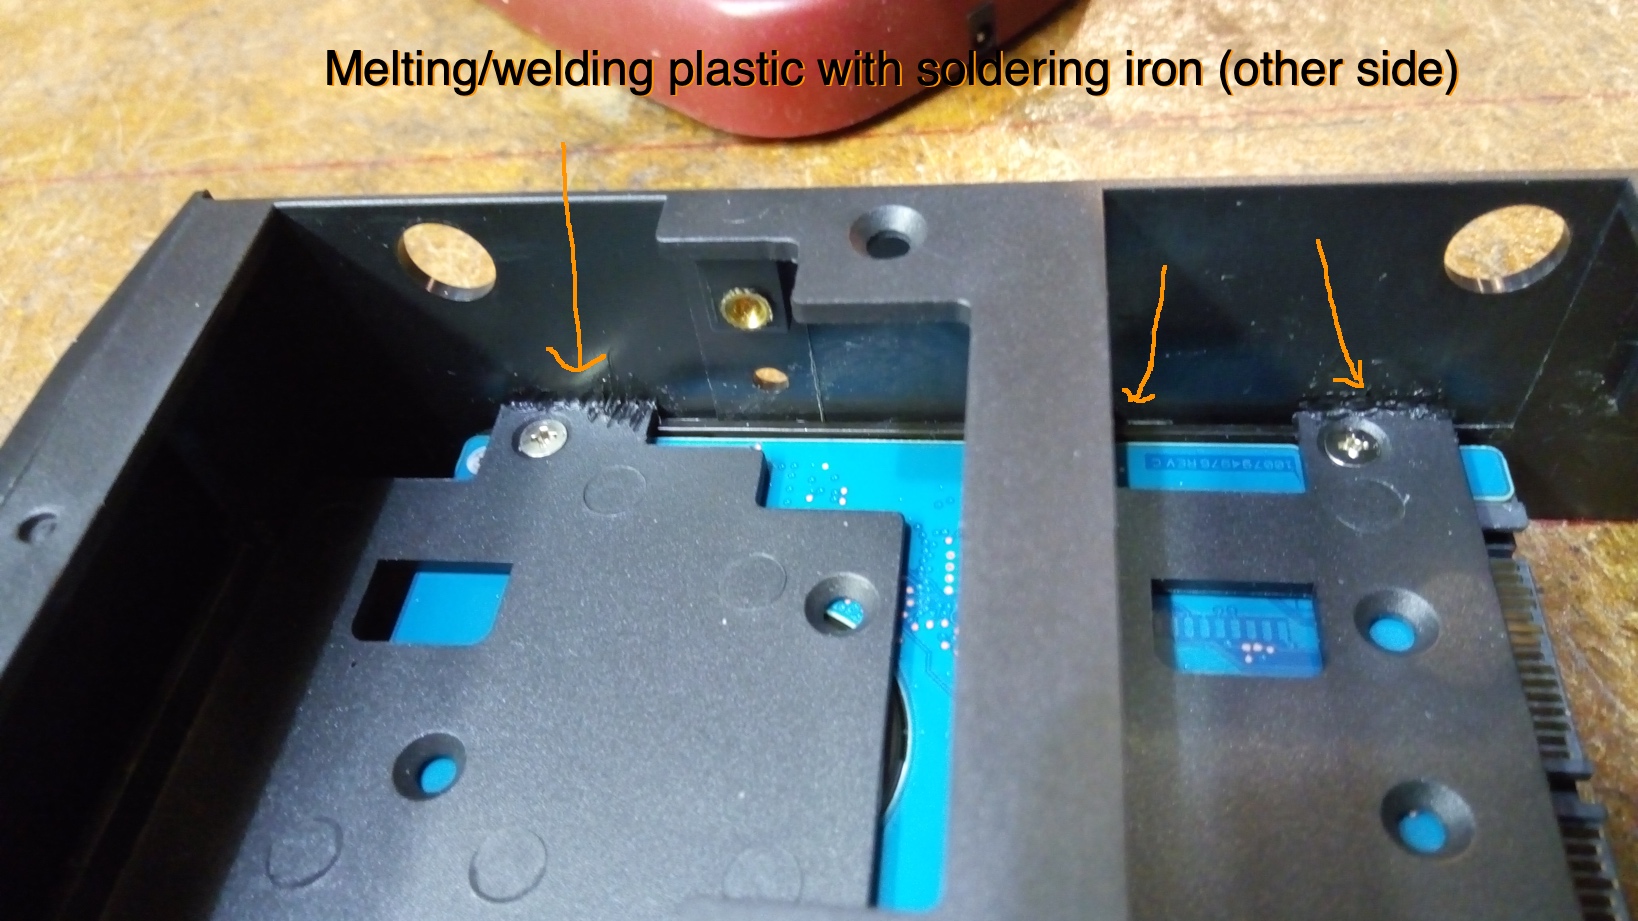
Welding plastic like this makes for an extremely weak weld. However, it’s enough that we can carefully unscrew the drive, and gently lift the enclosure off.
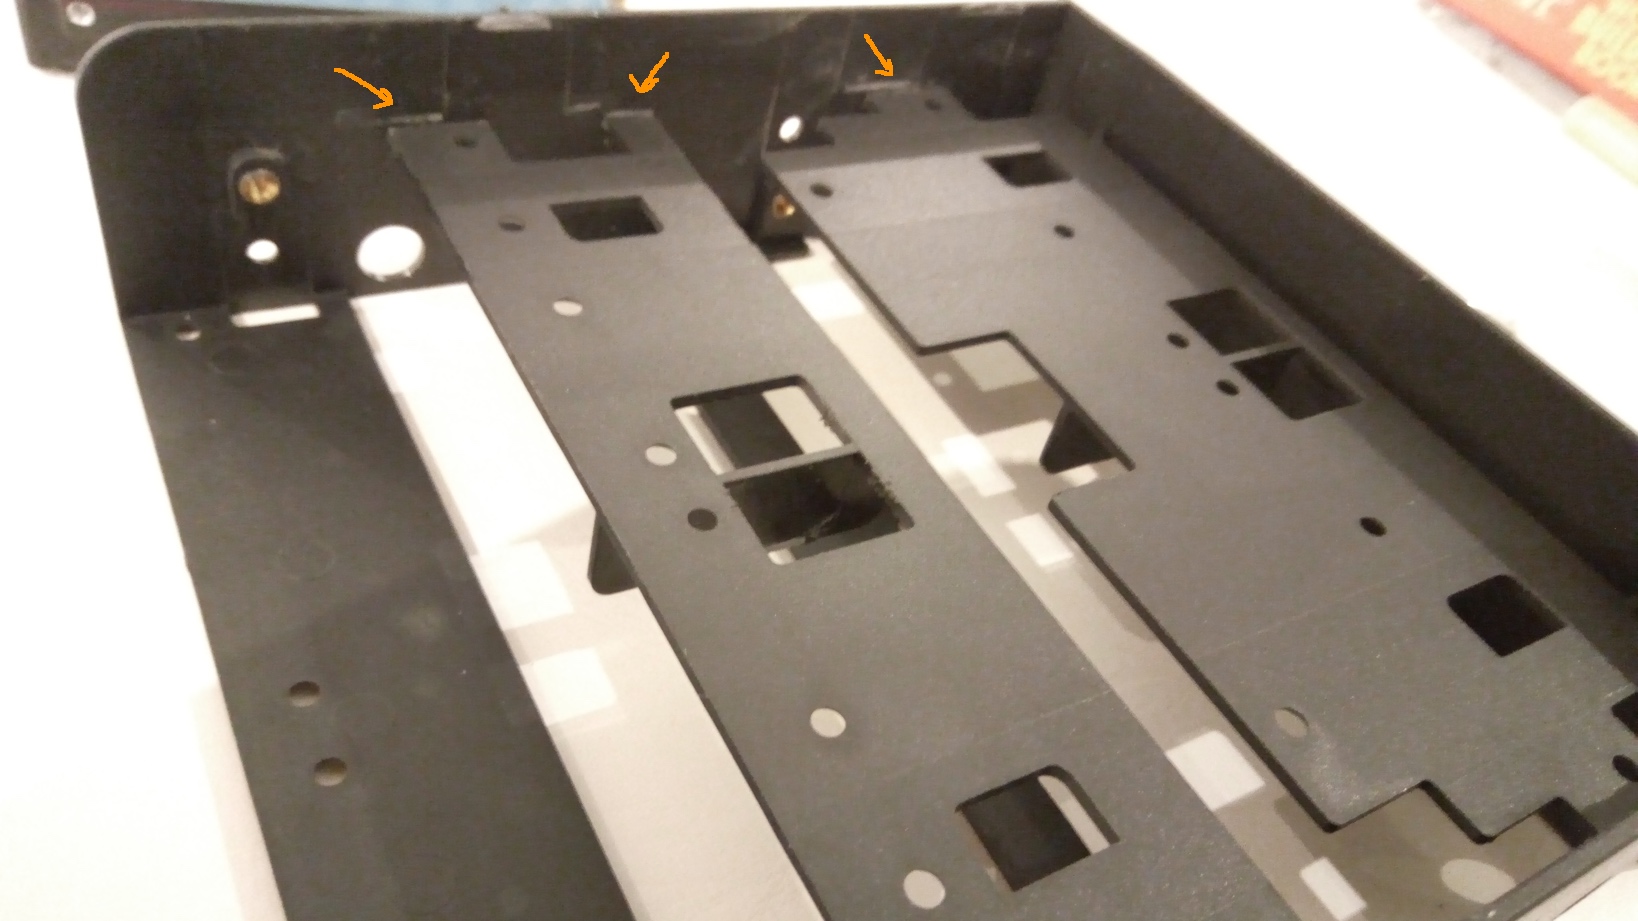
I’ve flipped the enclosure around and highlighted the spaces where we now need some glue.
Be picky about the glue you use: the plastic is fairly smooth and there isn’t a lot for the glue to “bite” into. You could feasibly rough up the surface, drill some tiny holes for the glue to get into, etc.
I used some LePages epoxy, but find something you trust. Be careful to avoid putting glue on too thick, as you’ll have problems attaching the drives if the glue is “in the way”. Something on the runny side can be helpful, so long as it’s also thick enough to fill the space.
Step 5: After the glue is completely dry, attach some drives
I only had the 15mm drive I used for the alignment (the others were busy in a machine), but I tested both top and bottom racks and it worked pretty well.
The exception is that in the bottom rack, the drive wants to “catch” a little along the sides. This issue could have been present even before the mod (I didn’t test), but because the divider on the top shelf “hangs”, it really reduces the wiggle-room available when putting a bottom drive in.
You’ll notice the 15mm drive is flush with the top, and there is a lot of extra space below. Reason is that the unit is about 42mm tall. If we wanted a little extra “headspace” at the top, an option would be to put a “shim” under the drive in Step 2. Since the plastic itself is about 2mm thick, we have 38mm worth of “drive” space, or 19mm per drive if we’d centered the shelf as perfectly as we could (using 4mm shims in Step 2).
Thoughts and Conclusion
The ability to put 20TB worth of relatively economical drives (4x5TB 2.5″ drives) in a 5.25″ slot has me re-thinking the value of 5.25″ bays. For the past number of years I’ve only cared to have 1 for a potential optical drive and tended to look at others and think “3.5 inch adapters required”. Nowadays, if I see a case with three 5.25″ bays, my thought is more likely to reflect the ability to hold 12 drives / 60 TB. Yikes.
As for the adapter itself, it’s cheap, it’s plastic, it’s not what I’d call rugged, but not what I’d call overly flimsy either. It’s about what you’d expect. Once I figured out it’s something I could mod fairly easily, it was an easy buy, and the mod itself was more straightforward than I’d anticipated.
Airflow is a possible concern but I’ve found the 2.5″ drives to run pretty cool in general, so if temperatures do climb I’d expect a slight fan speed increase to be sufficient in dealing with that. Interestingly enough, you can find some SSDs out there that push 5-15W of power (Kingston DCM 4TB as a quick example) which is far more than the 1W-2W each of these spinners pull.
In short, it’s an adapter I’m content with and a mod I’m happy with. If you’re looking to pack some 15mm drives into a 5.25″ bay at a low cost and don’t mind doing a little cutting and glueing, it’s something you can easily tinker away at while watching TV. The melting plastic part though… do yourself a favor and do that one outside.
It looks like a bit of a pain to deal with. Say you had 5 drives in there and wanted to add another, the whole lot needs to come out, 5x SATA cables, 5x power cables, then all back in again. Still, there isn't any other way to get so many drives in that case, and cases with more bays are silly money.
You're right that it's a bit of a pain to deal with. For the power I used splitters/extensions because it is such a tight area that contorting the PSU cable to reach all drives without stressing the connectors would have been hard. Much easier to plug splitters into the drives and then deal with connecting the splitters to PSU leads after the thing is in place. Of course, some splitters are of dubious quality so that's yet one more thing that could go wrong.
Beyond that, the biggest remaining issue is that it's time consuming to install (and to pull if you need to replace a drive), but as you say, cases with more bays usually cost quite a bit. This is cost effective, and this level of density is hard to beat.
I've eight 2.5" 15mm SAS 10k rpm HDDS and eight 3.5" drives I want to put in it.
Came across Icy Box IB-AC652. Looking at it, it should be able to accomodate three 2.5" 15mm tall drives. Bought one to try out because they are inexpensive.
I've got a couple of the Olmaster adapters as well.