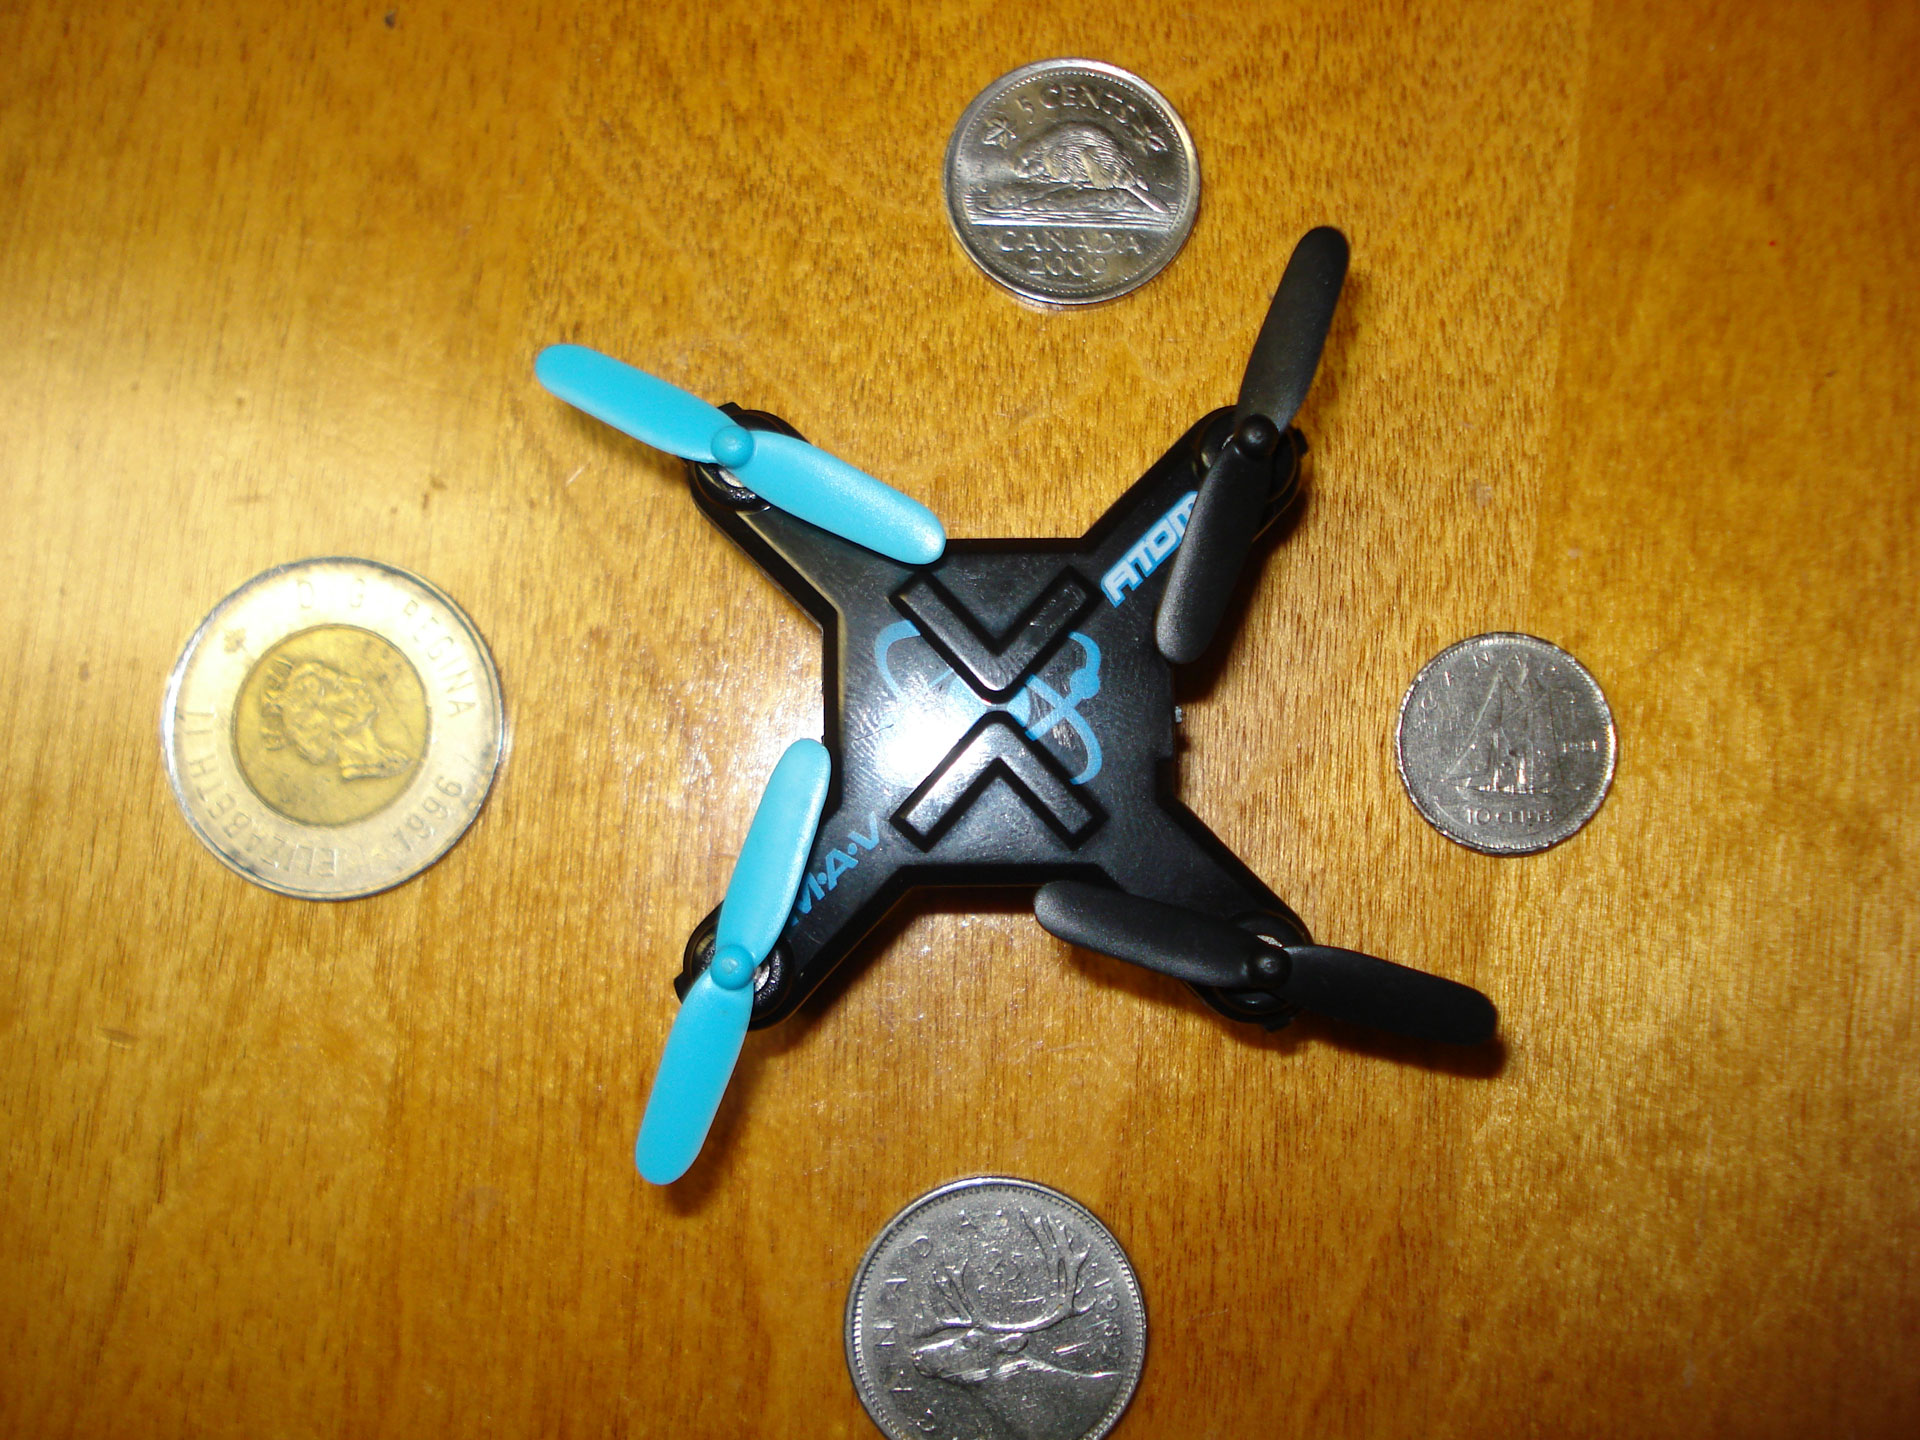
Time for a 2nd quadcopter look. This time I grabbed the Atom M.A.V from The Source in Canada during a sale. It’s a pretty basic nano-sized quad sold by BladeRunner – not as popular when it comes to the nano’s as Cheerson, Syma, Husban, Estes, etc, but not a totally-unheard-of brand either.
One thing that makes this quad really different is the controls. It uses “Mode 4” controls which means that left/right on each stick are opposite of what left/right is on most of the other quadcopters out there. It can be modded to most common “Mode 2”, but I’ll go into that near the end.
What’s Inside
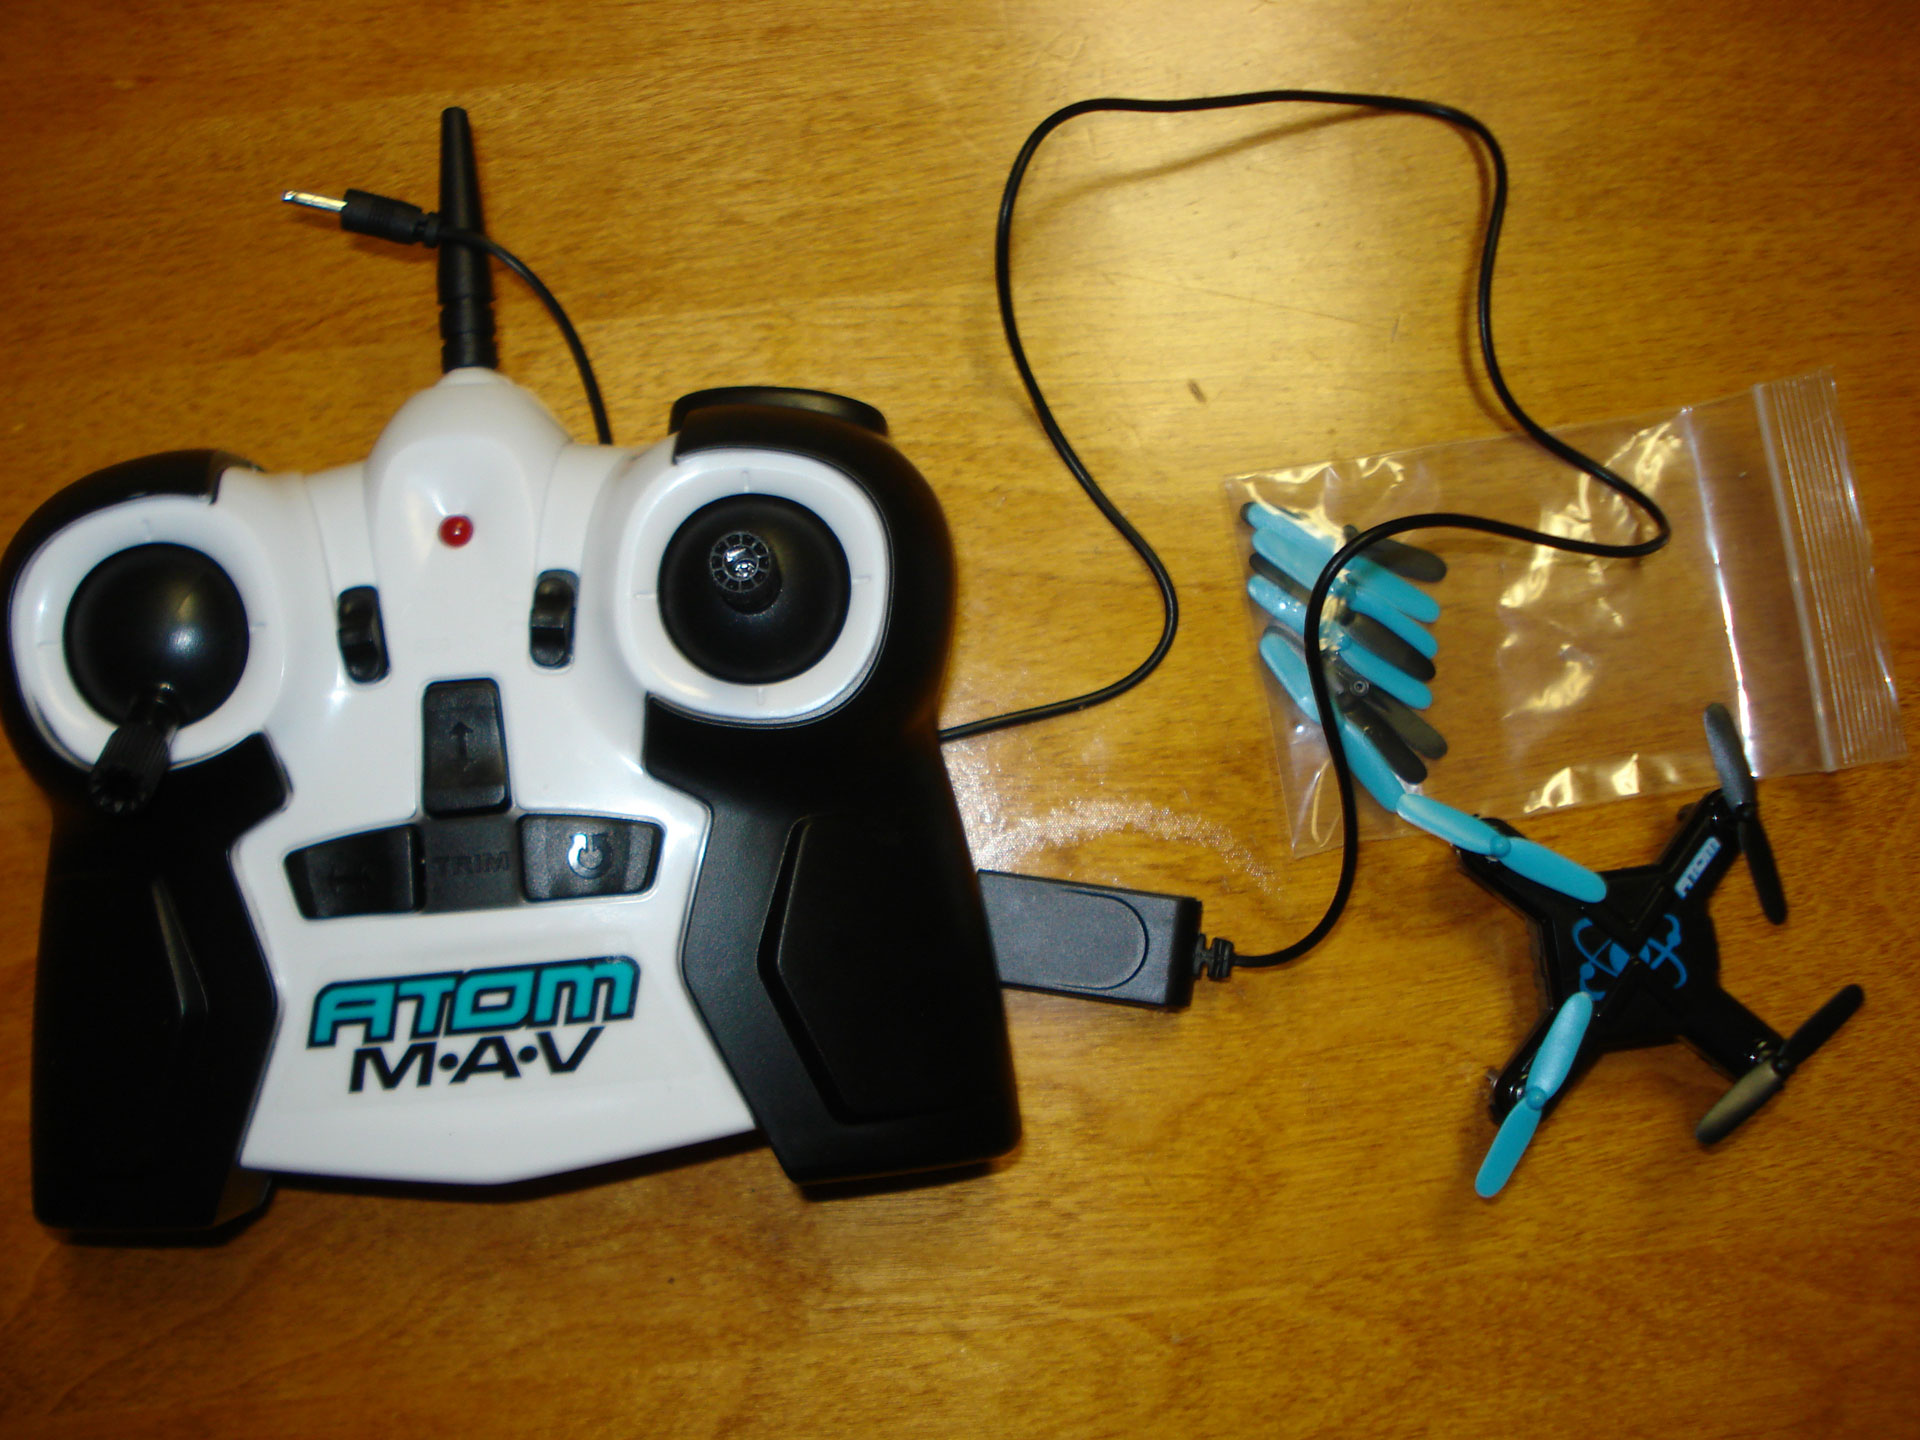
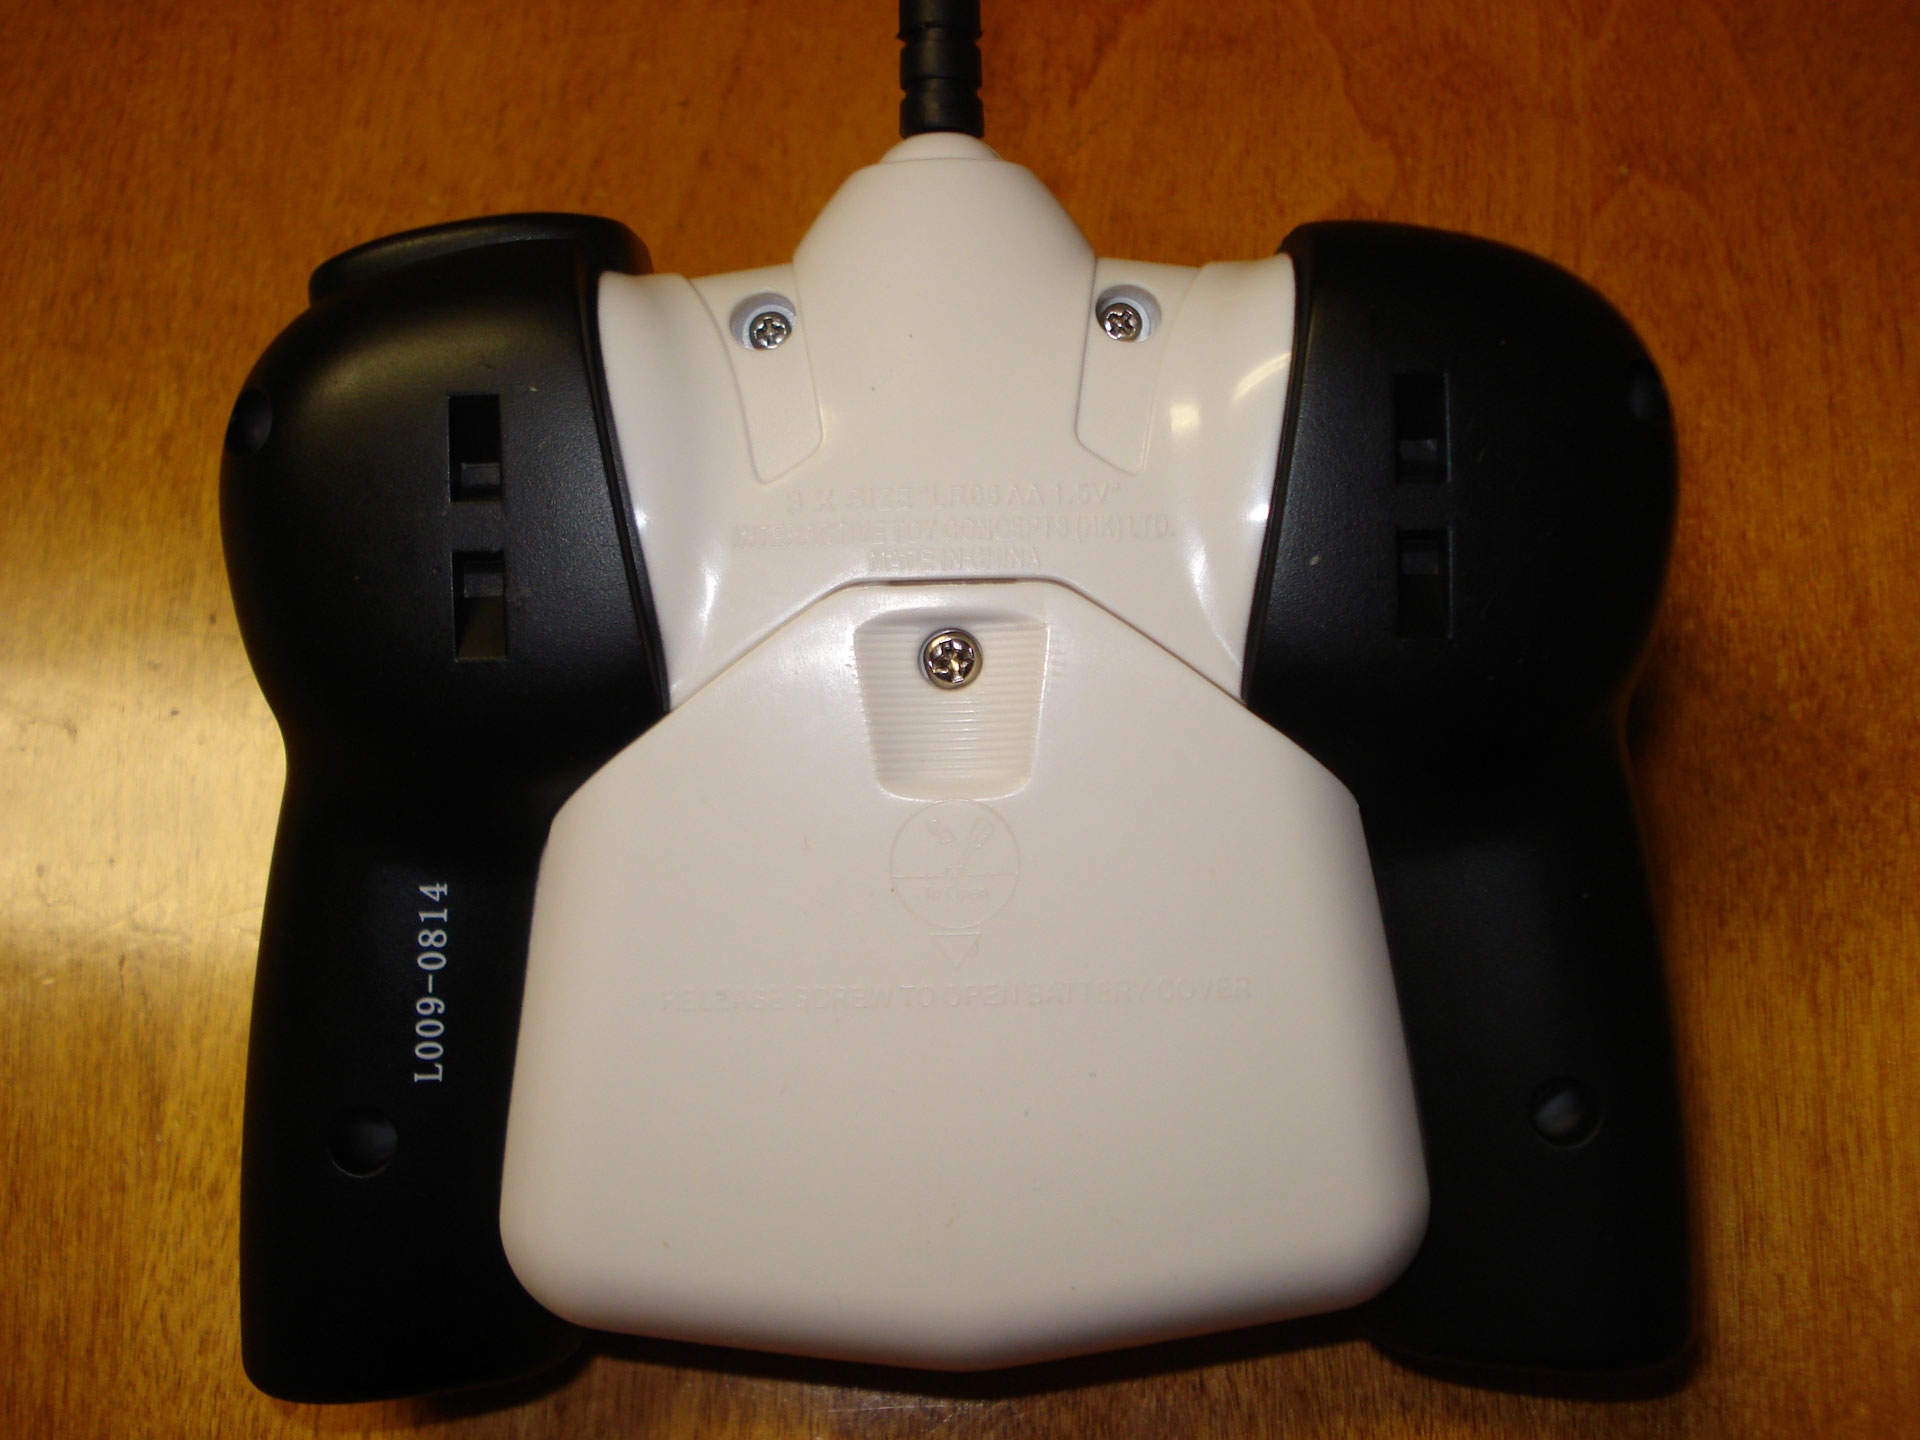
The box contains the basics – the quad, USB charger, controller, and 2 sets of replacement blades (8 blades in total), along with a manual. The quad has a built-in battery (likely somewhere around a 100mAh though it’s not actually mentioned). The battery is essentially built-in, so you won’t be replacing it without disassembling the unit. You’ll have to pick up 3x AA batteries for the controller to get going.


What’s Missing
Notably absent is any form of propeller crash-guard. To be fair, most of the popular nano’s don’t include them, which might leave you thinking “why bother pointing that out then?”. A few reasons:
- Prop-guards for most of the other nano’s can be found extremely easily through the common online retailers. Not so for the Atom MAV. While others may fit, finding something that works will at the very least be more inconvenient than finding for another brand.
- This unit was priced on the higher side ($36 CAD during a fairly substantial sale). Compare that to a Cheerson I ordered at 1/2 that price… I tend to raise my expectations a bit when prices are higher.
- Being sold at retail stores, you’re much more likely to get people buying these as gifts for people with 0 experience flying, which means they’re likely to eat crashes and more likely to be returned if/when they break.
- The controls aren’t common, so crashes from people who do have a little experience will generally be higher. Again, more damaged products that get returned.
Trying to look at a manufacturer’s perspective, it’s hard to see why they wouldn’t have thrown one in. Surely the small cost of the plastic would be more than compensated for by the reduced number of damaged retail returns that would result.
Durability
Durability’s about the same as all the other nano quads flown without a prop-guard. I took it through a few crashes (none terribly hard mind you), and cracked a prop during one of the early crashes, but the body and motors have held up well.
The prop that cracked was against a hard surface in the kitchen. I haven’t had any other damage due to crashes in a carpeted living room, but I’ve been reluctant to intentionally throw it too hard into anything just for the sake of saying “oh look, I can break it!”.
In any case, if you’re an experienced flyer, nothing out of the ordinary here (though the less-common controls might throw you for a loop). If you’re a beginner and don’t have a “soft” area you can fly in, plan on going through at least a couple of the spare blades while you’re “learning the ropes”.
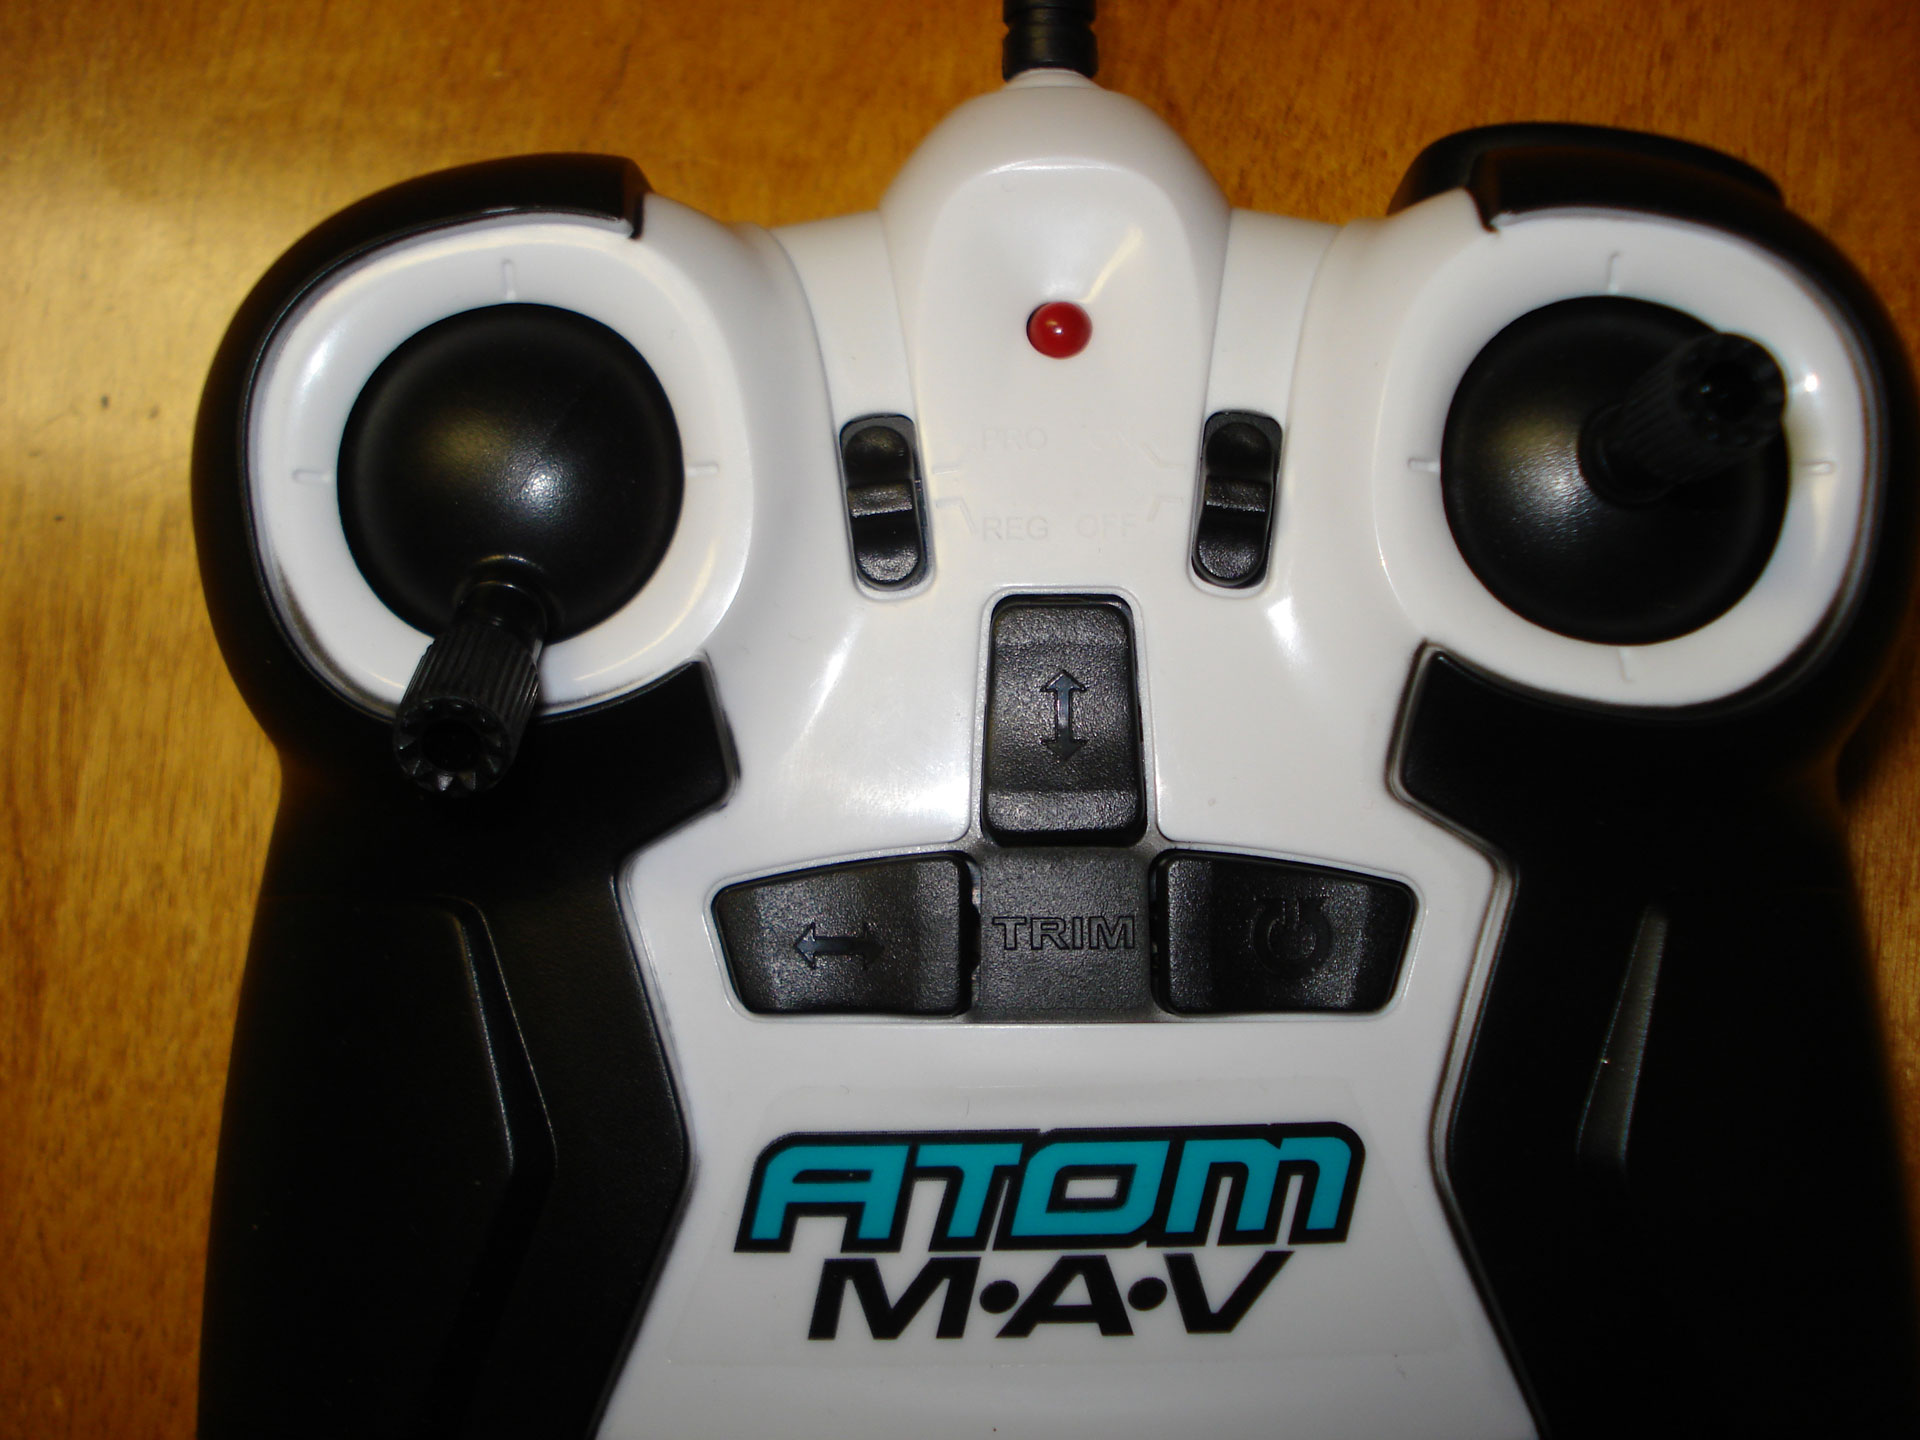
Controller
The left stick does throttle and roll (move left/right). Right stick has yaw (rotate left/right) and pitch (move forward/back). As you might have noticed, roll and pitch are on opposite sticks from usual, but I’ll go into the modding a bit later.
The right bumper lets you do a trick. Press it, then throw the right stick in the direction you want the flip to be in. Normal and Expert modes are included, as are trim buttons for each of the 6 axis directions.
Recalibrating the gyro’s isn’t mentioned in the manual, but it can be done with both sticks down and to the right.
I have to say, I really like the look of the controller – the black/white just looks really clean. The trim buttons feel a bit cheap, but the rest actually has a nice solid look and feel to it, particularly compared to some of the other low-cost nano quads out there.
Flyability
Obviously, the Mode 4 controls make it… interesting if you aren’t used to them (I wasn’t). After modding it to Mode 2, it really behaved just as you’d expect. Few notes:
- Tricks/flips are fairly tight. Pretty good recovery.
- Yaw (rotation) is in the medium range (maybe slightly on the slower side). A pretty comfortable level, but you’re not going to do any really tight fancy manoeuvres like whipping around table legs, doing tight circles, or anything similar with just yaw + forward.
- The yaw rate doesn’t change between standard/expert modes.
- Stability is decent. Like other nano’s it tends to be pretty touchy when it comes to drift, but as long as the blades are intact, it can be trimmed up enough that drift isn’t too hard to correct for manually.
- Often have to re-trim after a crash.
- Pretty good recovery from dead-drops.
- Power stays pretty consistent throughout the battery range.
- I’ve generally been getting 5 mins (+/- a minute or so) of flight time before the leds start to flash due to low battery. Battery charges in around 20 minutes.
There isn’t anything exceptional, but also nothing that stands out as really poor. It’s a typical nano-quad flyer that I’d rate fairly decent all around.
Modding the Controller – soldering to do the Mode 4 to Mode 2 conversion
If you’d prefer to have the more common “Mode 2” controls (throttle and yaw on the left stick, pitch and roll on the right), you can mod the controller.
Warning #1: Obviously, this will void any warranty, so you’re on your own.
Warning #2: This will change the trick combination. Forwards/backwards will still be on the right stick, but a flip left/right is SWAPPED to the left stick.
Stuff you’ll need:
- some thin wire
- soldering iron + solder
- knife (exacto/etc)
- some prior experience soldering
I took meticulous pictures during the process, but my Sony Cyber-shot corrupted all my pictures for the 2nd time now. Anyway, in lieu of those, I’ve merged 2 pictures (that will hopefully be most helpful) from elsewhere on the web, and I’ll include direct links to the sources as well, in addition to details that I think might help.
Step 1 – Remove the rear batteries, and all the rear screws
A typical smaller phillips screwdriver and they should all come out. The controller comes apart really easily once they’re out (no plastic latches or hooks), so if it doesn’t open up easily you probably missed a screw.
Step 2 – Open the controller
Only note here is that the battery wires aren’t very long. I ended just snipping them at the half way mark (and added some extra wire upon assembly). If you’d rather not cut them, you *might* have enough room to work around them, or you could de-solder them from the battery terminals (either mark where each goes, or trace back to the positive/negative terminals later)
Step 3 – Cutting and Soldering
This is where you’ll basically need to follow ONE of the pictures below for wiring. The cuts to the circuit board are the same for both, so you’re best to follow the 1st one when cutting since they’re labelled nicely. It’s the same circuit-board but different methods. I took about a dozen during the process, but my Sony Cybershot ate my pictures (2nd time now…), so I sourced these 2 from the web. My mod was almost identical to the bottom one, but the top one looks cleaner, should work, and is probably a much smarter way of doing it than I did. Use whatever you prefer.
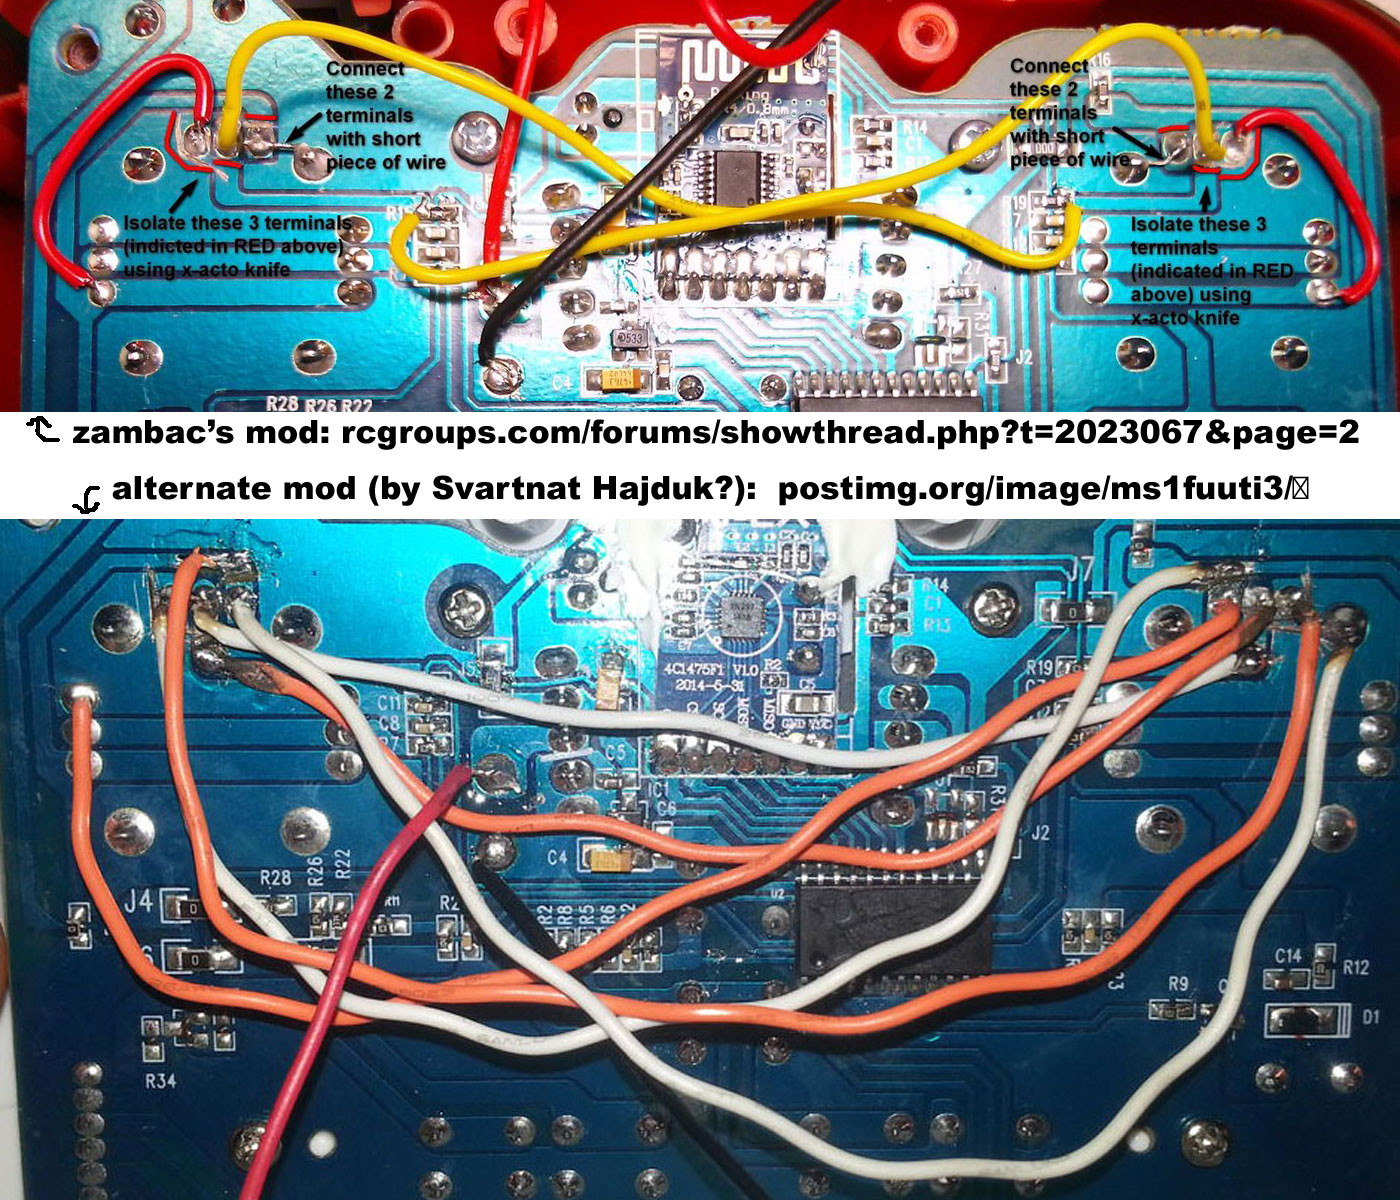
You can click for a larger version, or visit the original links for the full un-trimmed images:
- Top one: http://www.rcgroups.com/forums/showpost.php?p=27049568&postcount=23 by zambak of the RC Groups forum
- Bottom one: http://postimg.org/image/ms1fuuti3/ frequently posted by Svartnat Hajduk in YouTube comments
It’s probably easiest just to copy one of those directly, but if you want to do EXACTLY what I did:
- Make the same cuts as from the top image to isolate those terminals.
- Copy the yellow wires from the top image (basically the middle solder point from each stick to the opposite resistor). Soldering to the resistors can be a bit tricky with a large soldering tip, so keep that in mind.
- Copy the bottom image for the remaining wires (obviously omitting the middle solder points/wires though since you already connected them to the resistors).
Really, probably just easiest to follow one of those images instead of recreating my exact process – they should all work the same in the end.
NOTE: The rear shell (with the battery compartment) has 2 plastic circular extrusions that press against the board when reassembled. Look for them before soldering, and make sure you don’t solder the wires at angles where they will be in the way. If it’s too late, thin wires will usually let the casing still close enough, but thick wires might have to be routed and/or resoldered.
Step 4 – Test
If you can re-assemble the battery compartment without completely re-assembling the unit (and without creating a short if you cut the battery wires), do so.
Then power on the quad and power on the controller.
If the controller does not power on, remove the batteries, and double-check your work. The most likely cause is not cutting/isolating the terminals well enough.
If the controller powers on, try flying the unit very slightly… hold a direction and give it just enough acceleration to start moving (don’t actually fly it – you should be able to tell if it’s moving or rotating in the proper direction before the last 2 feet leave the ground). Make sure all the directions move.
If a direction doesn’t work, you might just have a bad solder joint (I had a bad joint at a resistor which kept the right-stick from working left/right).
Step 5 – If Everything Worked
Assuming it all worked, you can close things up.
Because my soldering job was on the “iffy” side and I had wires all over the place, I wanted to prevent a wire from coming loose or being stressed at a joint upon reassembly. I used some silicon to glue down where all the solder connections were made to the board first. Obviously, be sure you’ve tested before doing so, because there’s nothing more annoying than scraping off silicone if you have to get at the circuit board again.
Remember that flips are different… bumper + up/down works the same, but the left/right flip are now on the left stick.
Conclusion / Final Thoughts
There are 2 main issues I have with BladeRunner Atom M.A.V. :
- No prop guard, making it much more likely to go through props indoors.
- Mode 4 controls which take some soldering to change.
If you prefer Mode 4 controls, are looking for a nano, and wouldn’t use a prop guard indoors anyway, the Atom MAV might actually be the “diamond in the rough” you’ve been looking for.
Otherwise, it probably wouldn’t be my first look. While it’s a decent little nano all around, the “reversed” controls make it harder to fly for those used to Mode 2 (the majority), and lack of a prop guard means that mistakes while adapting are more likely to end that poor little nano’s life.
1 Comment | Leave a Comment