Preliminary Warning:
Overclocking has the potential to damage/destroy components. Overclock at your own risk. Just because my settings didn’t blow up my machine, doesn’t mean they won’t blow up yours. The writeup below is subject to error and inaccuracy. If your machine dies, your house burns down, or you inadvertently cause a chain reaction of events resulting in a nuclear power plant exploding due to something you read here, I disclaim all responsibility.
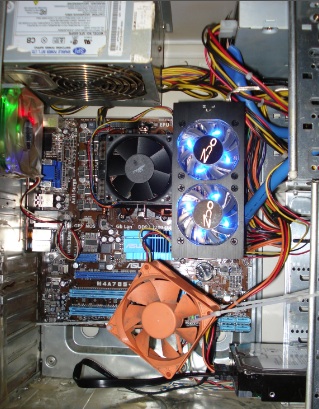
ASUS M4A785-M installed with AMD Phenom II X6 1055T – Yes, as you’ll see, all those fans are necessary!
With that out of the way… the M4A785-M isn’t the newest of boards, and pairing it with one of the best AMD processors might seem a little puzzling. Here’s why it was chosen anyway…
- It’s cheap (under $100).
- It supports DDR2 RAM.
The fact of the matter is, I had perfectly good DDR2 RAM that wasn’t being used, and one of the newer AM3 boards just didn’t make sense. Therefore, I needed an AM2/AM2+ motherboard. Even though the X6 is an AM3 processor, it’s backwards compatible with AM2/AM2+ motherboards, proving the board supports it physically as well as through a BIOS update.
—
Pre-build concerns:
- The M4A785-M is a budget board. Budget boards and high-end processors often *barely* manage. Adding overclocking to the mix has the potential to spell trouble (heck, budget boards often have difficulty dealing with overclocked low-end chips).
- While it supports the X6 through a BIOS update, this motherboard obviously wasn’t originally designed with the 6-core in mind.
- It supports processors with a maximum of 125W (which most of the current X6’s are). Again, adding overclocking potentially pushes the limit. Note that there are other boards that support 140W processors (the ASUS M3A78-EM being an example of an older DDR2 motherboard that supports the 140W processors). It would be reasonable to assume that a 140W-supporting variant would be better suited to the task.
- 4+1 phase power design. I suppose it could be worse (Gigabyte has a DDR2 motherboard supporting the X6 with only 3+1), but there are AM3 boards out there with 8+2 phase.
- El-cheapo heatsinks. The northbridge heatsink is actually sized very well. However, the southbridge heatsink is as tiny as possible, and there’s no heatsink on the MOSFETs.
Despite these downsides, motherboard options in the DDR2 realm are slim, and this was the best motherboard locally available.
However, the reasons above are largely why the overclock was done at STOCK voltages. Overclocking adds a bit of heat and power consumption. Overvolting increases the heat/power-consumption substantially and I’d be begging for trouble doing it (I wouldn’t expect the board to last more than a year assuming it survived the overvolting process on this processor to begin with).
Hence, stock voltage results only.
Board setup
Before throwing the motherboard in the case, I pulled the northbridge & southbridge heatsinks, and scraped off the old thermal interface junk. It’s silver stuff on the northbridge (similar to the AMD heatsink thermal interface pad), and the gross pink thermal pad on the southbridge. Once those were off, I replaced it with an extremely tiny amount of Arctic Silver.
If you replace the thermal pad with thermal paste, I’d recommend using a NON-CONDUCTIVE paste. The dies on the north/southbridge are so tiny that it would be easy to use too much, and if you conductive stuff you might kill the board.
I also used Arctic Silver on the stock AMD CPU heatsink. The included heatsink is actually pretty decent (heatpipes and everything), but the default thermal pad was too thick for my liking.
The motherboard’s a standard ATX size – if you’re using a medium-sized case, you’ll probably have to yank out your hard drives while you install it.
In terms of layout, the board’s pretty good. The one exception is that the 24-pin power connector hugs the IDE connector – this won’t matter if you’re using SATA, but if you’ve got an IDE drive, getting the cable in will be a little tight.
Initial set-up
First, the board needed a BIOS update to support the processor. It detected it as an “Unknown Processor” and gave an error message about a CPU not being installed, although it still let me into the BIOS where I could change options and pop into the ASUS Bios Updater.
The BIOS included was version 702. The current X6’s require at least version 906. I used another computer to download the new ROM onto a USB memory stick, popped it in the M4A785-M, and let it flash. After a restart, things were looking good.
—
I did some quick testing at stock settings. Note that I had close to the bare minimum attached to this thing, aside from a pile of fans. 1 hard drive, 1 dvd-rw drive, 2 sticks of DDR2-800 RAM, and that’s it. I was using the onboard video and had nothing else but a keyboard/mouse plugged in.
At idle (Windows 7), the system was using 84 watts at idle (measured from the power outlet), and 172 watts at load (running Prime 95). An average power supply should be able to handle this thing if you’re using onboard video.
Heat
While Prime was running, I touched the heatsinks. The CPU heatsink was relatively cool. The northbridge was cool (although the RAM cooler was giving it some airflow), but the southbridge was extremely hot. After about 5-10 seconds I had to pull my finger off to keep from cooking my skin. Immediately after shutoff, I felt the MOSFETs and they were hot.
Here’s the concern…
Southbridge – the heatsink is just too thin and tiny. Regular case airflow just doesn’t cut it. The thing’s screaming hot at stock, under load, with good case airflow. I’d hate to think what it would feel like in a stuffy (HTPC) case.
MOSFETs – the CPU fan passes some air over this region, but if you have the silent fan control enabled in the BIOS, at low CPU temps you’re not getting airflow.
I wouldn’t dare to overclock under these conditions. Overclock + a hot day could easily mean motherboard death.
My fixes were as follows:
Southbridge – I used zip ties to hang an 80mm fan over the location (which you can see in the picture), just to get some directed airflow. It worked very well.
MOSFETs – I turned off the setting for the silent fan in the BIOS so that it ran at full-speed all the time for maximum airflow in the area. I also used a dremel on the computer case to cut out the “grill” for the rear exhaust fan, so that the rear fan would pull more air over that general region (and increase total case air flow). This had a helpful effect – the MOSFETs still got very warm, but not as hot as before.
It’s pretty clear that the M4A785-M is marginal at best when it comes to cooling and the ability to deal with heat. I have a RAM cooler, rear exhaust fan, and 80mm fan over the southbridge added to the setup just to keep things comfortable temperature-wise at stock. I would have been very hesitant to risk overclocking without having dealt with the southbridge and MOSFET temps.
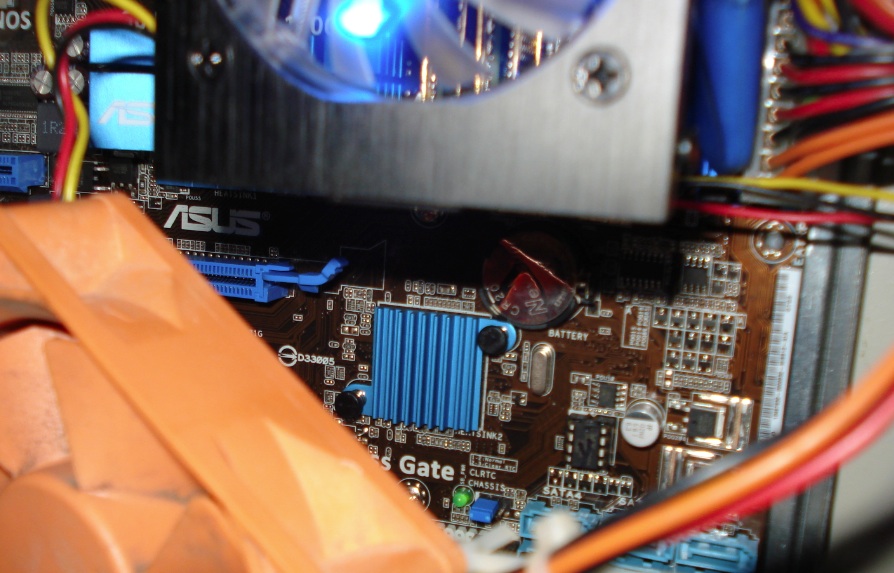
What a terrible southbridge heatsink! I’m surprised it doesn’t glow red. You’ll see part of the orange fan I hung with zip ties in the bottom left. It was either that, or rig something up so that the southbridge would keep my coffee warm.

Those MOSFETs are in dire need of heatsinks. Even with the CPU fan at full speed (blowing air out the sides), the exhaust fan to the left, and the PSU intake fan above, these things stay very warm. This in itself is a huge reason you don’t want to crank up the voltage of the CPU. These little guys probably wouldn’t be able to take the heat.
–
Overclocking (finally!)
Now we get to the good stuff.
For all it’s flaws, the M4A785-M has a very capable BIOS for overclocking. My last post was about a terrible Intel-based ASUS. This one’s so nice it feels like the old (awesome) ASUS is back in town again. There are some flaws in the way things are worded in the BIOS, but the options are there and are plentiful.
For those new to the AMD side of things (but not new to overclocking processors), here’s a quick crash course on this motherboard….
CPU/HT reference clock – this is the base frequency that all your other stuff is multiplied against. It’s like the Intel FSB, but better (because more things are detached by way of adjustable multiplier).
Processor Frequency Multiplier – you already know what this does. This multiplied by the reference clock = CPU speed.
CPB Control – aka “Core Performance Boost”. This is the “Turbo” function to boost the multiplier of cores when they’re not all in use (single-threaded tasks). You can adjust the multiplier used for this if desired. I disabled it for overclocking because of a couple issues I’ll mention, as well as the difficulty involved in testing each core individually when turbo’d.
CPU/NB Frequency – This multiplier determines your Northbridge frequency (again, multiplied by your reference clock). The default works out to be 2000Mhz. It’s possible to get a speed improvement by bringing this up, although you’re going to hit a wall without increasing the voltage.
HT Link Speed – This is the “HyperTransport” speed. The default is 2000Mhz. For some reason they list a frequency instead of a multiplier. Note that overclocking this generally has almost no effect on your total system speed, and can even result in a DECREASE in speed. Overclocking it can also cause instability. Therefore, try to keep this thing around the stock frequency of 2000Mhz. The frequency listed is what it would be at a STOCK reference clock of 200Mhz. Therefore, when you increase the reference clock, you must DECREASE this setting to keep the actual result near 2000Mhz.
Memory Clock Mode / Memclock value – This is poorly written just like the HT Link Speed. The frequency shown here (when set to manual) is the frequency the RAM will run at when running the STOCK reference clock of 200Mhz. The math you have to do here is nothing short of a nightmare. When overclocking, it’s generally easiest to set this to 200Mhz (which is actually a 1:1 ratio, and would be DDR2-400 speeds at 200Mhz). Once you’ve finished with your overclocking, start increasing this setting (which will change ratios) until you get near your desired RAM speed.
Advanced Clock Calibration – Apparently this helped the original Phenom processors obtain higher stable overclocks utilizing the southbridge somehow. I’ve read mixed things on this, but from the sounds of it, this probably doesn’t benefit Phenom II’s a whole lot, and could cause instability. I have it disabled, but you could try both and see which nets you better results.
There’s plenty more I could go into, but this should be enough for now. In any case, the settings I ended up with were as follows:
CPU/HT Reference Clock (Mhz): 250
PCIE OverClocking: Manual (100)
Processor Frequency Multiplier: x 14.0
CPB Control: Disabled
CPU/NB Frequency: 8.00x (works out to 2000Mhz – later increased a notch)
HT Link Speed: 1600Mhz (works out to 2000Mhz)
Memclock Value: 333Mhz (works out to DDR2-832 if I remember right)
C1E Support: Enabled
Advanced Clock Calibration: Disabled
This resulted in a 3.5Ghz machine – a 700Mhz improvement over the stock 2.8Ghz. However, turbo is off (which by default gives 3.3Ghz on single-threaded tasks), so this isn’t a huge improvement for single-threaded stuff. However, everything was left at stock voltage.
Incidentally, I tried a base clock of 260, but it failed Prime95. It’s possible I could have squeezed a little more out of this by trying 255/etc, but since 250 allows me to maintain the stock 2000Mhz HT (at the poorly named “1600Mhz” setting), I left it there.
Most of the other stuff was left at default values. Note that I used C1E to help the processor cool down periodically for the types of tasks I do – you may want to disable it to try pushing higher clocks.
Important note! It’s been said in numerous places that your NB frequency MUST be equal to or higher than your HT frequency (never lower). Be careful of your settings when changing things around.
Finally, use the AMD Overdrive Utility and CPU-Z to see what each BIOS change actually results in setting-wise. Focus on the CPU frequency, NorthBridge frequency, HT Frequency, and RAM frequency. Make changes a little at a time – because the ASUS bios is a little poor when it comes to being clear about what each setting does/changes (listing frequencies when they should list multipliers for example), tiny changes erring on the side of caution is the best way to go.
Oddities Abound!
I have never seen oddities like the ones I experienced here.
First, Memtest86+. Using the latest version I had (4.10), it never detected the actual RAM speed. It always used whatever the BIOS (incorrectly) reported based on the setting chosen. So when overclocked, it would say DDR2 667, even though the RAM was running at DDR2 832 when overclocked.
Next, the AMD Overdrive Utility, and CPU-Z. Initially, I had CPB (the “turbo boost”) setting enabled in the BIOS. However, no matter what frequencies I chose, AMD Overdrive kept claiming that I was running at stock (2.8Ghz), while CPU-Z showed my chosen frequency (3.5Ghz for example). They matched up everywhere else. Since I didn’t want to benchmark to see which was telling the truth (and didn’t want turbo boost limiting my overclock), I just disabled the CPB setting in the BIOS. They also mismatched when I’d manually choose a Processor Frequency Multiplier above 14.0 (basically if I chose the “turbo boost” multipliers), which is why I stuck with the 14.0 and just moved up the base clock.
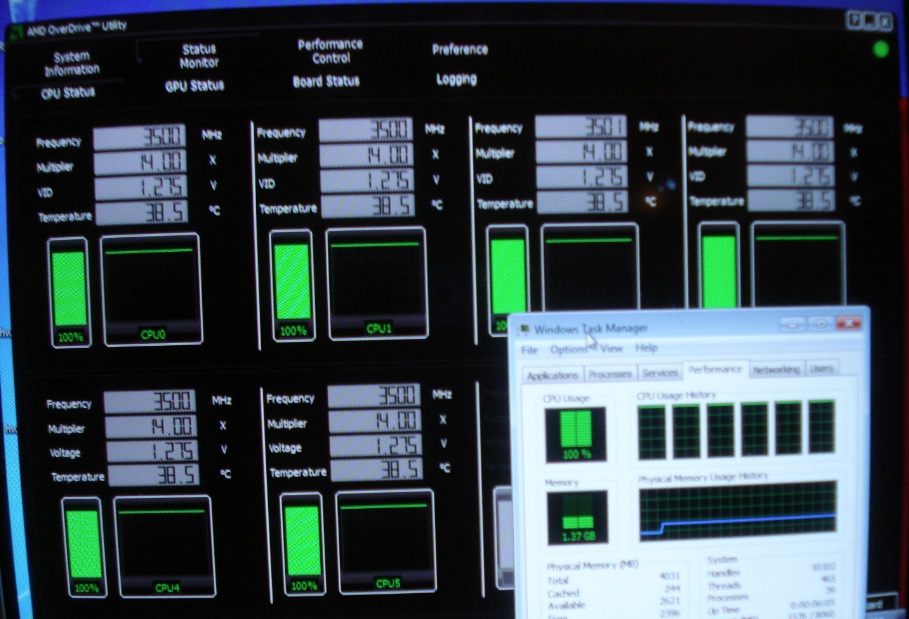
Here I’m keeping an eye on the temperatures reported in AMD Overdrive while overclocked to 3.5Ghz and running OCCT. Yes, it’s an ugly CRT monitor that you’re seeing.
—
Final results:
At the settings listed above, I’m at 3.5Ghz. Prime is stable.
For the CPU temp, I’m looking at 19 degrees at idle (it’s cold in the house right now), and 42 degrees at load.
System power consumption (using onboard graphics) measured from the wall is 76 watts at idle, 202 watts at load.
–
Final thoughts
All in all, the ASUS M4A785-M is a pretty decent motherboard in terms of capabilities. My overclocked results are in line with what most people seem to be able to achieve at stock voltages on the default air cooler. I’m sure that if I dared to up the voltage I could hit close to 4Ghz, but there’s no telling if the motherboard would actually survive for very long.
What I liked:
- Excellent overclocking options and a multitude of settings.
- The motherboard actually POSTed with the X6 before the BIOS update, allowing me to update the BIOS (some old BIOS’s used to require you to use a *recognized* CPU to even POST).
- Easy, stable overclock.
- Allowed me to use my DDR2 RAM, and you can set a 1:1 multiplier through the “200Mhz” option, which means even if you had ultra-slow DDR2 533 RAM, your memory would be able to run within spec at base clocks of up to ~266Mhz.
- Quite cheap. At under $100, it easily out-does every single Intel motherboard I’ve ever bought for under $100 in terms of options, features, and overclockability.
What I disliked:
- Southbridge cooling is marginal. No heatsink on the MOSFETs.
- Only 4+1 phase power design makes me leery.
- Some BIOS settings named incorrectly (showing HT and RAM as frequencies, even though they’re multipliers).
—
Would I recommend this board to others?
If you’re running a 2/3/4-core, and want to use DDR2, then yes.
If you’re running a 6-core and want to use DDR2, then only if you’re willing to: (1) refrain from cranking up the voltage for crazy overclocks; (2) add cooling.
UPDATE: I’ve since put this thing in an Antec 300 case, using a Noctua NH-U12P CPU cooler. There’s an intake fan, side fan, rear exhaust and top exhaust fan. I also JB-Welded a tiny tall heatsink to the southbridge to give it more access to air. Mosfets and Southbridge are both extremely cool now, so I have slightly upped the voltage to get a few more Mhz (still under the 4Ghz mark). Because the components are so cool, I’m not as concerned about the motherboard blowing up when overvolted a little, although I still wouldn’t go crazy. I’ll of course update again if the thing explodes anyway.
If you’re running a 6-core and DONT have extra fans lying around, you’re better off buying an AM3 board and just spending money on the DDR3 RAM – it’ll probably cost just as much as it would for you to buy a bunch of cooling and add it to this board.
If you’re determined to overclock towards the 4Ghz mark, don’t buy this board. Get an AM3 with good heatsinks all around, and a more capable phase power design.
Thanks tons for this post.
Because this board is only $70, I'm thinking of trying it, so your work here is REAL cool.
The update is great, makes it even more useful. I don't know about that Noctua cooler tho; is it really good? That southbridge heatsink; is it removable? 'Cause IF it is, I could get my brothernlaw to machine the top off flat, & solder on a taller, bigger 'sink. That would cool it down.
J-0n
The Noctua's pretty decent. You can read the comparison to a low end water cooler here if you're interested:
https://mattgadient.com/noctua-nh-u12p-vs-cool-it-domino-a-l-c/
The southbridge is removable - I popped it off and replaced the pink pad with a proper thermal paste. Your idea to solder on a taller heatsink is something that would probably help immensely. Don't forget to double-check beforehand to make sure the new height won't interfere with the video card though!
You've got to grab an updated BIOS from ASUS's website. For the M4A785-M, the page should be: http://www.asus.com/product.aspx?P_ID=ef0qgvMIwOUagAVl&content=download
You can find some flashing instructions on ASUS's website, but I highly suggest you get some help doing it from someone who's done it before, because if a BIOS flash goes wrong, your motherboard will often be dead.
I'll be slowly investing in some of the stuff i'll never change like my Cooling devices and my case.
I'm getting into this overclocking stuff and i really dig it. Too bad everything is so overpriced over here in south america.
I'll be using this card with a Phenom x4 965 BE and 4gb soon to be 6bg 800mhz of ddr2 ram. Paired with a Ati HD 4670. I'll be using it for Starcraft II gaming and some 3DStudio Max and Maya work, along with Photoshop and After Effects (I'm an Illustrator/animator).
Do you think that it'll be at least decent?
Thanks!
I'm sure it'll be perfectly fine for Starcraft 2.
As far as the work-related area goes, you may want to bump up the RAM a little bit more if you're working with large scenes in Maya/3DSMax, particularly if you have PhotoShop/AfterEffects running in the background.
If you do a *lot* of work in Maya/3DSMax (hours a day), you might want to consider grabbing one of the pro video cards. Either the nVidia Quadro line or the ATI/AMD FirePro line. Unfortunately they're incredibly expensive compared to the consumer cards, and won't help you any in Starcraft 2.
have problem with bsod x124 when playing hd video. I suspect the sb to overheat, it is extremly warm and when I placed a 4cm fan on top of it, the bsod have become more rarly.
Do you think that heat can be the problem here? that causes the bsod?
Have ordered me enzotech heatsink to replace the sb sink, and enzotech mosfet heatsinks to mount on.
It gets to throttling level within 1 minute with all cores at full load. 80c if I let it continue. I have front, side and rear heat fans, used arctic silver 5 (grain of rice method)..this is with no overclocking. I have noticed when left to auto, the vcore voltages migrate to the high end as well.
Any suggestions?
80 degrees is pretty crazy. I'd be inclined to suspect that the heatsink isn't properly seated (or still has the plastic film on it) - you may want to remove it and check again. If it's seated properly it should be pretty darn hot if you touch the side of it (assuming the CPU's actually running at 80 degrees).
If you're sure it's seated well, make sure you grabbed the BIOS update. The CPU should be telling the MB what voltage it wants, but I suppose something odd could be happening if the MB didn't detect the CPU properly.
If that doesn't work, reset the BIOS (it's been awhile, but I'm assuming it's a jumper on the motherboard) and start again. Maybe the board was returned by somebody who mucked with some settings, so a BIOS reset should return things to stock/default.
And if all the above don't work.... you might have to RMA something. I'd be inclined to think it's the CPU at that point (asking for too much voltage), but I suppose it could be a motherboard issue as well. There's the outside chance that the temperature sensor isn't working.
Best of luck.
I concur with your ultimate intuition.
The board shipped with the latest bios and was a new sealed box, so hopefully not a hand-me-down. The same board also ran a 95 watt processor very coolly and gave temperature/voltage readings squarely in the middle of that particular processor's profile. I double and triple checked seating and bios settings, changing to Arctic Silver 5 along the way.
The unusually high Vcore readings with everything set to auto led me to the same conclusion you seemed to draw...I 'won' the binning lottery and got a naughty cpu. I RMA'd it and should get my replacement in a day or 2.
I'll update you on the situation when I get the new one installed. I have followed the advice given and installed extra fans to cool the southbridge and mosfets and intend to order some of those little C1 heatsinks as soon as I am confident and cool.
A couple of questions. Do you think I will be safe in the long run if I add mosfet heat sinks and also, so you know if the southbridge reports temperature and what program I might use to monitor it?
Glad to hear the new CPU solved the issue.
As to mosfet heatsinks, it's something I'd strongly considered, but I opted for trying to improve airflow over them instead. The big reason I didn't attach heatsinks (aside from the work of trimming them to fit and making sure they didn't touch anything electrical) was that I'd be relying on a conductive adhesive to hold them in place - if the adhesive gave out on a heatsink it'd fall, and if the heatsink itself were conductive, it might short out whatever it landed on. At the same time, a really strong adhesive might be impossible to remove if I ever needed to remove the heatsinks (say when installing a larger CPU cooler).
I don't recall offhand if the SB reports it's temperature - if it does, it's probably shown with the other temps in the BIOS, in which case there should also be a few programs out there that'll read that temp sensor while in Windows - I seem to recall a program called "motherboard monitor" being around a few years back - maybe it still is. Otherwise, one of those laser IR thermometers (if you happen to have one around) should give you a good idea of the heatsink temp anyway (SB would probably be a couple degrees higher, but you'd get a very good general idea).
I added the little copper mosfet heat sinks and like yourself a better case with improved airflow. I had to up the voltage on my North Bridge to get a little extra performance out of OC'ing the North Bridge to 2.6 ghz and that gets me considerably more punch out of the Kingston Hyper X 1033 ram in that box.
My journey on that rig started here.
Yours still kicking?
A lil update..
Using your settings, (I cannot find anywhere else), I've got the SAME Board and the AMD 1040T X6 AM3 processor..
8 Gigs of DDR2 (G-Skill) PC2-6400 Ram...
Even added (as a upgrade) a ASUS Radeon R9 380 STRIX- 2GB 256-Bit GDDR5 PCI Express 3.0 HDCP Ready CrossFireX Video Card ..
AND a better Power Supply.. (cooler Master 750 watts)..
Runs like a "champ" with your settings.. I first read you blog post a Few years ago, (2012)? Here it is in 2018..
My lil Rig is STILL going strong!
Thanks a Million..
As I don't have monies to upgrade to Ryzen (yet) drool drool.. ;)
Here I am in Mar 2019 STILL running this MB. I won't detail stuff here probably cuz I'm the only one left around still interested, but my have I made a lot of discoveries along the way. For an office PC, practical use speed on the net and office type apps is substantially better than a current out of the box, mid-price, Win 10 PC.
Stuff I have ferreted out from this page has helped me tremendously does this on a budget. I bought the ASUS MB in 2010 but didn't actually install till somewhere around 2015. Current stuff used w/MB:
AMD Phenom II X6 1055T (newer 95W version)
Zaltan CPU Fan (big round w/tall fins)
AMD R5 220 PCIe 16 bit GPU (cheap Best Buy house brand, made by XFX)
8GB DDR2 RAM, Samsung 2GB X 2, Corsair 2GB X 2
128GB Toshiba SSD (for OS)
1TB Seagate HDD X 2 (1 is dedicated backup)
Primary Monitor: Typical LG 22" via VGA
Ext Monitor: Samsung wall-mount 1080p 42" via HDMI
Sound routes to "Monster" mini-stereo, AKG studio phones, or Samsung TV
Mic is dedicated AKG Perception 220 large diaphragm condenser via ART tube preamp
Power Supply is 700W and has a big fan that blows out of the cavity into the PS and then out the back.
Chipset Fan: Old CPU fan w/manual speed control pointed at chipset (for SB as you recommend)
GPU Fan: little fan screwed onto heat sink (both fans measurably reduce temps)
Virtual Machine On, Blue Stacks Android Emulator. Full video editing suite.
DDR2: 6-6-6-18-24, base clock 400MHz, VDC 1.995
BIOS (v11.02, last in 2012) dynamic control of overclock. Practical speeds attained:
Dynamically runs any of 6 cores of 2.8GHz CPU at 3.6Ghz, 1.4VDC indvidual cores
HyperTransport (NB) fixed at 2200MHz, DDR2 fixed at 440MHZ w/above fixed timings and fastest X of R in BIOS
Whoda thunk it was possible? Ain't 1/2 bad. And better than respectable by today's standards on a fiber optics ISP.
Thanks for your part Matt, Karl in Houston
Now if I could only figure out how to get AMD EYEfinity to let me hook up a 3rd display. I must be OCD. :)
I've tried every combination of PCI and PCIE X1 cards that I see out there but have never been able to get any of them to connect.
Putting any USB3 card in nets me a yellowed line in Device Manager saying "Universal Serial Bus". I can't find a driver that works.
Someone suggested that ASMedia had drivers but I get the same yellowed triangle.
Another site said to try Intel drivers, but how would that work with a Phenom X6 1090T CPU.
Yes, I've got all the USB2 connections that are ever SOOOO slow. I'm getting tired of letting my desktop run for 24 hours to transfer 64GB of files.
I'd send $25 to anybody that can give me detailed instructions to accomplish USB3 connections on this ASUS M4A785-M M/B.