After setting up users and groups in FreeNAS, I found that I wasn’t able to give any users write access.
I could get guests to read.
I could get users to read.
I couldn’t get anyone to write.
–
For whatever reason, it took a few searches before I came across the mac section of the FreeNAS documentation here (Web Archive). In any case, I’m going to guess that not everyone who uses FreeNAS is an SSH guru (although if you are you can just read the above link and skip the rest). Here’s the somewhat-easy-but-I’m-still-not-happy-about-it-way of doing it…
1) Hopefully you got to the point where you made users and put them in the same group.
a) If not, find Access/Users_And_Groups in the menu;
b) create a group (name it something easy)
c) create users (at least one for you!) and add them to your new group
It should look something like this afterwards:
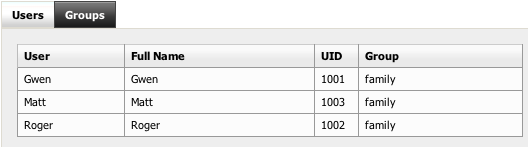
In the above example, “family” is the group. Since my name is Matt, “Matt” is the user we’ll be focusing on for the rest. The actual UID numbers used for the user and groups don’t really matter – just use the defaults.
d) Make sure you’ve also set up an AFP share (Services/AFP/Shares). The next part here might not matter, but may as well do it anyway just in case – stick your username in the Read/Write access part (may be case sensitive, so be sure to capitalize if necessary).
2) Assuming you got everything in #1 done, it’s time to get you some read/write access. Here’s how we do it:
a) First you need the location of the folder. Easiest way to get this is to navigate to Services/AFP/Shares (just like in the step above), and find the Path. Look below to see what mine looked like:
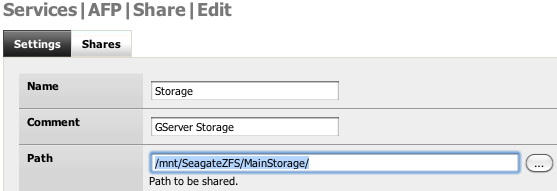
The part we’re interested is highlighted. Select it and copy it to the clipboard (Apple-C on your keyboard or right-click and choose “Copy”).
In my case it was /mnt/SeagateZFS/MainStorage/ – select whatever yours is and copy it to the keyboard.
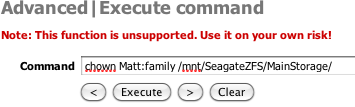
3) Next (and finally), we’re going to issue a couple commands, similar to what’s on the page linked at the very beginning. Head to the Advanced/Command menu.
a) Type in:
chown macuser:macgroup /mnt/yourvolume/yoursharedfolder
Replace macuser and macgroup with your name and group from step#1. Use the stuff from step#2 as /mnt/yourvolume/yoursharedfolder (you can either Apple-V or right-click paste to get that part in). I used double-spaces in the above to make it easier to read, but just using single spaces. As an example, mine was:
Hit execute. Not much will happen, except that it’ll display the command you just sent.
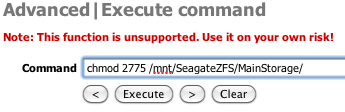
b) Type in:
chmod 2775 /mnt/yourvolume/yoursharedfolder
Again, similar to the above, except that where it says /mnt/yourvolume/yoursharedfolder, you’re pasting the stuff from your clipboard (from step#2) again.
Mine looked something like this:
Hit execute.
You’re done. Hopefully things should work. At the very least, you should be able to disconnect/reconnect and start copying files or create folders through your own account. Hopefully other people in your group will have access too, but verify to make sure they have the limited (or unlimited as the case may be) access you want them to have.
If you’re completely lost as to what exactly you just did, you basically just took ownership of the folder with your user account, and assigned it to your group on the filesystem / operating system level.
Hopefully in the future, someone makes changes to make things a little less cumbersome. Granted, there’s not a lot that can be done, but if the FreeNAS GUI automated the permissions settings (or at least presented a GUI to do it), it would make it a little easier for people. A *very* good place for this would be a new item in the Access Menu called “file and folder permissions” or something to that effect. The menu item could list the shares or the dataset and have a “choose owner”, “choose group”, and “set owner/group/user permissions” section for each share. Worst case scenario, giving the file manager a facelift and doing it there would help too.
I have a small problem though, i dont know if you know it but anyway:
I have just build a freeNAS server and i want it to act as a storage for my webserver, my webserver is running OSX Server, i have AFP up and running, i can make folders and upload files to my share /Volumes/Storage/Folder/, no problem at all, the thing is that i dont know how to get apache to use the /media/ folder and redirect all uploads to the freenas share, i still want document root on the OSX Server but /media/ to point to the freeNAS folder, do you know how to do that?