A few days back while trying to optimize animated GIFs, I experimented a little with APNG and animated WebP on a couple images. APNG was surprisingly worse, but WebP looked promising, and looked like it might be worthwhile across-the-board. In the end, I settled on the following solution:
- Generate WebP variants for every image on the sites automatically from a bash script, triggered to update via cron every once in awhile.
Why? Static files are fast to serve, and you can get away with the most CPU-intensive compression scheme since it’s only done once before any requests are made. It’s also possible to recompress if any images change via script. I considered trying to hack together a WordPress plugin for the WP sites and the zillion thumbnails, but realized quickly it would be a path fraught with peril. - Leave all the src/links in the webpages as they are (gif/jpg/png). Don’t make any changes to the served HTML.
Why? There aren’t any viable alternatives. Using JavaScript detection, or generating a separate page with WebP image links (detection via PHP) is a little gross in my opinion. First, if you somehow missed generating a WebP variant of an image, Chrome/Opera visitors get a missing image. The JS option would add page bloat and won’t work if the user has JS disabled. The PHP option would mean your site is now serving 2 separate variants for each page. Too many pitfalls to watch out for. - Have Nginx look at the “Accept” header for visitors. If it mentions image/webp, serve the generated version when an image is requested. Otherwise, serve the normal png/jpg/gif.
Why? It’s beautiful. If someone requests an image and their browser claims to support WebP, Nginx looks to see if a .webp variant exists. If it does, it serves it. If not, it serves the original jpg/png/gif. A reliable, robust solution.
Getting Started – Installing WebP tools (including gif2web):
On Ubuntu Server, following Google’s instructions for compiling the WebP tools worked, with one annoying headache…. gif2webp isn’t compiled by default via their instructions (gif2webp is what you need to process animated GIF’s). You can read the included README for more specific instructions, but if you want to take the lazy way out, simply ignore the line in Google’s guide that says:
./configure… and replace it with:
./configure --enable-everything…to compile with gif2web enabled. Otherwise, the instructions in Google’s guide remain the same.
Getting a feel for the compression:
I started by picking 3 random images and running them through cwebp and gif2web. After all, it would be a shame to keep going if there wasn’t going to be much benefit. Single datapoints aren’t worth staking any claims on, but are fine for a brief check to see if things look right. Here were the results at 100% quality settings (click for larger images):
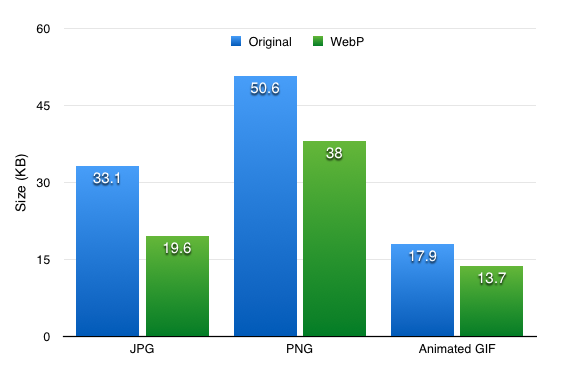

Fairly reasonable at a glance. All images had been run through ImageOptim beforehand, so this seemed to be a fair enough comparison. I couldn’t see any visual degradation, though I did use the 100% quality setting and the images weren’t massive in size to begin with. Good enough for me to continue!
Creating WebP images across the site with a bash script:
Warning: This script is awful/ugly, unnecessarily long, and comes with the standard disclaimer that you should back up before using it, and it may expose unknown vulnerabilities if others can create files on your site – I literally took the old bash script I mentioned in the Compressing only html/csss/js/etc files for use with Nginx’s “gzip static” post which wasn’t superb to begin with, and plugged in the gif/png/jpg stuff. I’m sure somebody else could do it in 1 line. Scroll down to the end if you can figure out how to make a script on your own!
——
Replace LOCATION=”/var/www/website” with the location of your site on the server.
#!/bin/bash

LOCATION="/var/www/website"
FILES="png|jpg|gif|PNG|JPG|GIF"

process() {

DEBUG=1
SLEEP_DELAY=0.5

        FILE="$1"
STARTTIME=$(date +%s)
        if [ -f "$FILE".webp ]
        then
                FILE_ORIG=$(stat -c %Y "$FILE")
                FILE_GZIP=$(stat -c %Y "$FILE".webp)
                if [ $FILE_ORIG -gt $FILE_GZIP ]
                then
                        rm "$FILE".webp
                        EXTENSION=$(echo "$FILE" | awk -F . '{print $NF}' | awk '{print tolower($0)}')
                        if [ "$EXTENSION" == "gif" ]
then
gif2webp -q 100 -m 6 -mt "$FILE" -o "$FILE".webp
touch "$FILE".webp -r "$FILE"
if [ "$DEBUG" == 1 ]
then
echo "Replaced old GIF WebP with: $FILE.webp"
fi
ENDTIME=$(date +%s)
WAITTIME=$((($ENDTIME-$STARTTIME)*4))
if [ $WAITTIME -gt 1 ]
then
echo "Sleeping $WAITTIME..."
sleep $WAITTIME
fi
sleep $SLEEP_DELAY
elif [ "$EXTENSION" == "png" ]
then
cwebp -q 100 -m 6 -mt -lossless -short "$FILE" -o "$FILE".webp
                                touch "$FILE".webp -r "$FILE"
if [ "$DEBUG" == 1 ]
then
echo "Replaced old PNG WebP with: $FILE.webp"
fi
                                ENDTIME=$(date +%s)
                                WAITTIME=$((($ENDTIME-$STARTTIME)*4))
if [ $WAITTIME -gt 1 ]
then
echo "Sleeping $WAITTIME..."
sleep $WAITTIME
fi
                                sleep $SLEEP_DELAY
elif [ "$EXTENSION" == "jpg" ]
then
cwebp -q 80 -m 6 -mt -short "$FILE" -o "$FILE".webp
                                touch "$FILE".webp -r "$FILE"
if [ "$DEBUG" == 1 ]
then
echo "Replaced old JPG WebP with: $FILE.webp"
fi
                                ENDTIME=$(date +%s)
                                WAITTIME=$((($ENDTIME-$STARTTIME)*4))
if [ $WAITTIME -gt 1 ]
then
echo "Sleeping $WAITTIME..."
sleep $WAITTIME
fi
                                sleep $SLEEP_DELAY
else
echo "Could not match extension of the file $FILE !"
fi
else
echo "Skipping already up to date: $FILE.webp"
fi
        else

                EXTENSION=$(echo "$FILE" | awk -F . '{print $NF}' | awk '{print tolower($0)}')
                if [ "$EXTENSION" == "gif" ]
                then
                        gif2webp -q 100 -m 6 -mt "$FILE" -o "$FILE".webp
                        touch "$FILE".webp -r "$FILE"
                        if [ "$DEBUG" == 1 ]
                        then
                                echo "Created new GIF WebP at: $FILE.webp"
                        fi
                        ENDTIME=$(date +%s)
                        WAITTIME=$((($ENDTIME-$STARTTIME)*4))
if [ $WAITTIME -gt 1 ]
then
echo "Sleeping $WAITTIME..."
sleep $WAITTIME
fi
                        sleep $SLEEP_DELAY
                elif [ "$EXTENSION" == "png" ]
                then
                        cwebp -q 100 -m 6 -mt -lossless -short "$FILE" -o "$FILE".webp
                        touch "$FILE".webp -r "$FILE"
                        if [ "$DEBUG" == 1 ]
                        then
                                echo "Created new PNG WebP at: $FILE.webp"
                        fi
                        ENDTIME=$(date +%s)
                        WAITTIME=$((($ENDTIME-$STARTTIME)*4))
if [ $WAITTIME -gt 1 ]
then
echo "Sleeping $WAITTIME..."
sleep $WAITTIME
fi
                        sleep $SLEEP_DELAY
                elif [ "$EXTENSION" == "jpg" ]
                then
                        cwebp -q 80 -m 6 -mt -short "$FILE" -o "$FILE".webp
                        touch "$FILE".webp -r "$FILE"
                        if [ "$DEBUG" == 1 ]
                        then
                                echo "Created new JPG WebP at: $FILE.webp"
                        fi
                        ENDTIME=$(date +%s)
                        WAITTIME=$((($ENDTIME-$STARTTIME)*4))
if [ $WAITTIME -gt 1 ]
then
echo "Sleeping $WAITTIME..."
sleep $WAITTIME
fi
                        sleep $SLEEP_DELAY
                else
                        echo "Could not match extension of the file $FILE !"
                fi
        fi
}
export -f process

find $LOCATION -type f -regextype posix-extended -regex '.*\.('$FILES')' -exec /bin/bash -c 'process "{}"' \;
A few details in case somebody is crazy enough to use my version instead of a better/simpler one, since you would want to tweak it:
- This was done on Ubuntu 14.04. It worked for me. YMMV.
- This creates WebP files with the same name, but an extra .webp added on. Examples: original.png.webp , file.jpg.webp , other.gif.webp .
- Highest compression level (most processor intensive) is set. That’s the -m 6 setting.
- GIF files: Are all run through gif2webp since it supports animated GIF’s and creates animated WebP’s. Lossless setting (default), 100% quality.
- PNG files: Are all run through cwebp with a “lossless” setting at 100% quality.
- JPG files: Are all run through cwebp with the default “lossy” setting, but set at 80% quality. So yes, expect at least some image degradation. Why didn’t I use 100%? See below.
- Change the LOCATION bit to point to your own site.
- SLEEP_DELAY is a forced-delay after any compression. Note that a WAITTIME is also calculated which takes effect if compression took at least a second – it will force a 4x delay if so. The reason for these is that if you have any number of images, you’ll peg the CPU every time it’s compressing, and if you’re not on a dedicated server, you’ll become a “bad neighbour” fast. The downside is that it will take a very long time to do a lot of images with all the delays. For reference, the maximum 5-min average load I hit with these settings was about 0.20 over the course of the 4 hours it ran, with a 1-minute peak of 0.34. I ran it early morning to be on the safe side anyway. The longest a PNG took was 7 seconds for a 1600×900 (so a 28 second wait afterwards), but obviously performance will depend on the server you’re on. Tweak the delays to suit your needs, but be mindful of the load you’ll cause and try to avoid becoming a bad neighbour.
- To make it possible to run the script on a regular basis without having it either (1) recompress everything; or (2) miss an image you updated; the script checks the time stamp of the original and the WebP files. If the original is newer, it deletes the old WebP file and creates a new one, and then sets the time stamp to match the original.
Testing, Compression Results, and JPG Suggestions:
Before delving into the final Nginx bit, I started gathering some data during my first run. I actually had to stop the first run, and you’ll see why in the following images:
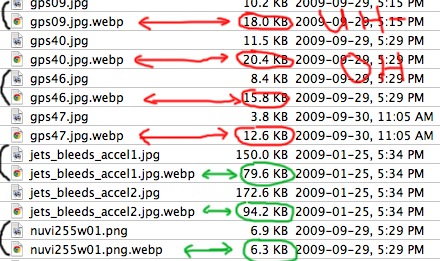

The 1st run is on the left (some of the bad results out of the hundreds of images). While converting PNG and GIF files to WebP were giving consistantly smaller results at 100% quality, as I looked through the files, I noticed that a number of JPG files were becoming larger when converted to WebP. If you’re wondering why, the answer is pretty simple – before uploading the original JPG pictures, I re-saved them by cranking the quality down to that tiny threshold before severe degradation takes place. Those who have done this with lossy images before know that it’s a 1-way trip for that image – historically, you couldn’t ever open it again and re-save it without it either looking worse or becoming larger.
I aborted the script and played with WebP’s quality settings for JPG’s, trying to find something that would at least keep the file size the same. After all, there’s no benefit to converting to WebP if a few images will ballon and the net-gain might be 0. I eventually settled on 80% (still a bit higher than Google’s default of 75%). You can see the results there in the 2nd image.
What surprised me was that after looking through those images afterwards, I couldn’t tell the difference. Granted, they’re small (around 220×160), but these were impossible to open again and re-save as JPG in the past. I also checked an banner I used to have for the old Warcraft-Maps site where I’d struggled to get it down to a visually-deteriorated 30KB JPG, and could not go further without it becoming unrecognizable. WebP at 80% brought it to 15KB – half the size, and despite looking pretty hard, I couldn’t tell any difference. I’m actually becoming a fan.
It’s worth mentioning that if you’re intent on using 100% quality for JPG’s that are converted to WebP but only if the size wouldn’t become larger, you could modify the script to check the output file size. Here’s how you might go about it (psuedo-code):
- Change quality to -q 100
- In addition to seeing if the .webp version exists, check for a .nocompress version via “$FILE”.nocompress . If it doesn’t exist, do the compression.
- Compare the file sizes
- If the WebP file is larger, delete it and do a touch “$FILE”.nocompress . This is the indicator not to bother looking at it again the next time the script is run.
You could extend it further to look for changes on subsequent runs by syncing the .nocompress’s time stamp to the original and checking for equality there too. It really depends on how far you want to go. Anyway, enough on that. On to the nginx bit!
Getting it set up in Nginx!
There are 3 main things you need to do in Nginx:
1) Set up a mime type. There’s usually a file called “mime.types” in your nginx directory. Edit it and add:
image/webp webp;Keep in mind that it’s not a “valid” mime type yet (at least, it’s not listed on the IANA’s web site). It’s what browsers and everyone else use though, so it’s as close to one as you can get.
2) Somewhere in your server block, add the following:
set $webp_suffix "";
if ($http_accept ~* "webp") {
set $webp_suffix ".webp";
}
location ~ \.(gif|jpg|png)$ {
add_header Vary "Accept-Encoding";
try_files $uri$webp_suffix $uri $uri/ =404;
}
What it does is look at the $http_accept request header (this is different from the $http_accept_encoding header which is often used for gzip detection by the way, so don’t get them mixed up). If it contains “webp”, it will try to serve the webp variant. For example, a request for image1.png from a browser that claims to support webp will be served image1.png.webp if it exists. If the file doesn’t exist (or a browser didn’t claim to support it), it’ll be served image1.png instead. The mime type will be set accordingly either way.
To test it after making the changes and restarting the server (you could try a reload instead of a restart):
- Open up Google Chrome, right click somewhere in the middle of the screen and choose “Inspect Element”. Then select the “Network” tab.
- Visit your site, or an image on your site (make sure to visit the PNG/JPG/GIF version if going directly to an image – don’t directly visit the .webp variant).
- Select the image name in the left-column. It will still say png/jpg/gif – that’s fine.
- View the “Response Headers” in the right-hand panel. You should see image/webp as the content type.

If it doesn’t say image/webp and says jpg/gif/png, visit the image file itself and SHIFT-REFRESH. Sometimes you’ll have the old version of the file still in your browser’s cache. If it’s still not showing correctly, make sure the request headers (below the response headers) mention webp.
That should do it!
If you got this far, you should be done! Either remember to manually run the script any time you upload a new image file, or set up a cron to do it automatically. Keep in mind that generating WebP variants for new images isn’t really time-sensitive – if the WebP version doesn’t exist, Nginx will simply serve the original image until it does. Good luck!
2 Comments | Leave a Comment