It’s been well known for some time now that heatsinks aren’t always perfectly smooth and flat. Sometimes the machining process used when making a heatsink leaves much to be desired. A poor surface means poor contact with the CPU, which translates to less effective cooling, and thus, higher temperatures. “Lapping” the heatsink is a technique that has become common practice with modders and overclockers. It’s generally accepted that a properly lapped heatsink performs better than one that isn’t, except in the case where the heatsink was already quite smooth and flat.
But what about the IHS (integrated heat spreader) on a CPU?
I recently read about a few experiences that others have had where they’ve lapped the heatspreader on the processor itself to make *it* flat as well. After all, what point is there in having a perfectly flat heatsink if the CPU it presses against isn’t flat too? From the sounds of it, people were seeing positive results. It usually takes a little more than a few success stories to convince me though, so I decided to test this out myself.
I decided to lap both the heatsink and the heatspreader on an overclocked Intel Dual Core E2140. While not known for high temperatures, this one was overclocked from 1.6Ghz to 2.67Ghz which resulted in it running a little warmer than stock. Another plus is that it’s a pretty low-cost processor. If I killed it during the lapping, it wouldn’t be the end of the world.
I did some temp testing over the course of a couple days before the lapping was done, getting temps at idle, while encoding, and during runs of Prime95 at various times during the day. The room temperature stayed fairly constant, but I took multiple readings over the couple of days just to be sure. Eventually, I pulled the heatsink and processor out, and cleaned the OCZ Ultra 5+ off of them. Here’s what they looked like (click the thumbnail for a full size image):

I used 600 grit wet/dry sandpaper. I had a bit of 1500 grit but there wasn’t enough to make a difference.
I started with the heatsink. Because there’s not a lot of space between the plastic pegs/feet of the heatsink, I needed a small flat surface to use as a sanding block. I had a copper waterblock from an old watercooling setup, so I first sanded that against a glass mirror to get the waterblock perfectly flat, and then used the waterblock as a sanding block. It was a tight fit, but it worked. The aluminum from the stock heatsink sanded away very easily. It sanded very evenly, and I suspect is was very flat to begin with.
On to the IHS of the processor. I wet the sandpaper, put it down on the mirror, and ran the CPU heatspreader-side-down against the sandpaper. It took a *really* long time. I went through a total of 3 sheets of sandpaper. About 1/4 of a sheet was used on the heatsink, with the other 2.75 sheets being used on the CPU heatspreader. I varied the sanding “technique”. I tried sanding in a straight line and rotating 90 degrees, and also tried sanding in circles. I honestly don’t believe there’s a difference. The nickel plating wore off at the same rate and in the same places each way. I’ve heard people say that one way is better than the other, but until someone comes up with actual proof, do whatever you feel like doing. As long as you don’t apply uneven pressure somewhere, there shouldn’t be one bit of difference.
This is how it looked about a sheet into the process:
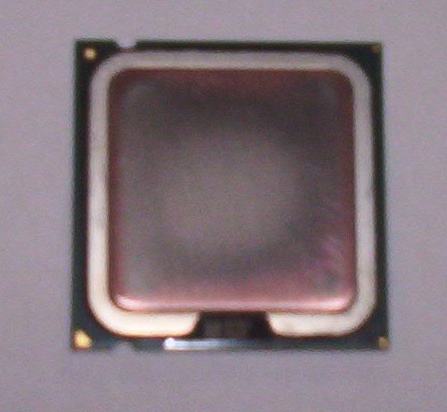
The digital camera’s image quality is terrible. However, you can see copper around the edges where the nickel’s been sanded away. Obviously the IHS was *not* even to begin with. If you look towards the center (this is where the actual CPU core touches the heatspreader), you can see that the nickel hasn’t even started to wear off here yet – it’s the lowest point. Had the processor/heatsink been reassembled dry (without thermal compound), there would probably be a large pocket of air here, and temperatures would have likely been extremely high.
I kept going until it was perfectly flat. This is what the results looked like (click the thumbnail for a full size image):

The heatsink’s contact point actually looks pretty dull. It’s smooth and flat, but the 600 grit sandpaper just rips through that aluminum too easily. To get a shiny look, I would probably have needed to use some very fine grit sandpaper. As for the CPU, all the nickel’s gone from the heatspreader, and you’re left seeing the copper. As you might guess, the warranty’s totally void on the processor now, but at least the IHS is flat!
I reassembled the CPU and heatsink. I actually did this twice, once using a dot of thermal compound in the middle (letting the pressure from the heatsink spread it out), and the 2nd time using a credit card to spread the thermal compound in a thin flat layer across the CPU (which is the pre-lapping method that had been used). Both methods gave the same temperatures.
So how did it do? Did my temps drop dramatically?

Well… not really. At idle, each core dropped 2 degrees Celcius. At load (Prime 95), it was 1-2 degrees Celcius. Granted, it’s cooler, but there are almost certainly easier ways to get a 2 degree decrease in temperatures. Remember, I went through a few dollars in sandpaper and spent a good bit of time sanding. I also voided my warranty in the process, not to mention risked killing it with either static or water over a 1 hour period of sanding. It might be a bit tougher to sell the CPU in the future (though it’ll depend on the purchaser).
Would I recommend it to others? Probably not. I’ll be getting a Quad Core processor soon – if I lap it and get better results, maybe I’ll change my mind. Buying a high(er) performance heatsink or adding case fans are probably smarter options though and will probably give you better temps than lapping would. If you’ve “already done all that” though and are looking for that extra bit more, or if you’re convinced your heatsink and IHS are not flat (and therefore not matching up), then give lapping a try. Just be careful and make sure you have the money for a new CPU if yours dies in the process!
In closing, I’ll give 3 reasons why my results may vary from the results that others have claimed (I’ve seen claims of over 10 degrees difference):
- Their testing may have been flawed (ie it was new thermal goop that caused the change, the heatsink just needed reseating, they cleaned out dust at the same time, the ambient temperature changed, etc)
- I may not have done a “good enough job” during my test (not perfectly flat, made an error elsewhere, etc).
- Their heatsink and/or heatspreader was in worse shape than mine. Remember, my heatsink was pretty flat to begin with. It was just the heatspreader that wasn’t. If another tester’s heatsink/spreaders were bulged in or out, they would have had a really poor contact patch and really high temperatures to start with.
Great gravedigging skills, Ian