I set aside 15 minutes this morning on a test site to figure out how I’d start flushing the fastcgi cache via PHP.
…hours later, and I’ve used that bit to put together a WordPress plugin. But let’s start with a small PHP script that will effectively purge the entire nginx cache….
<?php
  array_map('unlink', glob("/path/to/nginx/cache/*/*/*"));
  array_map('rmdir', glob("/path/to/nginx/cache/*/*"));
  array_map('rmdir', glob("/path/to/nginx/cache/*"));
 ?>
Simple, right? And technically, you’d only need the first line since #1 removes the actual cache files, while #2 and #3 just remove the now-empty directories (which nginx will recreate eventually anyway).
But as long as the following are true, it works:
- You’re using levels=1:2 for the cache in your nginx config (part of the fastcgi_cache_path bit).
- You’ve replaced the /path/to/nginx/cache/ part with the actual location of your cache (part of the fastcgi_cache_path bit in your nginx config)
- PHP has the required permissions to write to that location (if you run nginx and php as the same user it should work “out of the box” – otherwise you’ll have to adjust permissions so that both nginx and php can write there).
- You don’t have something else wonky going on.
Of course, it clears the entire cache, but it’s great in that you could just access that php file anytime you needed to purge.
This was the basis for the WordPress plugin I started putting together which I’ll get into later.
—
On the other hand, if you wanted to just remove 1 cached file, things start to get a little more tricky… “Jesin A” put together a fantastic guide on Digital Ocean, and I’ll mention that one here as well:
<?php
$cache_path = '/etc/nginx/cache/';
$url = parse_url($_POST['url']);
if(!$url)
{
    echo 'Invalid URL entered';
    die();
}
$scheme = $url['scheme'];
$host = $url['host'];
$requesturi = $url['path'];
$hash = md5($scheme.'GET'.$host.$requesturi);
var_dump(unlink($cache_path . substr($hash, -1) . '/' . substr($hash,-3,2) . '/' . $hash));
?>
In that script, you’d have to send a POST to that script with the URL that you want to clear. Example given was as follows (in this case you’d be flushing http://www.example.com/time.php from the cache):
curl -d 'url=http://www.example.com/time.php' http://localhost/purge.php…a big thanks to “Jesin A” too – I actually ended up using that in the plugin to give an option to manually clear pages, and the write-up on the DigitalOcean site is definitely worth a read if you’re at all new to this stuff.
Extending it all to a WordPress plugin!
Ok, so here’s the deal… if you want to use the plugin, you can, but it comes with a bit of a warning!. The location to the nginx cache directory is hard-coded into the plugin, so you’ll want to edit and change it to <whatever the correct one on your server is> BEFORE you activate it.
I can’t stress that enough – as soon as it’s activated, it’ll try to auto purge when you edit posts, etc, and if it starts trying to delete files in the wrong place on your server…. you’re on your own. I suggest you back up anything important just in case.
Download: nginx-fastcgi-cache-purge.zip (v0.0.2)
(Remember to EDIT it before activating, and that it only supports “levels=1:2” in your nginx fastcgi cache setup. Currently it assumes “/etc/nginx/cache/” as your cache folder, so be sure to edit that if it’s not correct!)
Ok, so now that you’re (hopefully) editing it while your server is backing up, here are some of the highlights:
- Auto purges the whole cache anytime you edit a post, switch a theme, add/delete a category, and I believe it should work when you approve a comment as well.
- Has an option page where you can purge the whole cache, or individual pages.
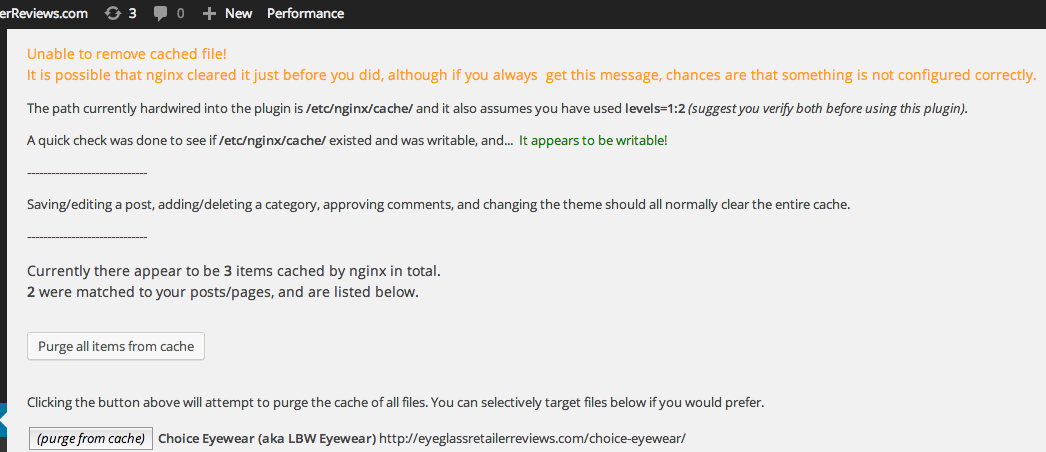
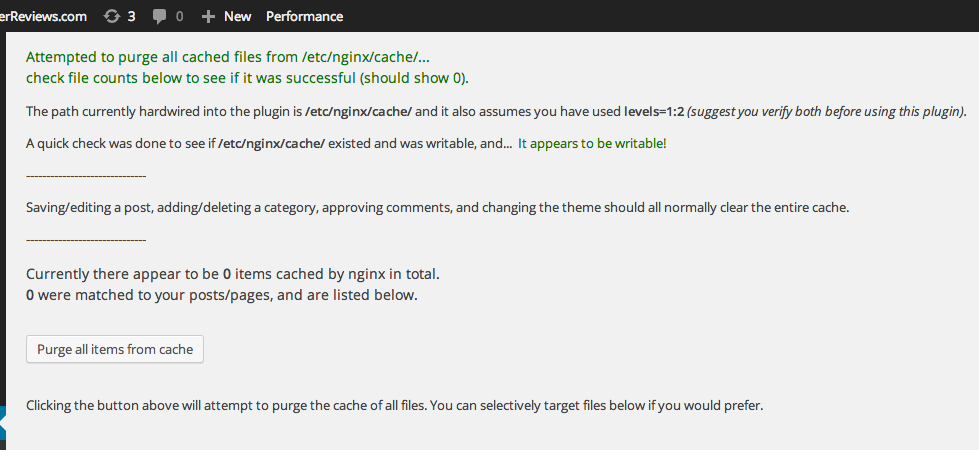
- Has a couple built-in checks to notify you if it doesn’t think the cache folder is there and writable.
- Shows you which WordPress posts/pages are currently cached.
- Tells you the total number of cached pages.
- Doesn’t create any new entries in the WordPress database. So if you hate it and remove it, you won’t have extra junk sitting in your MySQL database.
A few downsides to it:
- When I say it purges everything, it purges everything. If you have a few sites on the server that all (presumably) share the same cache, they’ll all get cleared (both automatically and when you manually purge all). You could disable those with some edits if you wanted, mind you.
- There’s no way to auto-detect your cache location, so it’s simply hard-coded into the file and you’ve gotta edit it to change it.
- Ideally it would hook into other common caching programs (where possible) so it clears when you manually “empty cache” in another plugin, but it doesn’t. So if you’re fighting with content that hasn’t changed in say W3TC, you’ll have to “Empty All Caches” there and then go into the option page for this plugin and do the same.
- Manual purging (when automatic doesn’t do the trick) has to be done from the options page – no “Empty all Caches” button.
- …probably a few other things.
Few screenshots of the options page (click for larger version):

Just in case you missed it, download link again (please read the warnings above and make the edits before activating).
Download: nginx-fastcgi-cache-purge.zip (v0.0.2)
(You can upload it to your WordPress install (via the plugin page), but remember it assumes “levels=1:2” and “/etc/nginx/cache/” is the way you have things set up since most nginx guides/tutorials out there use those those, but you should edit it to the correct values before activating!)
Feel free to leave a comment if it’s worked for you (or hasn’t!).
My nginx user is same with my wordpress user in Linux. Still do nothing and not purging those cache.
Let me know if you run into any issues. Good luck!
How can generate writable cached files by Nginx ?
Chances are that nginx and PHP are running as different users. Few options off the top of my head:
-Run PHP and nginx as the same user (done in the config files for both). You'd have to be sure to chmod the appropriate directories afterwards to make sure they can read the "old stuff" they created under the previous user accounts (or under "nobody").
-Modify user/group permissions so that the current PHP user account can write to the cache files.
-Write a shell/bash script (or a simple crontab that runs every minute or something) that continuously checks the cache folder and changes the permissions automatically. This is probably the least error-prone option, but also the most clunky.
Btw, does fastcgi cache have the same unwritable issue?