NOTE: This write-up was originally written for version 0.9.9. While it still applies to newer versions, formatting of custom settings has changed. The easiest thing to do is follow the guide as-is and read the updated section at the end to “convert” your desired settings to the format that newer Handbrake versions require.
When encoding your favourite DVD’s or BluRays, one of the issues you’re bound to run into at some point is a noisy source.
Now I’m using the term “noise” very loosely here – when I say “noise”, I’m basically referring to little dots on the screen that aren’t part of the actual picture. This can be the result of film grain, compression artifacts, a poor camera, etc. Before I start to sound like I’m trying to get everyone on the “noise is evil” bandwagon, note that sometimes film grain is digitally added to a movie during production to go for a certain look. In less common cases, digital film grain can be added to cover up other issues such as color banding in the master. Whether noise is good or bad often depends on it’s intent, and also depends on your own preferences – some people like it, others loath it.
That said, when it comes to the video encoder, noise is extra detail – detail that the encoder is going to try and keep, at least to some extent. And this is expensive detail to keep. Encoding a noisy source can easily double the bit-rate/file-size necessary at a given quality. And if you don’t give a noisy source enough bitrate, the overall quality of the picture tends to suffer heavily.
If you’re looking for small file sizes, or you’re not a fan of noise on a visual level, removing some of this noise can be helpful. Handbrake includes a denoiser, so here I’ll show you how to use it.
THE DENOISER
Handbrake uses a denoiser called “HQDN3D”. It’s not the best or most powerful denoiser out there, but it’s fairly quick and does a reasonable job as long as your source wasn’t a disaster and/or your expectations aren’t crazy.
It’s accessed in the “Picture Settings” section of Handbrake.
The default settings are:
- Off
- Weak
- Medium
- Strong
- Custom
At some point you probably want to see what denoising actually does, so in the video below, I start by showing the effects of Weak/Medium/Strong before delving into the custom settings. I suggest you tinker with the buttons in the player to set this to 1080p and fullscreen (if your connection can’t handle 1080p, go as high as you can – otherwise you’ll have to rely on the pictures below, as lower resolutions on YouTube kill too much detail).
https://www.youtube.com/watch?v=93GtdIkrrLA
If you’re planning to de-noise, but are not interested in the Custom stuff and just want to use the presets, my suggestion is to start at “Weak”, because you start to get significant blur as you move towards “Medium” and “Strong”.
CUSTOM DENOISE SETTINGS
If you’re remotely serious about denoising, custom settings are the way to go.
Custom values are entered in the form of 0:0:0:0 . Using all zeroes would not do any denoising, so realistically you’d put some actual numbers in there. But before you start plunking in random numbers, to give you a little bit of a reference, here are what those presets above actually use:
WEAK: 2:1:2:3
MEDIUM: 3:2:2:3
STRONG: 7:7:5:5
Handbrake’s denoiser does 2 types of denoising. One is called “spacial” which is represented by the first 2 numbers. The other is called “temporal” which is represented by the last 2 numbers. We’ll look at both.
SPACIAL
The first 2 numbers have to do with “spacial” denoising. For example, 2:2:0:0 would only do spacial denoising.
The technical jargon has to do with looking at a single frame. To put it in an easy-to-understand way, the end effect is that the picture is softened, smoothed, or blurred (pick your favourite term). The noise is caught in the process, and softened/smoothed/blurred away.
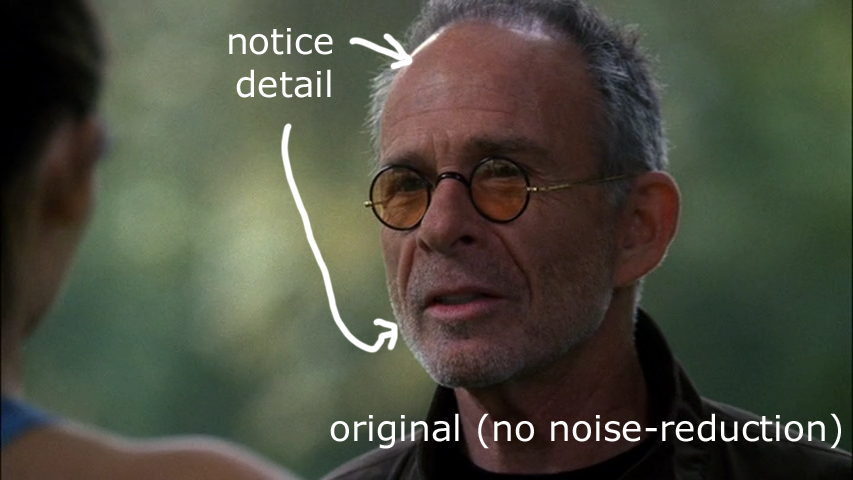
I’ve used high spacial denoising below (higher than a rational person would normally use) to show what happens as this setting is pushed too far. Click for a larger image.
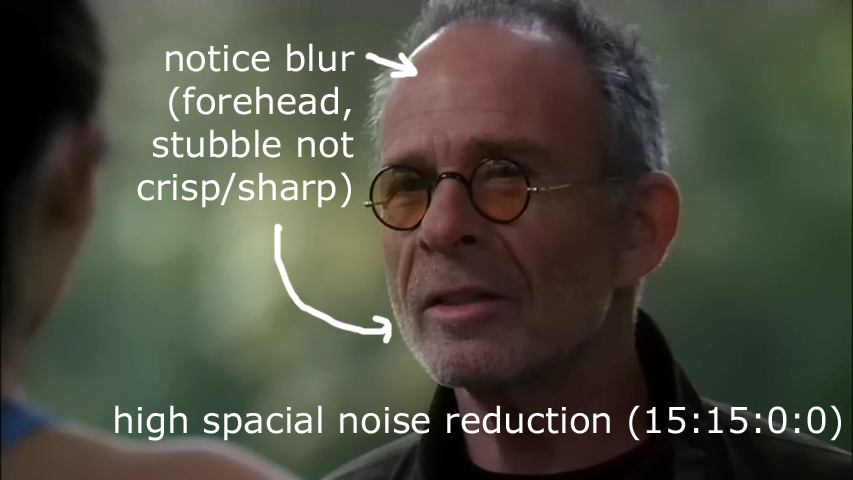
You can easily see the effects of spacial denoising when a resulting video is paused. Tiny changes in these numbers can have a drastic effect.
Spacial denoising is very powerful, but:
- it reduces the sharpness of your picture (unavoidable)
- it can make everyone look like Ken & Barbie dolls (worse at higher settings).
- a high enough setting will kill all the noise, but will kill all the other detail in the process.
Unless you really love a soft picture, be very conservative with the spacial settings.
TEMPORAL
The last 2 numbers have to do with “temporal” denoising. 0:0:4:4 would only do temporal denoising.
The technical jargon has to do with comparing sequential frames. To put it in an easy-to-understand way, the end effect is that all those little “dots” that keep bouncing around the screen are averaged out and tend to disappear (mostly).
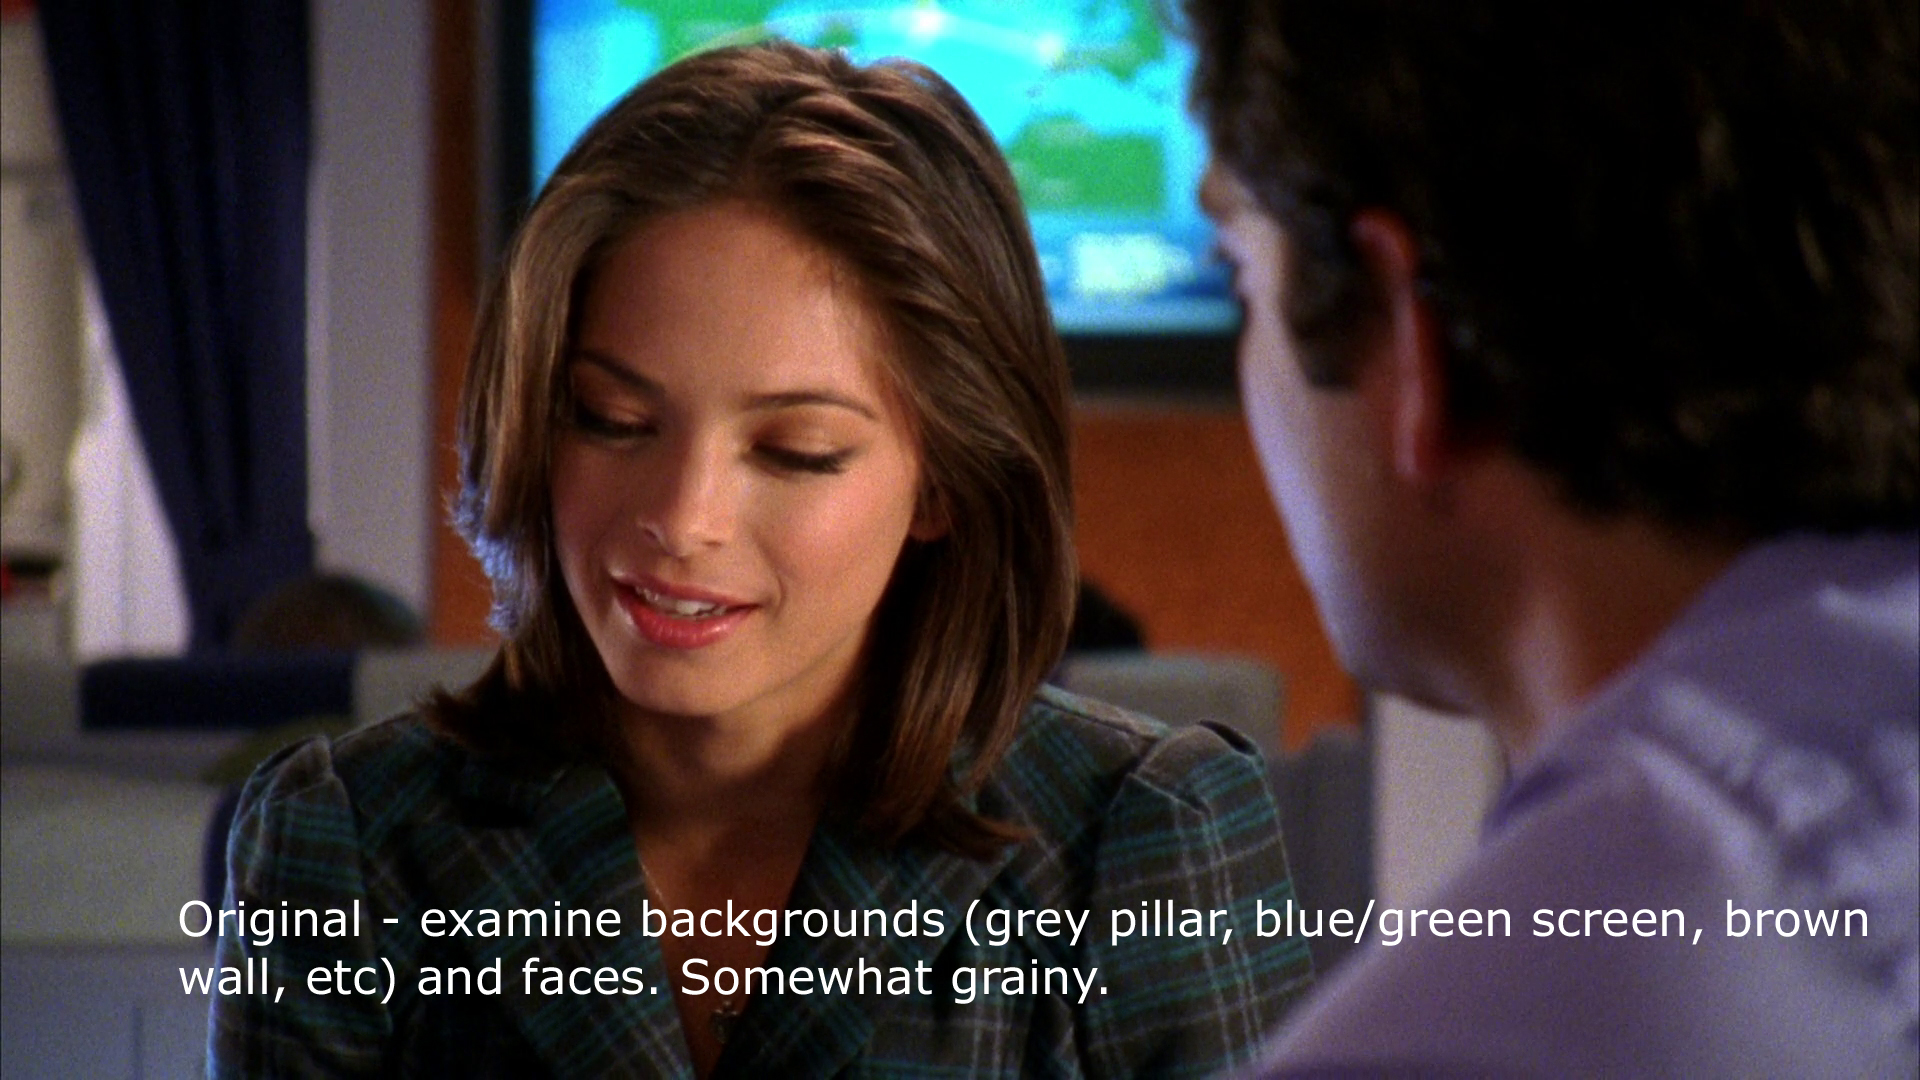
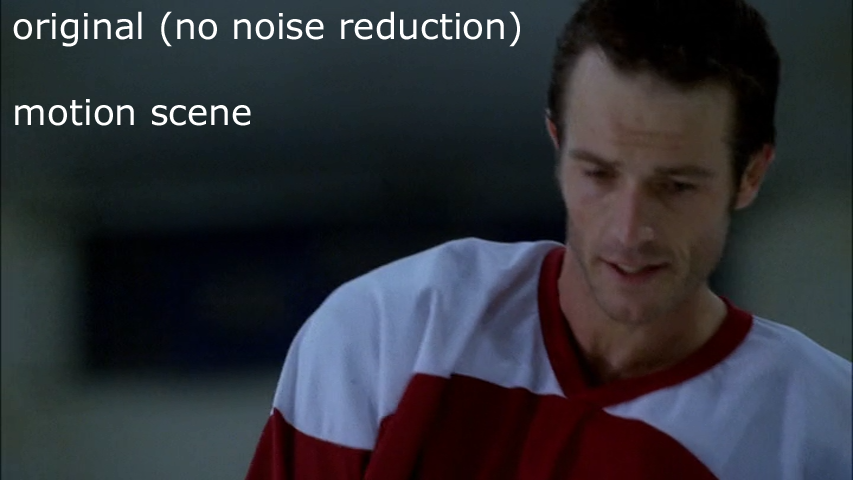
Below, an example of the “original” compared to somewhat rational noise-reduction settings – the same that were included in the video (0:0:10:10). The 2nd has had the grain “calmed” somewhat, and there isn’t much loss of detail. Since these are 1080p images (around 1MB each) and won’t fit in a pop-up window, you may want to right-click and open-in-a-new-window.
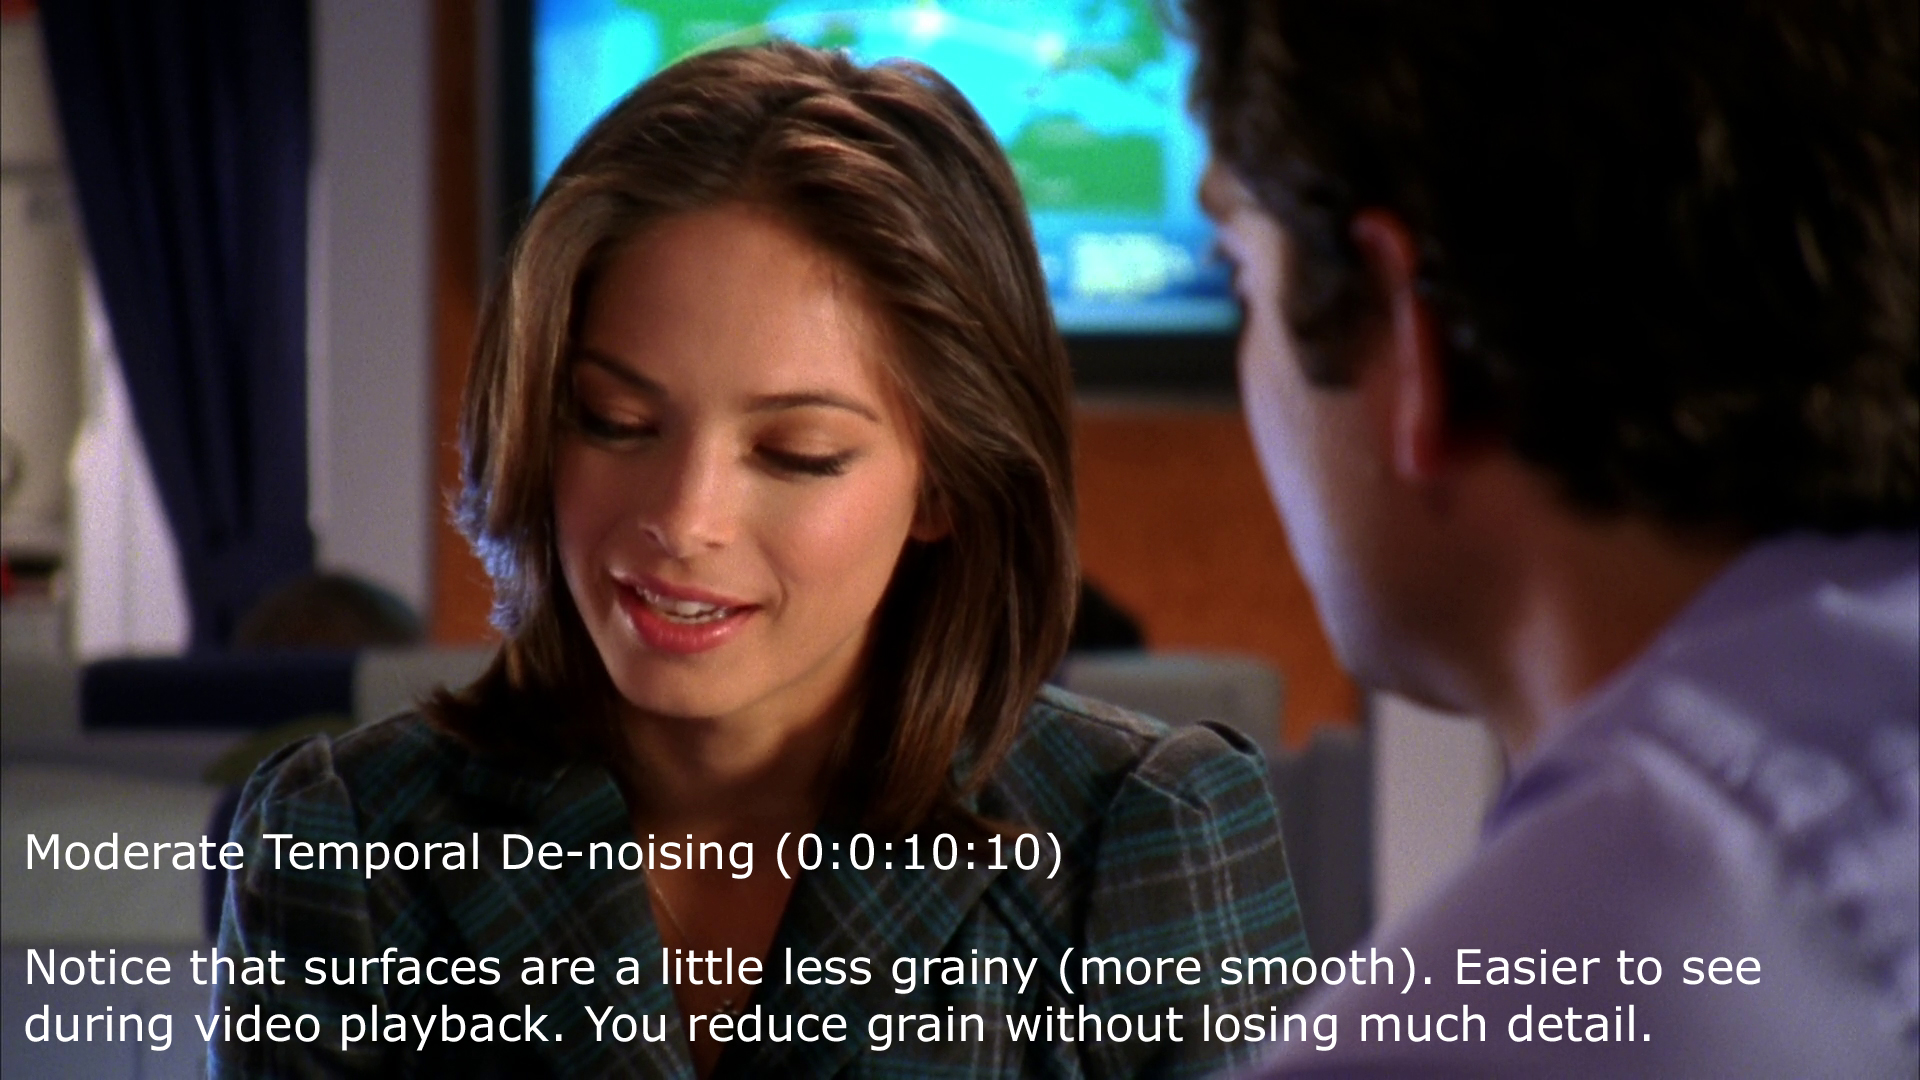
You generally see the effects of temporal denoising when the resulting video is played back – those little dots that bounced around flat surfaces don’t bounce around as much anymore. The effects of temporal are usually hard to see when paused.
Below is an example of what happens when this is pushed too far (“original” vs custom settings of 0:0:25:25). It’s called “ghosting” and if you look at the larger version, you’ll see a “ghost” image. Obviously, settings of “25” are considered unreasonably high. Normally you don’t ever want to go higher than “10”. Click for a larger image.

Temporal denoising is much more forgiving than spacial denoising, and you generally don’t lose any “sharpness” in the image, but it:
- is not guaranteed to get rid of all the noise, even at high settings
- will do almost nothing for you if your source is already “clean” (no dancing-dots/grain/noise/etc)
- can cause ghosting at high settings
- is not motion compensated – your lower motion scenes may look clean, but during high-motion scenes, all those little dots that went away tend to reappear in areas of the screen that contain motion.
While high settings inevitably cause ghosting, you can usually be fairly liberal with this setting up until the point of ghosting (which tends to start at around 0:0:15:15). Personally I wouldn’t usually go higher than 0:0:10:10 as things start to look “off” before you actually see the ghosting.
COMBINING SPACIAL AND TEMPORAL (2:2:6:6, 1:1:8:8, etc)
You may have noticed that none of the presets use “0’s”. They all do some degree of spacial AND temporal denoising. It’s fairly common to combine them to some degree.
Due to the type of noise I usually try to reduce (“dancing dots”), I typically push up the temporal denoising first, and then add a slight bit of spacial denoising if necessary. Depending on the noise *you* are targeting, your methodology may be a little different.
Note that these have various effects on file-sizes, and now’s as good a time as any to take a look at an example….
FILE SIZE COMPARISONS
I encoded the full 43m21s episode of “Alias” Season 1, Episode 7 at RF18, using the “veryslow” preset and various denoise settings. Here were the results:
Standard (no denoising) – 806.8 MB
Spacial (5:5:0:0) – 474.8 MB
Spacial (10:10:0:0) – 373.6 MB
Spacial (15:15:0:0) – 332.8 MB
Temporal (0:0:10:10) – 482.0 MB
Temporal (0:0:15:15) – 451.2 MB
Temporal (0:0:25:25) – 419.1 MB
Combined (3:2:9:7) – 422.3 MB
You’ll notice that:
- Nearly any denoising was helpful with this source. I didn’t use lower (sane) values, but even small settings here do help (trust me!).
- I used fairly high values but got pretty high gains too.
- Numbers used for the “combined” setting were smaller than any of the individual tests, yet the file size came out quite small. That’s where the value really is in combining spacial and temporal. If I needed the file to be about 420 MB for example, trying to do that with only spacial would result in a very blurry video. Trying to do that with only temporal would result in a very ghosty unwatchable video. On the other hand, by having *some* spacial and *some* temporal, I’d get a very watchable video.
As a reminder, if your source is already “clean”, temporal will do zilch for you. That includes file-size. If you try using temporal denoising on a “clean” source you might not even save 5%. It’s one of those things that works wonders when there’s noise, and seems useless when there isn’t.
Spatial on the other hand will *always* reduce the file size (though it will *always* blur to some extent too).
USING SIMILAR NUMBER PAIRS (2:2:0:0, 0:0:6:6, 1:1:4:4, etc):
This part gets slightly technical. If you don’t really care “why” we use similar number pairs, just use them and you’ll be fine (skip to the next section).
Each number pair has to do with luma and chroma. The format of the custom setting is actually broken down like this:
SpacialLuma : SpacialChroma : TemporalLuma : TemporalChroma
- “Luma” is basically a black and white scale – how dark or how bright the pixel is. Back in the days of B&W TV’s, the television signal that contained the picture was all Luma.
- “Chroma” is the color information, which is applied to the Luma to give you the picture.
Most of the time (with most types of noise), “Luma” does the brunt of the work when denoising. That’s because most types of noise affect at least the luma channel (sometimes only the Luma channel).
Chroma noise is more hit-and-miss. It’s rare to find noise that only affects chroma. Chroma noise is usually a little harder to see visually too.
So while using 2:0:7:0 wouldn’t be a crazy thing to do (and would probably clean up most sources nearly as well at 2:2:7:7), you shouldn’t ever find a reason to use the opposite like 0:2:0:7 unless something wonky happened to your source.
For a bit of a balance, it’s not uncommon to use similar values but with the luma slightly higher. So 2:1:7:6 might be used instead of 1:1:6:6 or 2:2:7:7. That said, minor tweaks like that aren’t likely to be very noticeable. So don’t spend too much time trying to figure out whether it’s advantageous to bump the luma higher or not for your current source.
CASUAL DENOISING – RECOMMENDATIONS
If the noise in the source doesn’t particularly *bother* you, and your goal is simply to clean up a little excess noise, or slightly bump down the file size with little-to-no degradation of the actual picture (a “freebie” size reduction), something like:
0:0:3:3
..is a nice safe custom setting. Your file size will drop slightly, you’ll have slightly less noise, but you probably won’t notice a lick of difference when watching.
————-
If file-size reduction is what you’re aiming for (or you’re trying to pack more quality in a fixed file size), try:
1:1:4:4
…your picture will be softened a little, but it’s so slight that you probably aren’t going to notice with most sources unless you’re doing a side-by-side comparison.
————-
If the source is visibly noisy or you’re hard-core about dropping down the file size, but are still hoping you won’t notice the difference try:
2:2:9:9 for a DVD
4:4:9:9 for a BluRay
…BluRays are a little more forgiving when it comes to softening via the spacial setting due to the increased resolution. That said, whether you notice the difference or not is going to depend on your source and…. well… you.
PITFALLS TO WATCH FOR:
The more aggressive you are with denoise settings, the more unintended consequences you’re going to run into. Every source is different, and thus, the pitfalls will be different.
Here are a few in particular to watch for:
- The “Ken and Barbie doll” look – people look like plastic, or like they’re smothered in make-up (spacial settings too high)
- Color banding – instead of say… a sky gradually going from light-blue to dark-blue, you have “bands” of colors” (the actual cause can be complicated, but high spacial OR temporal settings tend to exasperate this). Note that sometimes noise actually covers up *existing* banding in the source, in which case you’ll have to make a the choice between seeing noise or seeing banding. Other tools can “fix” banding via dithering, but Handbrake is not meant for that.
- Ghosting – at the low end, tends to start looking like weird motion-blur. At the high end, you get an after-image during scene changes. If you inexplicably start to feel motion-sick while watching your encoded video, chances are this is why. Caused by high temporal settings.
- Noise during motion – since the temporal denoising isn’t motion compensated, if the source was very noisy and temporal did a great job of cleaning it up, you’ll probably run into an issue where as soon as there’s motion, you get a few frames where there’s massive noise where the motion just took place. This sudden change can draw visual attention to the noise which is arguably worse than just having noise there all the time.
When experimenting with denoise settings to try and “fix” a problem area of the video, BE SURE TO CHECK OTHER PARTS OF THE VIDEO for unintended consequences. Making a noisy scene look perfect almost always comes at the expense of other scenes. Denoising is a balancing act. You usually have to accept that you’ll never remove all the noise without severe detriment to the rest of the video.
THE X264 NR SETTING
Finally, x264 includes a built-in denoiser which you can access with some custom settings in Handbrake.
The run-down:
- it’s motion-compensated
- negative side-effects are minimal
- it can bump down file size pretty well
- it’s usually not very good/helpful for most noise
To use it, you’ll have to add something like this in the “custom settings” box:
nr=400
(this would be for a setting of 400).

Typically, values in the 100-1000 range would be used, with higher being stronger denoising. You could try higher/lower, but YMMV. If I understood it correctly back when I read up on it, it drops certain detail which is-probably-noise. Warning: I may not have understood correctly.
Personally, I’ve found it fairly useless on it’s own for most sources (aside from the file size benefit). However, combined with a custom denoise setting, I’ve found that it seems to slightly help some of the noise that remains during motion. That said, I haven’t done extensive testing with it and found it pretty hard to come to solid conclusions because the end result isn’t nearly as obvious as with the spacial/temporal stuff, so you might want to do your own testing and draw your own conclusions here. Again, your mileage may very.
—
UPDATE FOR NEWER VERSIONS (v0.10 or greater)
A setting such as 1:1:7:7 became 1:1:1:7:7:7 in v0.10. I’ll use some color to help point to where that extra digit comes from:
1:1:7:7 becomes 1:1:1:7:7:7
…or using different numbers…
1:2:8:9 becomes 1:2:2:8:9:9
If you recall the “luma” and “chroma” sections above, what has actually happened is the chroma has been split into chroma-blue and chroma-red. So where it used to be:
LUMA:CHROMA:LUMA:CHROMA
…it’s now:
LUMA:BCHROMA:RCHROMA:LUMA:BCHROMA:RCHROMA .
For 99% of us, fine tuning the red vs blue chroma channels isn’t going to be an endeavor worth pursuing, so the easiest way to convert old to new is by changing 1:2:3:4 to 1:2:2:3:4:4.
FURTHER UPDATE FOR VERSIONS NEWER THAN 0.10
Handbrake made yet another change so that you have to add text with your numbers.
1:1:1:4:4:4 becomes y-spatial=1:cb-spatial=1:cr-spatial=1:y-temporal=4:cb-temporal=4:cr-temporal=4
…or using different numbers…
1:2:3:4:5:6 becomes y-spatial=1:cb-spatial=2:cr-spatial=3:y-temporal=4:cb-temporal=5:cr-temporal=6
You *must* add this text now. To ensure it’s working, open the Activity Log in Handbrake during your encode and check the line called “Denoise (hqdn3d)”.
If it looks like this:
Denoise (hqdn3d) ()… it did not work.
If it looks like this:
Denoise (hqdn3d) (y-spatial=1:cb-spatial=1:cr-spatial=1:y-temporal=4:cb-temporal=4:cr-temporal=4)… it’s working.
Note that I never bother to remember the actual text – I copy/paste and fill in the numbers I want.
—
UPDATE 2 FOR NEWER VERSIONS: NLMeans Denoiser
A new de-noiser called NLMeans was added to Handbrake. Short version:
- Presets in NLMeans are generally considered better than presets in HQDN3D. It’s also more capable in general
- Many more preset combinations to choose from in NLMeans (4 presets with 6 tune options each)
- Custom settings in NLMeans are considerably more complex.
NLMeans custom settings are complex enough that I won’t be putting together a specific guide for it here. If you want to get a sample, BradleyS put up a guide on the Handbrake forums at https://forum.handbrake.fr/viewtopic.php?f=4&t=30135&p=139077 which goes into all the details.
For those who don’t visit that link, to give you a brief notion of the complexity, custom settings in NLMeans look like this:
y-strength=y:y-origin-tune=y:y-patch-size=y:y-range=y:y-frame-count=y:y-prefilter=y:cb-strength=c:cb-origin-tune=c:cb-patch-size=c:cb-range=c:cb-frame-count=c:cb-prefilter=c:cr-strength=c:cr-origin-tune=c:cr-patch-size=c:cr-range=c:cr-frame-count=c:cr-prefilter=c…some values have to be odd numbers, some between 0.00 and 1.00, others can trigger/combine between 1-8 different prefilters… you get the idea. Most people will be best off just using the presets.
—
So, hopefully this write-up is more helpful than the previous one that lacked images/video. If not, or if you have something to add, or if you notice that I’ve said something horribly wrong, feel free to leave a comment below!
Just looked through the logs to get you some specific numbers though. In all of the cases there was a time reduction by denoising, and here are the values for the full episode of Alias (Season 3 Episode 7):
-no denoising 1H 12M 37S
-insane temporal (0:0:25:25) 50M 38S
-insane spacial (15:15:0:0) 48M 39S
-mixed settings (3:2:9:7) 51M 35S
...so denoising dropped the time to around 70% of the original (give or take a few %).
Note that all were encoded at RF:18, with the veryslow preset.
Any chance of you also doing a custom de-interlacing post? Or is it too complicated for a simple guide like this (the Handbrake docs for decomb are really messy).
BTW, I can't find a contact email for you anywhere here... how else are we to send you examples of horribly interlaced DVDs?
That seems ideal to me, if I take it to mean it can shave some bitrate with no visual impact. I'd like to know more about the bitrate impact of nr vs HQDN3D, when removing the normally invisible camera noise a high-quality source would have; Google searches were completely inconclusive.
I used the an older Handbreak Beta set at the REGULAR/NORMAL Setting w/CQ set to 14 - Anamorphic at STRICT and the Detelecine & Decomb is set to DEFAULT with a Denoise setting of 0:0:4:4 I had hoped for the best to remove some of the fuzzy dots that tend to appear more in background or when there isn't a character closeup, but it did little to remove them and only shrunk the file which is great. Newer DVD shows don't have this fuzzy grain to begin with so its never an issue. In fact I have no complaints with any of my backups DVD or Bluray overall - just these older movies or TV shows on DVD that produce distracting floating pixel fuzz. So my question is can you recommend any other settings I could try using Handbreak to keep these elements at bay and a backup closer to the original? I drive an Apple TV3 so iTunes compatible files are my only option right now. Never had an issue or complaint using the HB presets until backing up older TV shows on DVD. Thanks for anyone that recognizes my problem and could share some advice. JIM
Otherwise, you could try the x264 denoiser by adding nr=200 to the custom settings box (try various values between 100 and 1000), though I don't know if their denoiser would have any more luck with it.
A last resort could be to try moving the RF value to something closer to 20-22 (and don't use film/grain "tune" settings), and hope really hard that the encoder decides to drop the noise before anything else. This is entirely a shot-in-the-dark-probably-wont-work-but-maybe-worth-trying idea though.
Do a few 30 second clips at different settings. I personally find it helpful to set the duration to 30 seconds and queue a whole pile up with names like "tv_test_rf20_dn0044_nr200.mp4", spit them all out, and then do a few side-by-side comparisons to see what does best against the type of noise I'm trying to reduce. Good luck!
Are you planning to update this for HB-0.10? I've just updated and got bit by the change in HQDN3D settings: it now accepts both chroma channels, so my 0:0:3:3 ended in a mess...
Looking here:
https://github.com/HandBrake/HandBrake/blob/master/libhb/param.c
around line 200, you can see that my "0:0:3:3" needs to change to "0:0:0:3:3:3"... the HB folks have really been irresponsible with this (could they really not add a line in the release notes to explain this?).
I took a peak at the forums and there's also a mention of a new NLMeans denoise filter. Did you notice if it's live in 0.10.0? (I've been busy with some other stuff and haven't done any encoding in awhile, and am thus still on 0.9.9). From the looks of it, it also takes 6 arguments, which are different from the spacial/temporal luma/chroma stuff that HQDN3D takes. Came across it here:
https://forum.handbrake.fr/viewtopic.php?f=4&t=30135
At some point I'll update the guide (or tag this one as 0.9.9 and do a separate one for 0.10.0), but I'd really like to spend some time verifying stuff with the new settings, and with NLMeans if it's in. Unfortunately things are really hectic with other stuff right now so I'm spread a little thin and doubt I'll be able to get to it before the new year.
I'll put a warning at the top of the page (and in the video description) in the meantime, noting that this writeup applies to 0.9.9 and that the format has changed. Thanks again!
Hoping you'll get some time to work on an update at some point!
Cheers, and thanks for the best Handbrake guide out there! (or here, as it were?) :)
If I'm remembering right, your 1:1:2:3 would translate to 1:1:1:2:3:3 under HQDN3D in 0.10 if you decide to stay with it. That's how they changed the presets anyway: I didn't peak into the code itself to see if the 2 chroma values are implemented in a way that becomes additive (and would be 1:0.5:0.5:2:1.5:1.5 in that case), but test encodes I did that duplicated the 2nd and 4th values from an old preset came really close to the same file size on output.
NLMeans on the other hand is... well, a lot more tricky when it comes to custom settings. There's a lot less separation between spacial and temporal - it has a strength setting that applies to both, and there are separate settings for the ranges of spacial/temporal. Some values have to be odd numbers, one has to be from 0-1, and changing 1 value will often impact something else you just fine-tuned. I'm still debating on whether to try going over custom settings in a guide, or just recommend finding one of the defaults for that one.
0.9.9 default: (default 4:3:6:4.5)
0.10.2 default: (default: 4:3:3:6:4.5:4.5)
The 2 chroma values are the same for the b (blue end of spectrum) and r (red end of spectrum). Therefore, the default is the same between versions. It's just that now we can use the 2 chroma values to tweak the denoiser for noise at different ends of the color spectrum. At least that's my take.
Looking forward to hearing what your take is on NLMeans vs hqdn3d.
1) When using the "vf" filter, what is the correct sequence for the following and why?
-vf "setpts=1.333*PTS,hqdn3d= " or -vf "hqdn3d=,setpts=1.333*PTS". In other words, should the frames be duplicated before or after noise reduction? is there interference depending on the order of application?
2) How many frames on either side of the frame that is being modified does the temporal function reach to. For instance, with temporal settings of 2:2, might the software look at two frames before and two frames after?
3) And I believe you have answered the question on argument values vs file size. As I understand it, with video stored at 1440 x 1080p in HQ ProRes, I would have "the authority" to bump both spacial and temporal arguments higher than say the nominal limits of 10, ie, 10:10:10:10?
1) I haven't used vf before, but assuming it preserves the order:
- If reducing frame rate (say... dropping frames), I'd be inclined to do the frame rate change and *then* the noise reduction. The reason is that otherwise, you'll have noise from soon-to-be-non-existent frames affecting the neighbors. As an example, if the screen was all black for a few frames, but a bright white dot (grain/noise) showed up in the center of the screen in frame 2, the temporal filter might normally influence the center of frames #1 and #3 with that dot (slightly brightening them from black to a slightly grey dot). Now if frame #2 is dropped, we've kept the *influence* of it's noise on the surrounding frames.
- If increasing frame rate (duplicating frames), it probably matters less. Doing the NR beforehand might make a little more sense though, because otherwise, any duplicated frames are likely to effectively become "double weighted" (2 frames exactly the same will extend their influence a little further, artifacts and all).
That said, it's how I figure things should/would work. Haven't ever done it so could be completely off-base here. It's almost certainly worth doing a couple 30-second test encodes of your source first to see if you can tell a difference. If you can discern a difference but it's not enough to actually tell which is better, do a test encode with the temporal cranked up a bit higher to exacerbate the effect.2) Not completely sure on this. I'd certainly *think* about it the way you mentioned (the output behaves pretty linearly/expectedly, within the "usable-settings" range at least), but under the hood there are a lot of ways you could implement temporal denoising. You'd probably have to either ask in the HB forums, or look through denoise.c to get a concrete answer as to the nuts and bolts of the actual implementation. It's entirely possible that instead of looking at X number of frames, it uses a modifier to "push" forward detail at each step so that the denoiser just has to look at the preceding frame or something (in which case, the effect of an frame would simply become extraordinary small once you got a certain number of frames ahead).
3) Just the spacial can go up with the resolution, though 10 there is really on the higher end, and is probably going to give a pretty soft picture at 1440x1080. I suppose a 2K or 4K video might get away with something like 10, though that's just a guess based on the behaviour I've seen at more standard resolutions. The only way to get away with a really high temporal would be with a really high frame rate (with a really low frame rate, you'd probably want to go a bit lower on the temporal). The ballparks given in the write-ups are really oriented for DVD/BR sources/resolutions that tend to sit around the 24-30fps range.
Anyway, hopefully something there helps.
Correctly, the frame sizes are 1920 x 1080p with the use of pillar boxes added to the original 4:3 super 8mm format. The transfer vendor coded the digitized video to run at 24fps, not the original 18fps. So I add one duplicate frame for every three frames of the original, a 4/3 or 1.333 ratio, using the "setpts=1.333*PTS" function. Then when I play the video, because of the extra frames, the video has an apparent run rate of 18fps. ie, after 24 frames have run in one second, 18 original frames will have been viewed, padded with 6 duplicates.
1)Your comments here do seem logical. I use "ffmpeg" on the command line to render/transcode; the rule for use of -vf in ffmpeg is to separate the various filter functions with commas. So based on your comments, my complete entry for the filter portion of rendering/transcoding looks like the below, where hqdn3d and unsharp arguments are "to be tested". Note that "setpts" follows the denoiser per your recommendation.
-vf "hqdn3d=5:5:10:10,setpts=1.333*PTS,unsharp=3:3:1"
2) Maybe asking the question is just over my head. However, what are the "HB forums"?
3) I may have missed it in your original piece, but thanks for pointing out that the temporal is more constrained than the spacial in terms of pushing higher values.
so thanks, hope I did not muddy things up, and possibly you could address my HB question re 2).
I know you've been asking about NLMeans and I've been running it with the light setting. It probably knocks 6-10% off filesize without changing the picture at all from the original as far as I can tell. However, the video takes about 3x as long to compress in this setting and it slows my computer to a crawl (uses all cpu resources when this filter is active).
Going back to hqdn3d, which I like better only for encode time, I'm not exactly sure how to manually control the settings of this (in 10.x.x) in the Extra Options command line. I just want light/light on both t/s denoise:
4:4:9:9 would become 4:4:4:9:9:9? How can I tell what the light setting is doing now? And how do I add it to video options? :hqdn3d=4:4:4:9:9:9 (like that?)
Feedback appreciated
Ryan
As to what light is doing, I think it'll spit it out in the encode logs. Otherwise if you're referring to the HDQN3D "weak" it should be very similar to the old setting but extrapolated out to the new system: probably 2:1:1:2:3:3.
Ultralight, Light, Medium, Strong for hqdn3d
Same goes for NLMeans, but NLMeans also has a built-in tune function. At times hqdn3d light will create a smaller file size than NLMeans light (tune film), while processing at least 3x as quick. NLMeans does seem to leave a bit more pixel detail, but again not sure it's worth it.
And, looking at logs, you are right, hqdn3d shows (hqdn3d) (2:1:1:2:3:3) under "Light" setting, so "Ultralight" should be even more minimal than that.
Cheers!
Ryan
y-spatial=2:cb-spatial=1:cr-spatial=1:y-temporal=2:cb-temporal=3:cr-temporal=3
If I don't care at all about encoding speed, just quality and just want to reduce file size if possible in films with some grain, for example jurassic park or Raiders of The Lost Ark, which method is better? If I use NL-means, I will use the appropriate third option (either film or animation in my case).
Is one of methods better theoretically or is it going to be completely subjective?
Should I use a custom value like 0:0:3:3 or 1:1:4:4, or should I just use the Ultralight setting?
Also using latest handbrake, does these numbers now need to be adjusted, are there six numbers now?
Thanks
Ben
1) HQDN3D is pretty basic, but also pretty straightforward. There's a clear divide between spacial and temporal, and as long as you "get" those 2 concepts, delving into custom values and fine-tuning isn't out of reach. I'm personally not a fan of the presets for it (higher spacial than I'd prefer), but since custom presets aren't insane to figure out it's usually my go-to denoiser.
2) NLMeans is pretty complex. Not just a matter of "how much spacial/temporal to do", but there are different weightings, etc. I don't recall the details behind each of the options if you actually break it down into custom values, but suffice it to say, technically it should be a superior denoiser. However, the custom options are significantly more complicated and intertwined - I played with them for quite a while and eventually decided it wasn't worth the time for me to try and tweak settings depending on the video I was doing. My feeling here is that presets are the way to go with NLMeans.
Back to HQDN3D: For custom values, old versions of HandBrake would use something like 1:1:4:4. I believe the current release version uses the format 1:1:1:4:4:4 (6 values with the chrome split into 2). The nightly has moved to a long format that looks like this:
y-spatial=1:cb-spatial=1:cr-spatial=1:y-temporal=4:cb-temporal=4:cr-temporal=4
...still the same 6 values, but you need all the extra spatial/temporal text in there too. I assume this will make it into the release version at some point. Note that last I checked they hadn't added any backwards compatibility, so you have to use the appropriate format depending on your version of HandBrake.
Obviously, simply using something like the Ultralight preset is quite a bit easier than delving into custom settings (at which point using an NLMeans preset might be the better route), but ultimately the choice is up to you, and you may want to do a few quick test encodes of 30 second duration or so and compare before doing a full-blown encode. As you indicated, there's a degree of subjectivity to it all - output that I like best might be quite different from what you like best.
With that said I googled different text strings and I couldn't find much other than "nlmeans is better." I found a few references to people saying it is more complex but is much better at removing noise/grain without changing the original image at all so I think I'll go this route with either ultralight or light. A quick 10 second encode of nlmeans_ultralight_film compared to the hqdn3d light (and also 1:1:4:4) looked much better to me and the file size was smaller, however it did take longer but like I said I don't care about time.
I'm currently doing longer encodes, a full chapter of 5 minutes to really see if I can find good/bad/differences between them and any reason not to use nlmeans.
Lastly, I looked at the logs of an nlmeans encode in hopes of trying to figure out what the syntax for inputting a custom set of numbers would be and let's just say, I'll stick with the presets. Four (or now 6 numbers for hqdn3d) is manageable but 12 numbers plus the repeat (I don't know if it's necessary):
LIGHT: + Denoise (nlmeans) (3.000000:0.900000:7:3:2:0:4.000000:0.900000:7:3:2:0)
ULTRALIGHT: + Denoise (nlmeans) (1.500000:1.000000:7:3:2:0:1.500000:1.000000:7:3:2:0)
Unless you can make out what those represent...and without any proper documentation anyway I'll stick with the presets.
Thanks for the response...great as always!!!
One more question for you about these denoise settings. Rather, I'd like your opinion. In terms of using NLmeans versus the innate nr= function of handbrake.
In your opinion, does one of these "not change" the picture more than other other. I know you mentioned that NLmeans does a much better job than hqdn3d of not changing the actual source material. Are you aware of any difference between NLmeans and nr=? For example would using NLmeans_MEDIUM_nr=0 be "better" than NLmeans=Light_nr=400? Or as far as your concerned both are pretty good at keeping the content fairly unmodified? I would never use more than NLmeans=MED, and that would be for animation only, otherwise I'll stay with Light. Is there a max level or nr= that you recommend not going over?
Specifically, I am trying to reduce file sizes but I don't really want to reduce the "quality" per se. If a high bitrate is required to accurately reproduce the source material because of movement, detail like hair, lots of colors, or other content related material than I'm good with that. It's just the dancing dots, fuzz that is in a lot of older "not as clean" films that I don't mind getting rid of. Examples would be films like Predator, Jurassic Park and Raiders of the lost Ark with lots of what I call film fuzz.
Wouldn't use the HQDN3D presets though, since they're high on the spacial.
I don't think nr= is going to noticeably clobber much in the way of fine detail, but it won't be as effective with the dancing-dots etc. Also won't save as much in file size generally.
Not positive here, but with NLMeans I thought each preset had at least some spacial denoising to it, so my gut instinct wouldn't be to go to it first - I could be wrong here though.
Regardless, it's probably worth doing a few test encodes - pick a 30 seconds section of the video, fast encode settings, high bitrate since you'll be deleting the tests anyway, and pump out a few with different denoise options. Take a look to see what you like best and tweak from there. Really it's going to boil down to your personal preference here in the end anyway. It's also one of those things where when you start to get a feel for what the settings do via a couple tests, it helps a lot when you need to tackle specific types of noise in the future and are looking to get a specific look/result.
I will do exactly that...a couple 30 seconds tests with high bitrate testing hqdn3d
Thanks
Ben
Now on blu ray they are all mostly professionally remastered so no need for dated formats like avi, but it is still amazing to see sloppy looking blu rays which are nothing more than an upscaled DVD or blu rays killed to death with over done DNR like in Predator where everyone looks like a 'Ken and Barbie doll!' Informative work on denoise Matt, to make the average user aware of the dangers of over using a denoiser too much! Thanks.
One question: How does negative denoise values affect the output video?
If you're referring to Deblocking on the other hand (the Deblock previously found under the Advanced section that takes 2 values - *not* the Deblock in picture settings, filter, or anywhere near the denoise options), negative values cause a sharper image on playback, whereas positive values cause a softer image which is less likely to show macroblocks (though this is done by setting a flag within the video - the playback device/player itself is what actually handles this).
If you're referring to something else entirely (always possible I get mixed up), let me know. Otherwise, hope that helps!
I also did quite a research on these two filter settings (Deinterlace and Denoise)... Actually I came up with couple sets of custom presets for both Deinterlace and Denoise and also with some guidance over already available presets (applicable for latest Hb 1.0.7 and nightlies... I like to contribute here along with you for Handbrake and Staxrip guidance with every version updates so after...
I don't have a detailed guide for NLMeans, nor do I plan for one in the near future. However I've included a link in the added sections for those who'd like to delve into custom settings there.
From just typing a number and colon to typing a long text, what a waste time and hassle handbrake developer should just stick with X:X:X:X:X:X format.
BTW can you do a test With the new sharpen filter(Unsharp and Lapsharp) with and without de-noising, Does using sharpen filter with de-noising reduce the detail loss compared just using only de-noising?
However, from what I understand of those sharpening filters, you won't actually gain any detail, at least from a technical standpoint. Technically speaking it should be a detail *loss* (if you did PSNR/SSIM encodes, a sharpening filter should always have a worse showing).
Sharpening filters use tricks to make edges appear sharper to the human eye, but technically it's doing a blur/mask/superimpose behind the scenes.
Relating it to denoising, a possible benefit would be blurring/softness caused by denoising (high settings, or any spacial settings) - detail that wasn't blurred away might be able to be sharpened enough to look a little less smoothed out in some areas. This would (should) hugely vary by source, scene, and specific denoise settings used.
Also it depends on when the filter runs - if it runs *before* denoising, this kind of becomes a bit moot.
But you'd really have to test to know for sure. If you have specific encodes that came out looking quite smoothed/blurred I'd give it a shot on those first, see if it makes a difference, and if so, see if you prefer the result.
(y-spatial=30:cb-spatial=35:cr-spatial=35:y-temporal=0:cb-temporal=0:cr-temporal=0)
My experience with commercial software(DVDFab & Xilisoft) left me unsatisfied.
The Filters section has so many options and possibilities I am confused. Could you possibly suggest settings in Filters option, to get the best quality (size no matter) mp4/mkv of old DVDs; to get rid of most of the noise, sharpen if possible, upgrade quality and preferably not to make the pictures look like barbie dolls.
Any chance you could indulge me ? Thanks
Last I checked (a few versions ago), there wasn't a sharpening filter available in Handbrake, so unless that has changed you're probably left to simply retain as much existing sharpness by being easy on the denoise settings, and use a low RF value or high bitrate. Tune Film or Tune Grain should go easier on the deblocking flag, though you could alternately enable the advanced options from Handbrake preferences and force it to a negative set of values like -3,-3 or -2,-2 etc. Note that you don't want to use the "Deblocking" in the filters section as it's a different deblock and will soften your image.
Keep in mind that older videos that have less-than-DVD quality to begin with are fairly hard to clean up to the point of looking modern, and Handbrake with it's emphasis on being all-in-one and fairly simple to use does not have the same massive access to filters as something like AviSynth.
Gosh! Really appreciate your considered reply and all the trouble you've taken for that. As you say,a lot of the DVDs I'm trying to convert are 70s and 80s Italian & French ones. So, yes the quality is ordinary to start with but hopefully I can improve at least a touch!
Had just heard about AviSynth; will look it up.
Thanks again Matt!
Billl